How to Schedule a Facebook Live: A Step-By-Step Guide
Looking for how to schedule a Facebook Live? We’ve got you covered here!
Let’s face it, we cannot always go live when we want to. Vacations, sick days, or unexpected life events can knock your plans off course.
But with scheduling, you can set your broadcast to go live at peak times when your audience is most active, and even cater to viewers in different time zones.
In this guide, I’ll show you how to pre-record your Facebook Live, upload it, and schedule it so that everything runs smoothly.
This way, you can focus on interacting with your audience through live chat and answering questions while your pre-recorded video plays.
Let’s get into business!
Table of Contents
- 1 Preparing for Your Facebook Live
- 2 How to Schedule a Facebook Live (Go Live)
- 3 How to Schedule a Facebook Live (Event)
- 4 How to Schedule a Pre-Recorded Video on Facebook Live
- 5 After the Live Stream
- 6 Tips for a Successful Live Streaming on Facebook
- 6.1 1. Have a Strong Internet Connection
- 6.2 2. Optimize Your Lighting for Better Quality
- 6.3 3. Engage with Your Audience
- 6.4 4. Do a Test Run Beforehand
- 6.5 5. Provide Clear Next Steps for Viewers
- 6.6 6. Collaborate with Other Creators
- 6.7 7. Invite People to Your Live Video
- 6.8 8. Appoint a Moderator
- 6.9 9. Use Facebook Live Performance Stats to Improve
- 7 Troubleshooting Facebook Live Videos
- 8 Final Note
- 9 FAQs
Preparing for Your Facebook Live
Getting ready for your Facebook Live session means you’ve covered all your bases – both technically and content-wise.
When you plan ahead, you not only boost your confidence on camera but also create a smoother, more engaging experience for your audience. Consider this pre-planning checklist:
Technical Setup
- Equipment: Ensure you have solid basics: good lighting, clear audio, and a stable camera. You don’t need a Hollywood studio, but quality matters. Use a tripod for steady shots, a ring light to brighten your space, and a decent microphone to capture your voice clearly.
- Internet Connection: A strong, reliable internet connection is crucial. Aim for an upload speed of at least 5 Mbps. If you’re streaming on mobile, using a stable 4G network will do the trick to keep your broadcast smooth and uninterrupted.
- Software: Facebook’s Meta Business Suite is your friend here. This tool helps you schedule and manage your live streams with ease.
- And if you’re feeling adventurous, advanced streaming software like OBS Studio or VMix can bring in cool overlays and graphics to add extra flair.
Content Planning
- Decide on a Topic: What will you talk about? Pick a subject that your audience cares about. This could be a product demo, industry insights, or a behind-the-scenes look at your process. Think about how your content can spark conversation and offer real value to your viewers.
- Scripting: Write down your talking points. A clear outline helps you stay organized and confident. You don’t need to read a script word‑for‑word; use it to guide your discussion and keep you on track, so you avoid any awkward pauses.
- Rehearsals: Do a quick test run before your actual broadcast. A rehearsal lets you iron out any technical issues and practice your delivery. Plus, it gives you a chance to check that your camera, lighting, and audio are working perfectly.
Facebook Live Stream Rules
- Be On Time: Your stream will start at the scheduled time, so ensure you’re ready and connected within 10 minutes. Otherwise, your broadcast might end automatically.
- Scheduling Limits: Regular live streams can be scheduled up to 24 hours in advance, while official Facebook Live Events can be planned up to one year ahead.
- Minimum Lead Time: Make sure to schedule your stream at least 10 minutes before the intended start time to avoid any glitches.
- Crossposting Restrictions: Note that you can’t stream one live broadcast across multiple Pages or Groups simultaneously. That is no longer allowed!
How to Schedule a Facebook Live (Go Live)
Ready to schedule a Facebook Live and captivate your audience? Follow these simple steps to set up your live broadcast in advance and ensure your viewers are ready and waiting!
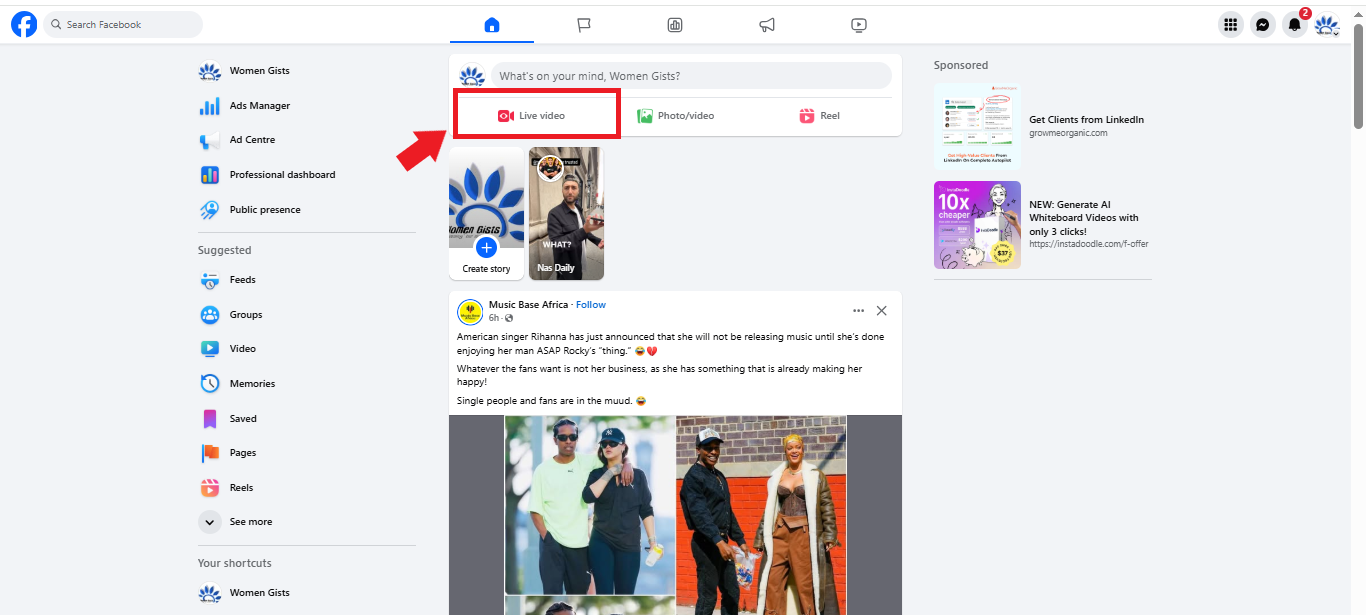
Step 1: Access Live Video Settings
Go to the “What’s on your mind?” section on your Facebook profile or Page. Click “Live Video” to open the live streaming setup.
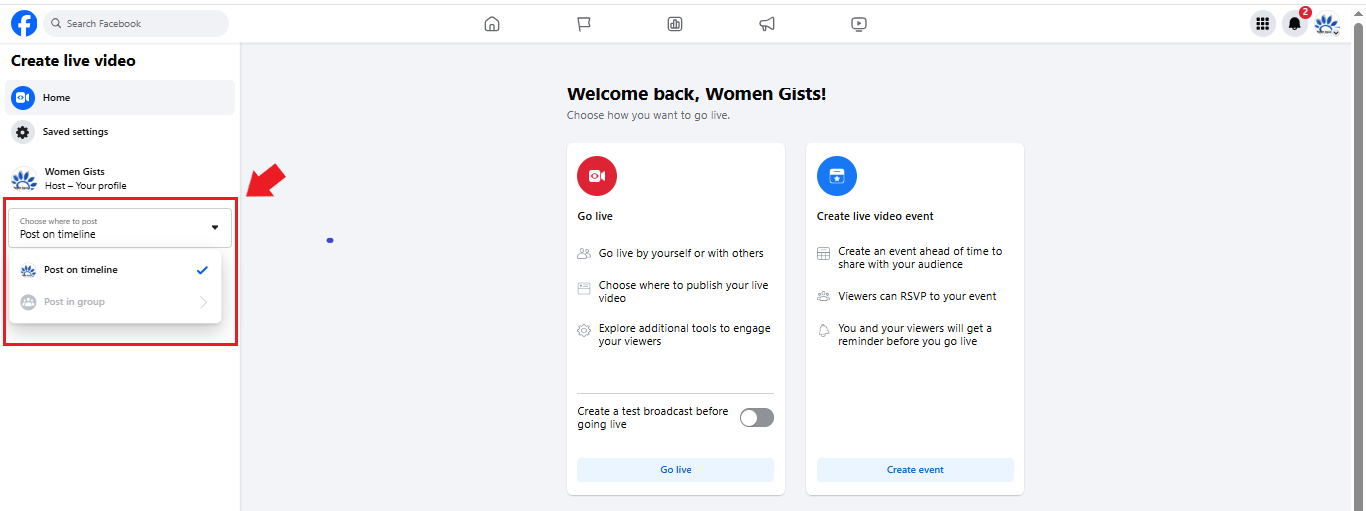
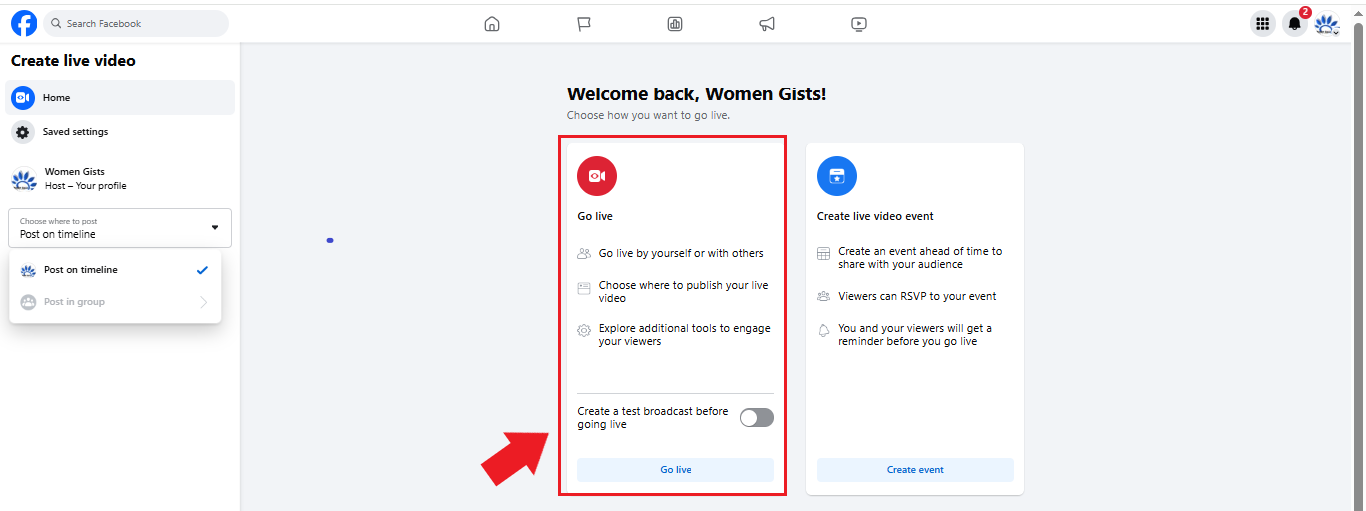
Step 2: Choose Your Live Option
First, decide whether you want to use Go Live or Live Video Event:
- Go Live lets you schedule your stream up to 24 hours in advance.
- Live Video Event lets you schedule a broadcast up to 1 year ahead.
Pick the option that suits your needs best.
Step 3: Select Your Posting Destination
Choose where you want your live video to appear. You can post on your profile, on a Page, or in a group. Select the appropriate destination.
Step 4: Set Your Schedule
Look for the option to schedule later. Click on the “Select” button on the Go Live card if you’re using that option.
In the left-side menu, click “Later” and then pick the date and time for when you want your broadcast to start.
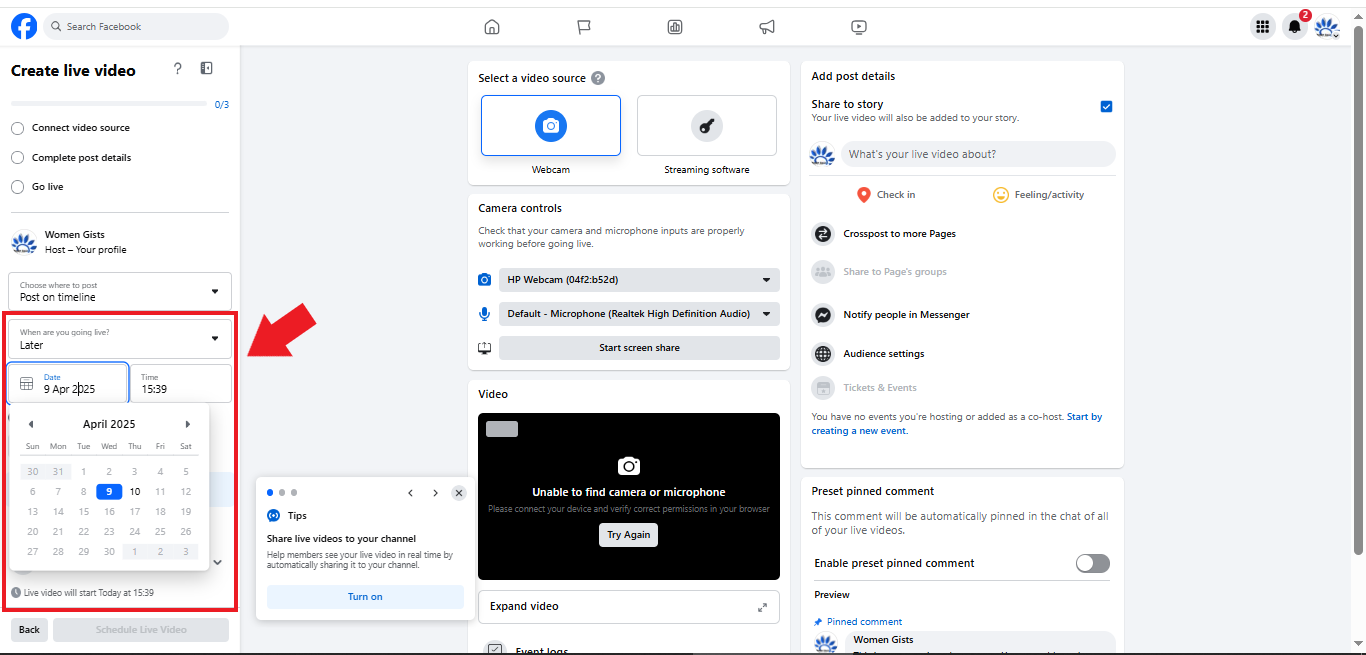
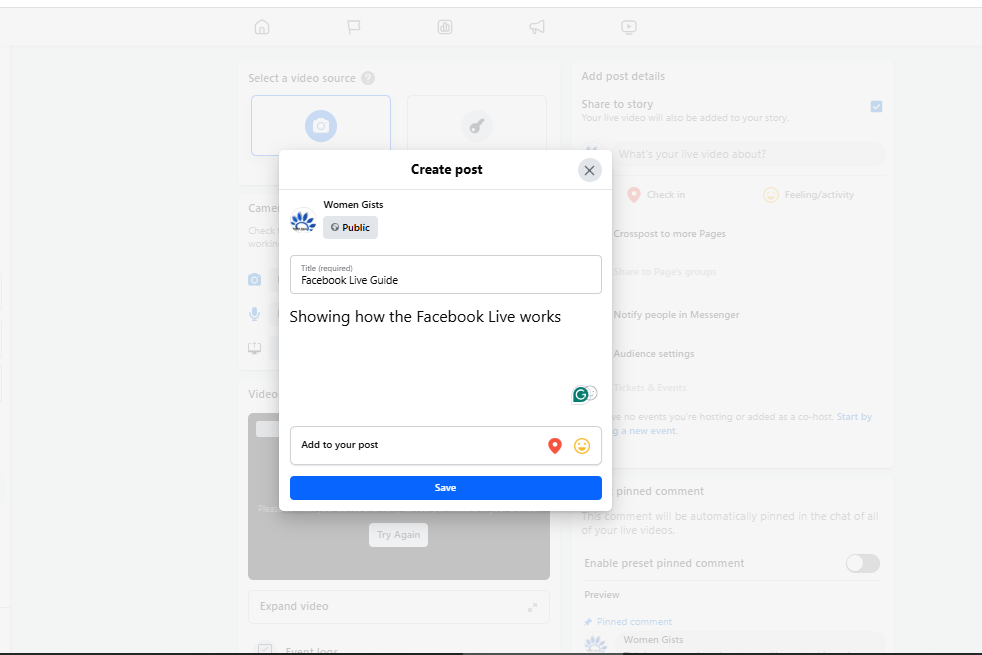
Step 5: Add Details
Write a clear and engaging title for your live video. Add a description that tells viewers what your stream is all about. These details help set expectations and generate interest in your upcoming broadcast.
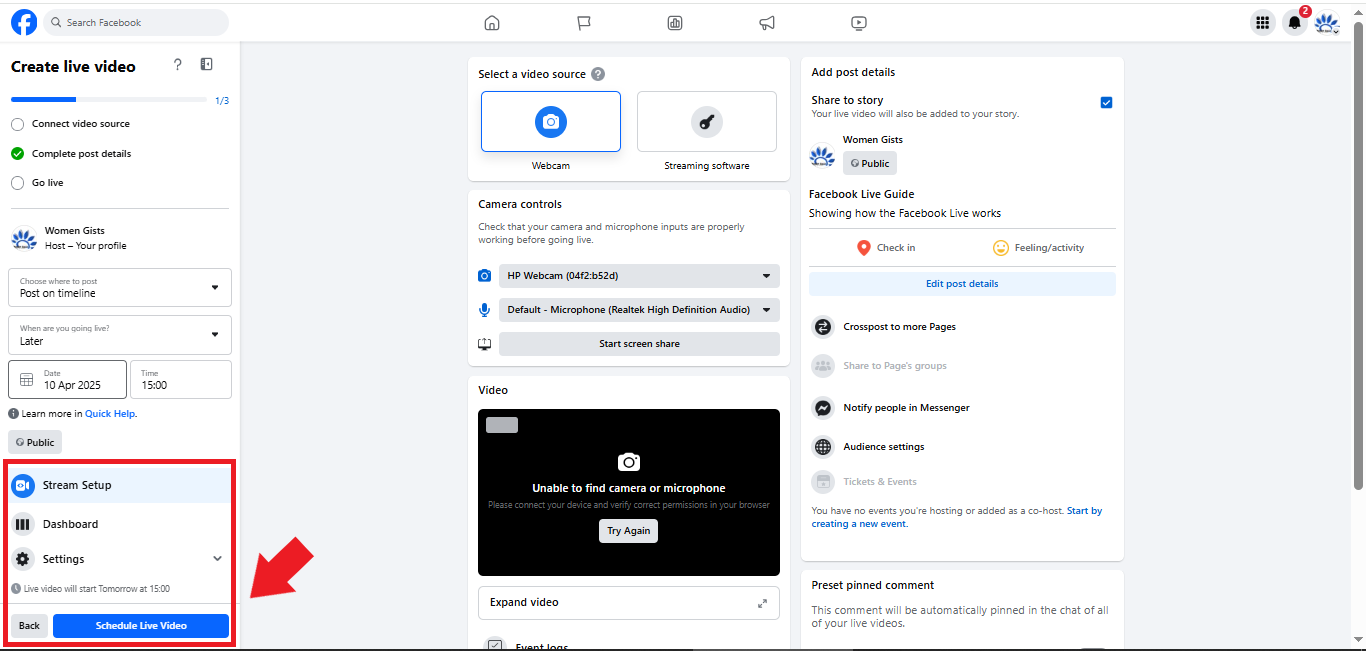
Step 6: Confirm and Schedule
Once you’ve reviewed your settings and are satisfied with everything, click “Schedule live video”. Your Facebook Live is now set and will go live at the time you selected.
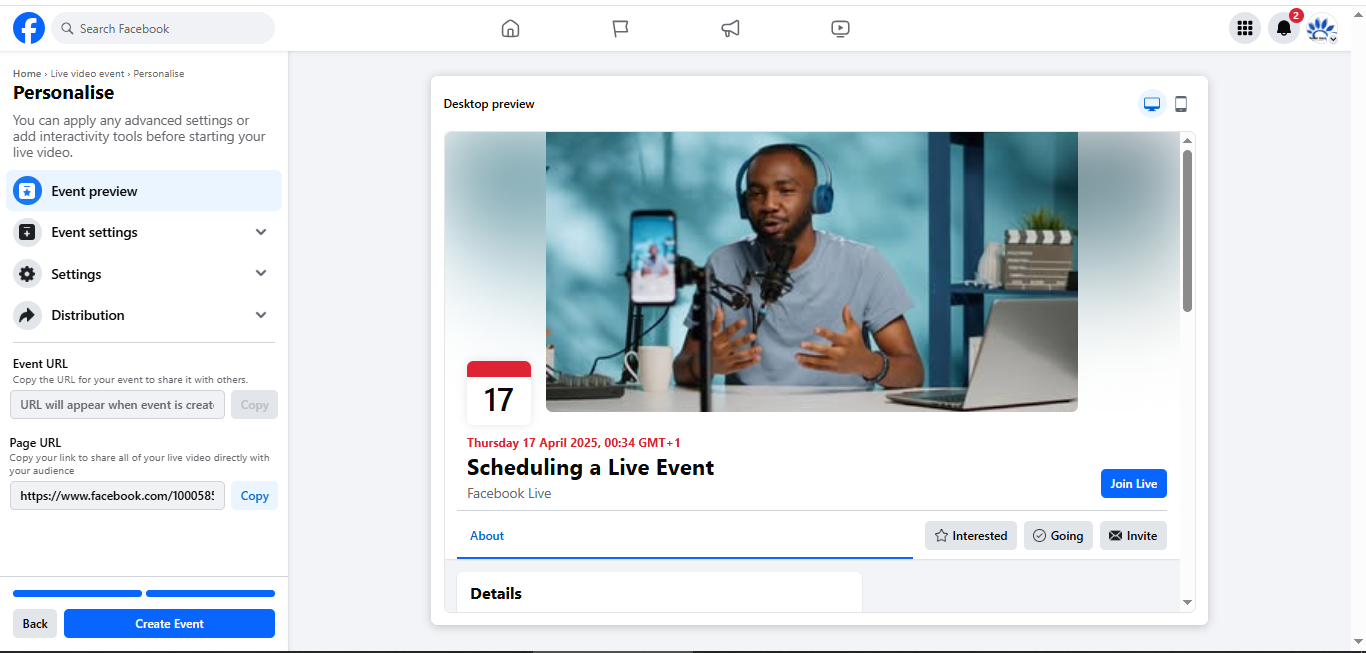
How to Schedule a Facebook Live (Event)
Remember, you have two options when thinking of scheduling a Facebook Live. Now that you know how to schedule Facebook Go Live, let’s see the steps involved in scheduling Facebook Live Event:
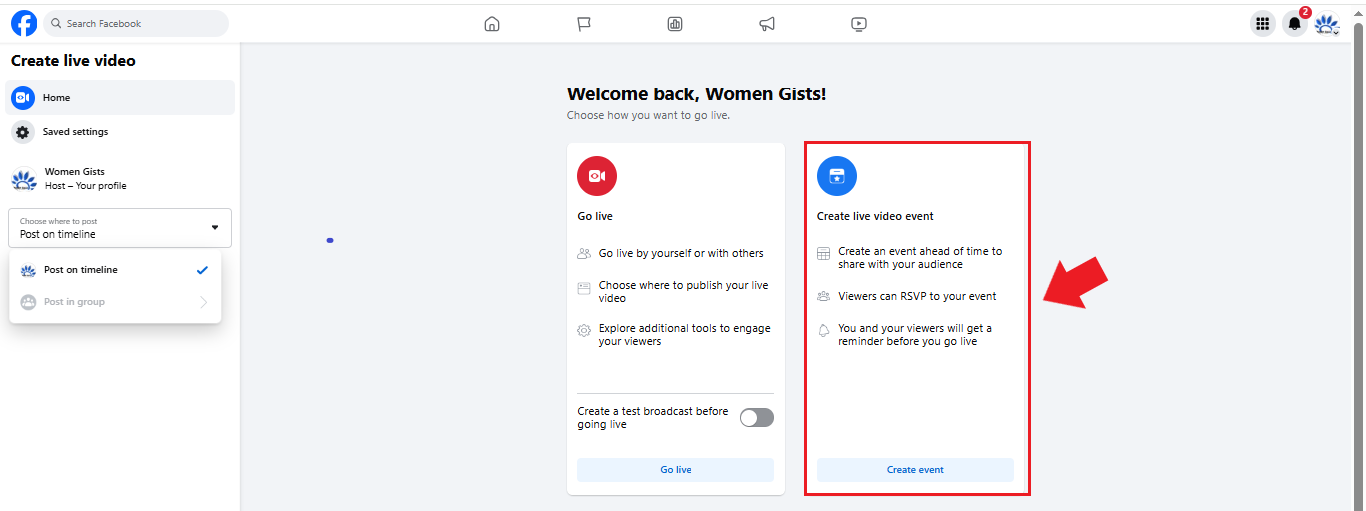
Access Facebook Live Producer: Go to Facebook Live Producer. That’s your hub for creating live video events.
Select Your Posting Destination: Choose where the event will appear. You can post on your profile, a Page, or in a group. These first steps are similar to scheduling a regular Live Video.
Create the Live Video Event: Click on the “Create live video event” card by selecting the “Select” button. This tells Facebook you’re planning a special live event.
Add Event Details: Fill in all the key information, including an attention-grabbing name and description of what the event is about. You will also need to set when the live event will go live.

Generate a Shareable Link: Before you finalize your event, create a shareable link by clicking “Share” or “Copy Link” in the event settings. This link lets you promote your live event well ahead of time, drawing in more attendees.
Finalize Your Event: Click “Next” and then “Create Event” to schedule your live broadcast. Your event is now set and ready to be shared with your audience!
How to Schedule a Pre-Recorded Video on Facebook Live
Sometimes you have a pre-recorded video that’s too good not to share live. Yes, Facebook doesn’t offer a built‑in feature to directly schedule a pre-recorded video as a live stream.
But you can use the “Premiere” option to create that live feel without the pressure of going on air in real time. This lets your viewers interact with your content as if it were a live event – leaving comments and reactions in real time.
Here’s How to Do It:
- Upload Your Video
Go to your Facebook Page and click the “Create Post” button. Choose the “Video” option and upload your pre-recorded video file. - Add Details
Enter a compelling title, a clear description, and any relevant tags. This information helps set the stage for your video and informs your audience about what to expect. - Select Premiere
Instead of posting immediately, choose the Premiere option. This tells Facebook you want your video to roll out like a live event. - Set Your Premiere Time
Pick the date and time when you want your video to “go live.” Make sure you choose a moment when your audience is most active, so you get maximum engagement. - Review and Confirm
Take a quick look over your details to ensure everything is just right. Then click Confirm or Schedule to lock in your settings.
When your scheduled time arrives, your video will appear as though it’s streaming live, giving your audience the chance to join in, comment, and react in real time. It’s a great way to present polished, pre‐recorded content with all the live interaction benefits.
After the Live Stream
Your Facebook Live session might be over, but your work is just beginning! Keeping the momentum is key to turning a one-off event into continuous audience engagement. Here’s what you should do once the live stream ends:
Reposting Live Stream Content
Reposting your live stream can extend its life and help you connect with viewers who missed the real-time action. Consider these ideas:
- Create Highlight Reels: Edit the best moments of your live stream into shorter clips. These highlight reels capture the excitement and key takeaways of your broadcast.
- Repost the Full Session: Upload the entire live stream as a video on your Facebook page. This gives your content a second chance to be seen.
- Share Across Groups: Distribute your video in relevant Facebook groups where new audiences can discover your brand.
Using OnlySocial to Repost Your Content
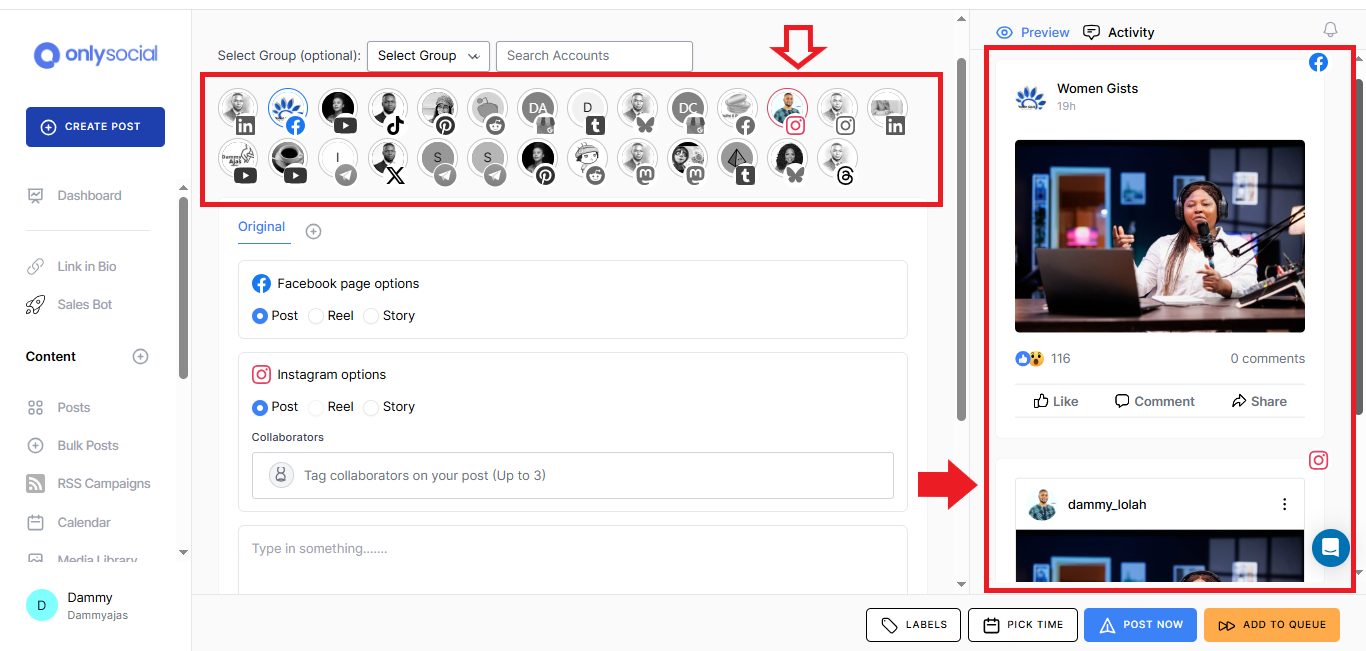
You can get the most out of reposting your videos when you use a tool like OnlySocial. With it, you will not only be reposting the highlights of your live stream on Facebook but you can also post to other platforms for more engagement.
You can also easily schedule those videos to hit your audience at different times when you know engagement will be high. This is a gold mine for people who have audience scattered in different time zones.
So, how do you use OnlySocial to schedule your videos? Follow the steps below:
- Open your OnlySocial dashboard to access your scheduling tools.
- Click on “Create Post” and select Facebook as your posting destination. And if you wish to schedule the same video across multiple platforms, just select the platforms and the job will be done.
- Add the video file of your live stream or the edited highlight reel.
- Write an engaging caption, add relevant hashtags, and include any UTM parameters to track performance.
- Click on “Pick Time” and select the best posting time based on your audience’s activity.
- Finally, click “Schedule” to set your repost in motion.
Analyzing Performance
After the live stream is ended, you need to understand how your live stream performed. This is crucial to refining your future content. Check these key metrics on Facebook Analytics:
- Reach and Impressions: See how many people saw your live broadcast or its replay. The higher the numbers, the more visibility your stream gained.
- Interactions: Look at likes, comments, shares, and other engagements to gauge how compelling your content was.
- Peak Live Viewers: Identify the maximum number of people watching simultaneously. This indicates the drawing power of your stream.
- Average Watch Time: Check how long, on average, viewers stayed engaged. Longer watch times show that your content was captivating and relevant.
By analyzing these metrics, you get valuable insights into your audience’s behavior and preferences. You can then use the insights to fine-tune your future live streams, ensuring that each broadcast is even more engaging than the last.
Tips for a Successful Live Streaming on Facebook
A successful live stream isn’t just about going live – it’s about making sure your viewers have a smooth, engaging experience from start to finish.
So, let’s quickly see some essential tips that can help you get it right:
1. Have a Strong Internet Connection
Your live stream’s quality hinges on your internet connection. Without a strong, stable connection, your stream can become choppy, causing frustration for viewers.
So, run an internet speed test before you start. Aim for an upload speed of at least 5 Mbps to keep your stream smooth.
If possible, use an Ethernet cable instead of relying on Wi-Fi. A direct connection minimizes the chances of unexpected disconnections.
2. Optimize Your Lighting for Better Quality
Lighting is one of the first things your viewers notice. Good lighting makes your stream clear and professional, while poor lighting can make everything look dull.
Natural Light: Whenever possible, use natural light. Position yourself near a window, but avoid direct sunlight that can create harsh shadows.
You can also invest in a ring light. This will provide consistent, even lighting across your face and background, making your stream much more inviting.
Also, ensure the backdrop is not too dark or cluttered. A well-lit, clean background helps keep the focus on you and the message you’re sharing.
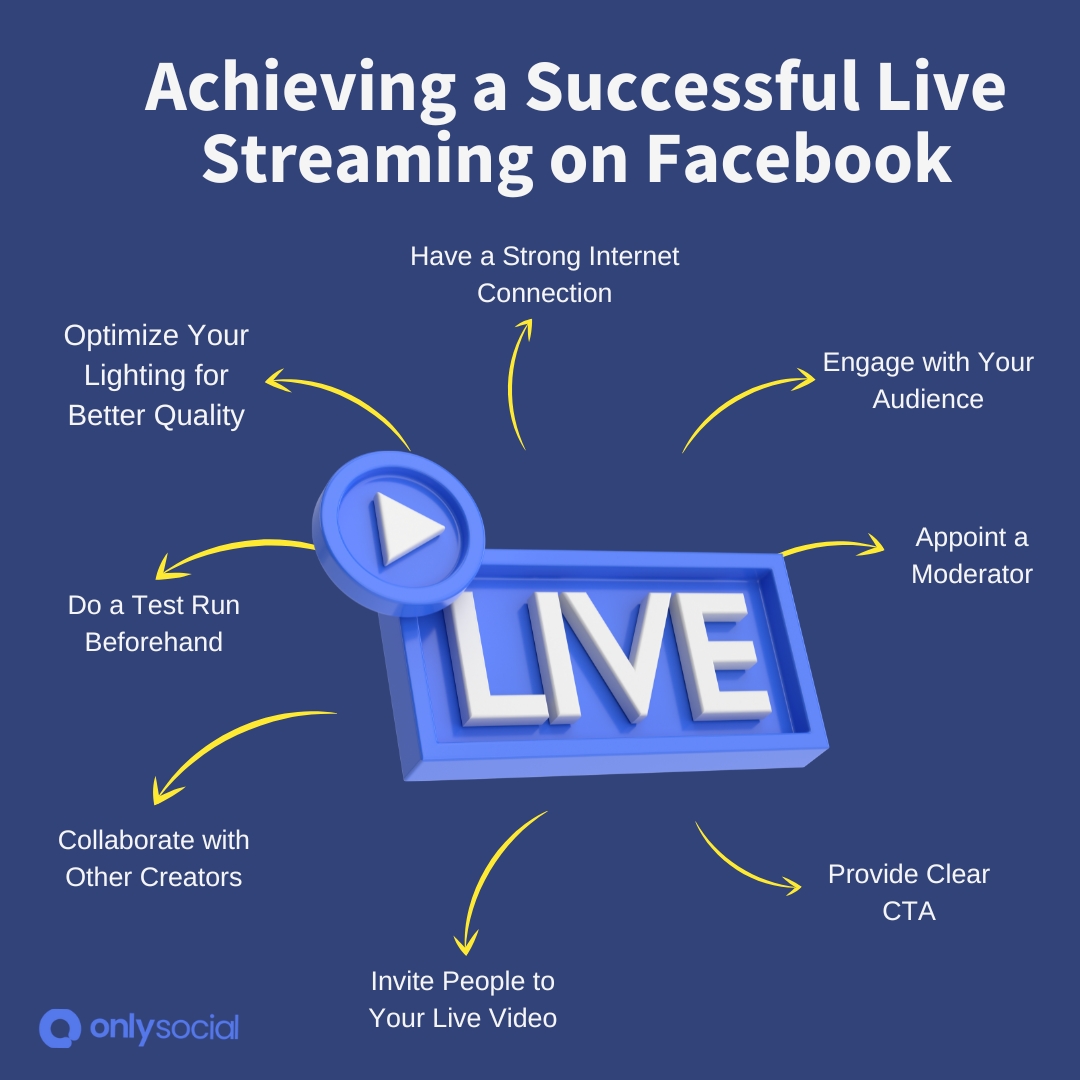
3. Engage with Your Audience
Interaction is key to turning your live stream into an engaging conversation. Don’t just broadcast – invite viewers in and make them feel like part of your session.
- Greet Your Viewers: Start by welcoming your audience as soon as you go live. Acknowledge names as they join the chat.
- Ask Questions: Pose interactive questions throughout your stream. This could be as simple as “What do you think?” or “Let me know your thoughts in the comments!”
- Respond in Real Time: Keep an eye on the chat and reply to comments and questions. This real-time interaction makes your audience feel valued and connected.
- Call-to-Actions: Encourage viewers to like, share, and comment on your stream. Direct interactions, like asking them to share their ideas or feedback, can create a lively, engaging environment.
4. Do a Test Run Beforehand
Before you go live, run a quick test to check your setup. Test your camera, microphone, and internet connection to make sure everything works perfectly. A test run helps catch any technical glitches, making your actual broadcast smooth and professional.
5. Provide Clear Next Steps for Viewers
Tell your audience what to do once your live session ends. Whether it’s following your page, visiting your website, or signing up for a newsletter, clear calls-to-action guide your viewers and keep them engaged even after the broadcast.
6. Collaborate with Other Creators
Invite a co-host or guest to join you on your live stream. Collaborations can add fresh energy and new perspectives to your content. They also help you tap into each other’s audiences, broadening your reach and making the session more dynamic.
7. Invite People to Your Live Video
Boost attendance by sending personal invitations and promoting your live video across your social channels ahead of time.
The more people you invite, the more engaging your conversation will be during the stream. Pre-broadcast promotion sets the stage for a vibrant, interactive live session.
8. Appoint a Moderator
When you’re live, things can move fast. Appointing a moderator ensures someone is actively managing comments, answering questions, and keeping the conversation orderly. This way, you can focus entirely on your presentation, knowing your audience is well taken care of.
9. Use Facebook Live Performance Stats to Improve
After the show, take some time to dive into Facebook’s performance metrics. Look at key stats such as reach, engagement, peak live viewers, and average watch time.
Use these insights to understand what your audience loves and what could be improved, and then refine your strategy for an even better live session next time.
Troubleshooting Facebook Live Videos
Even the best-prepared live streams can hit a few bumps along the way. So, what issues are you facing? Let’s address it together.
Here are some common issues you might face with Facebook live stream and how to fix them.
Connectivity Issues
Ever have your video buffer or drop frames? This is often due to a weak internet connection. Make sure you’re connected to a strong, stable Wi-Fi network.
If you’re using cellular data, check your signal strength and data plan limits. Sometimes moving to a location with better reception can be a game changer.
Audio or Video Problems
Sometimes your viewers might complain about muffled audio or a blurry video. For audio issues, ensure your microphone isn’t muted on your device or within Facebook’s settings. Always do a quick sound test before going live.
For video problems, check that your camera lens is clean and your setup is well-lit. Adjust your lighting if necessary to achieve a clear, crisp picture.
Can’t Go Live
If you run into an error when trying to start your live stream, try these simple fixes:
- Restart the App: Close and reopen the Facebook app to clear any temporary glitches.
- Check for Updates: Make sure you’re using the latest version of the app, as updates can resolve performance issues.
- Restart Your Device: Sometimes a quick reboot is all it takes to get things back on track.
Limited Features
Sometimes, you might find that certain features aren’t available on your device. For example, scheduling live videos or adding guests might only work on desktop.
In these cases, review the platform’s limitations or consider using a third‑party tool to access the full range of features.
Final Note
Now you can see how easy and straightforward scheduling and hosting a successful Facebook Live stream can be. Simpler than you thought, right?
But as simple as this might look, going live on Facebook can do wonders for your digital presence. We have shown you all that you need to know about hosting and scheduling live streams on Facebook.
So, if you have not been doing that, we highly recommend exploring Facebook Live as part of your overall social media plan. It’s a powerful way to build your brand, engage your community, and watch your online influence grow.
FAQs
Which is better: going live immediately or scheduling a Facebook Live?
Both options have their perks. Going live immediately lets you tap into real-time conversations and spontaneity. But scheduling a Facebook Live gives you time to plan, prep your content, and ensure high quality. It also helps when you want to reach your audience at peak times.
So, the best choice depends on your needs – use scheduling when you need a smoother, well-planned broadcast, and go live spontaneously to capture the moment.
How far in advance should I schedule my Facebook Live?
You can schedule regular Facebook Live broadcasts up to 24 hours in advance. For Facebook Live Events, you can plan much further – up to 1 year ahead.
Just be sure to schedule at least 10 minutes in advance, as that’s the minimum time required to get everything set for your stream.
What equipment do I need to schedule a high-quality Facebook Live?
For a top‑notch broadcast, you don’t need a Hollywood studio, but some key equipment really helps:
- A good camera or smartphone for clear video.
- A quality microphone for crisp audio.
- Adequate lighting, like natural light or a ring light, to ensure your video isn’t too dark.
- A tripod or stable stand to keep your camera steady.
- A reliable internet connection, preferably wired or a strong Wi-Fi, to avoid interruptions.
How long does a Facebook Live stream last?
A Facebook Live stream can last up to eight hours, giving you plenty of time to cover your topic. However, the ideal length depends on your content and audience.
Shorter, focused sessions often keep viewers engaged, while longer streams may work for special events or in-depth discussions.