How to Schedule Instagram Stories Like a Pro – 2025 Update
Let’s show you how you can schedule Instagram Stories like a pro!
You will agree with us that Instagram Stories have become a crucial tool for engaging with your audience. However, one area many have often found challenging is keeping up with the demand to post regularly.
With stories being such a popular feature, it’s more important than ever to maintain a consistent presence. That’s where scheduling comes in.
This feature allows you to plan ahead, save time, and ensure your content reaches your followers at the perfect moment.
In this guide, we’ll show you how to schedule Instagram Stories like a pro in 2025, so you can stay ahead of the game and keep your audience engaged without the stress of daily posting.
Table of Contents
- 1 First, What Are Instagram Stories?
- 2 Why Should You Schedule Instagram Stories in Advance?
- 3 How to Schedule Instagram Stories in 2025 – 2 Methods
- 4 Method 1 – How to Schedule Instagram Stories Using Meta Business Suite
- 5 Method 2: How to Schedule Instagram Stories with OnlySocial
- 6 How to Edit Your Scheduled Instagram Story
- 7 OnlySocial; Not Just Any Instagram Scheduler
- 8 10 Tips and Tricks to Schedule Instagram Stories Like a Pro
- 9 Questions from Instagram Users
- 10 Final Words
First, What Are Instagram Stories?
Instagram Stories are a dynamic feature on Instagram that lets users share vertical photos and videos with their followers. But unlike regular posts, these stories vanish after 24 hours.
With over 500 million people using Instagram Stories daily, they offer a powerful way to engage your audience.
Stories are displayed in a slideshow format and come with a host of creative tools to make your content pop. Yes, there are various tools and elements available to help make your Stories super engaging. Let’s take a look at some of these features:
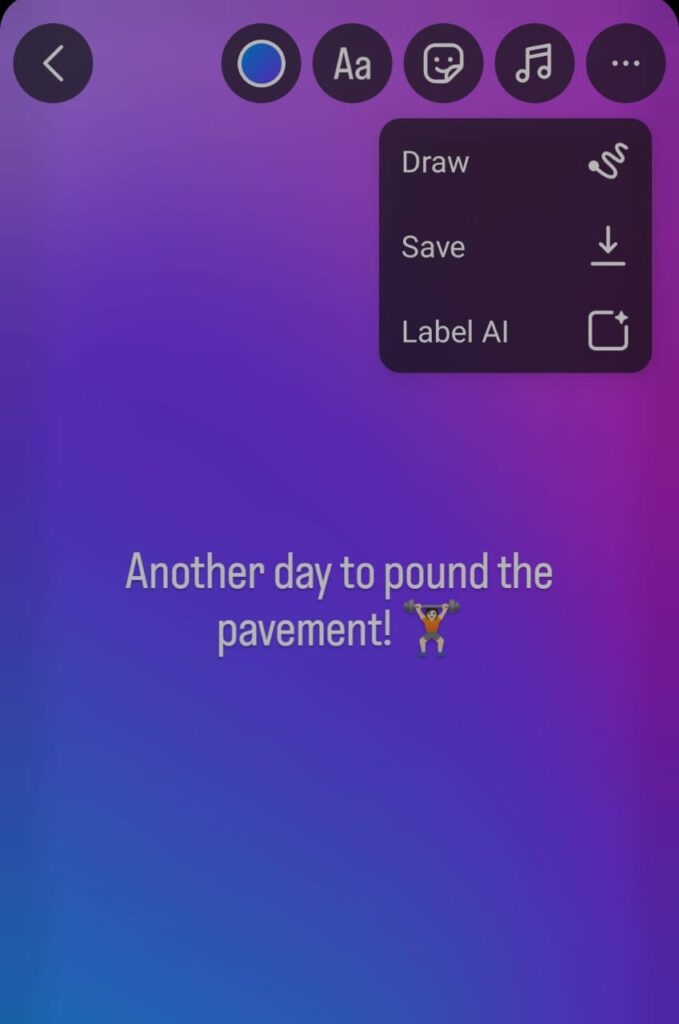
- Text and Drawing Features
Instagram Stories come equipped with a variety of text options and drawing tools, letting you easily add captions or personal touches to your posts.
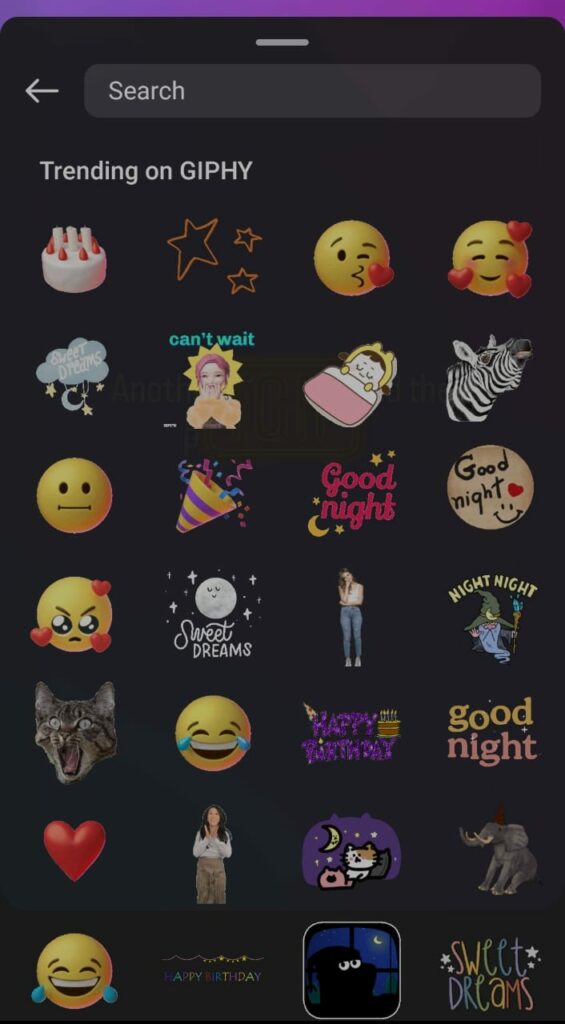
- Stickers and GIFs
Instagram offers an array of stickers and GIFs that can be added to your Stories, giving you the freedom to personalize and animate your content.
- Photo and Video Uploads
You can capture photos and videos directly using Instagram’s camera or choose to upload them from your device’s camera roll.
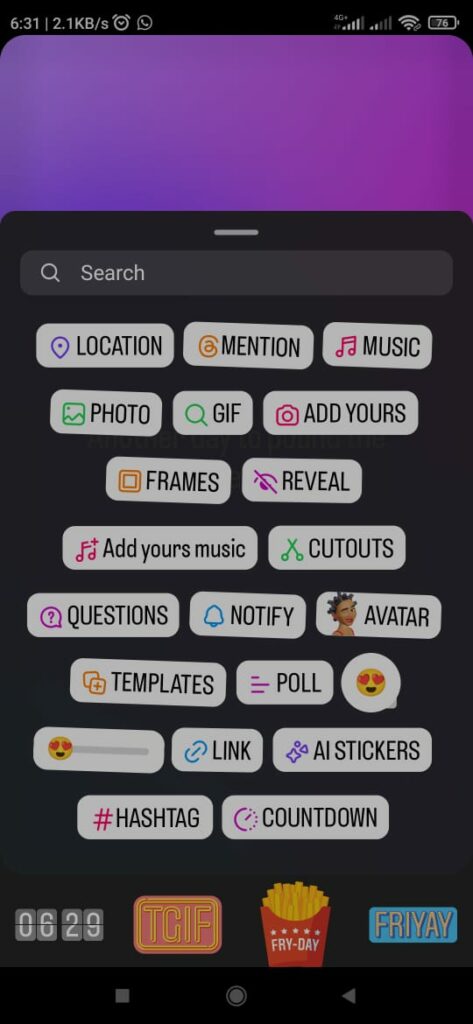
- Engagement Tools
Instagram Stories include interactive elements like music, polls, quizzes, and questions, making it easy for your audience to actively participate.
- Filters and Visual Enhancements
Instagram Stories lets you apply various filters, effects, and augmented reality (AR) elements to your content. That way, you can easily create visually stunning posts.
- Story Highlights
While Stories typically vanish after 24 hours, you can preserve and categorize your favorite ones in Highlights, which remain on your profile for longer visibility.
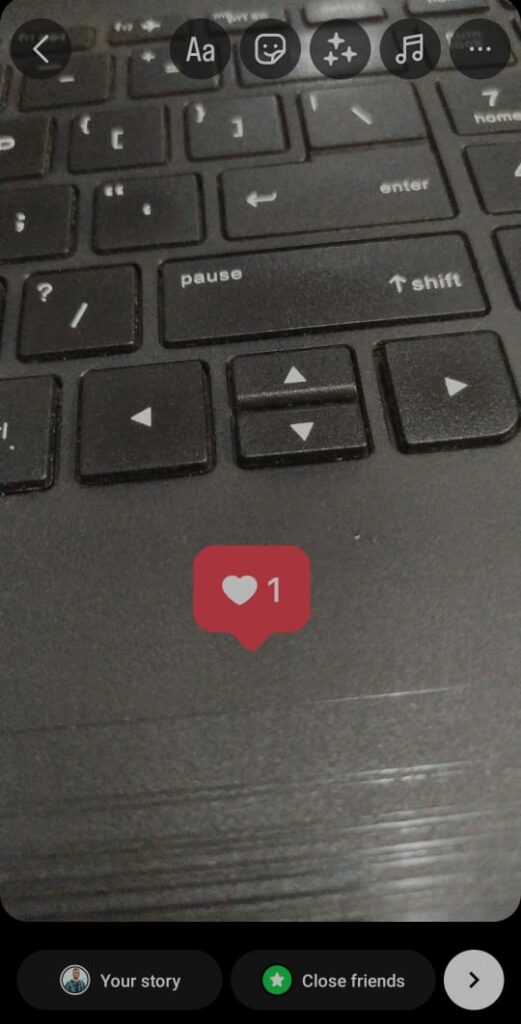
- Viewer Insights
Instagram provides detailed analytics on who has viewed your Stories and how they interacted with them. This provides valuable insights into your audience’s behavior.
This mix of features makes Instagram Stories a go-to for anyone looking to connect with their followers in a fun and spontaneous way.
Why Should You Schedule Instagram Stories in Advance?
When you are looking to maintain consistency across multiple social media channels, you need to learn scheduling to make the job easier for you.
Besides streamlining your content curation process, scheduling your content in advance can have a huge impact on your social media strategy.
So, if you are still not sure if you should schedule your Instagram Stories, here are some compelling reasons you should consider it:
- Helps You to Be Consistent with Posting
Scheduling your Stories ensures a steady flow of content. This goes a long way to help you maintain a regular presence on Instagram without any gaps.
- Saves Time
By planning and scheduling your Stories in advance, you free up time to focus on other important tasks, rather than constantly thinking about what to post next.
- You Can Post at Optimal Times
Scheduling allows you to target the best times for engagement, ensuring your Stories reach the largest possible audience when they’re most active.
- Story Sequencing
Planning ahead enables you to create a well-thought-out sequence of Stories, ensuring a smooth flow of content that tells a cohesive story.
- Significantly Reduces Stress Levels
With your Stories scheduled in advance, you can reduce the pressure of last-minute posting. Of course, that will help make your social media management more enjoyable and less stressful.
How to Schedule Instagram Stories in 2025 – 2 Methods
Now that you understand what Instagram Stories are and why scheduling them in advance is a smart move, let’s get into the how-to part.
There are two main methods for scheduling your Stories: using Meta Business Suite or a third-party scheduler.
The first option, Meta Business Suite, is free and provides direct integration with Instagram.
However, it can be a bit complex, especially if you’re looking for a straightforward, quick way to schedule your Stories without jumping through too many hoops.
This is where a third-party tool like OnlySocial comes in. Not only does it simplify the scheduling process, but it also offers more flexibility and additional features to enhance your social media management.
Let’s explore both methods and see how you can easily schedule Instagram Stories with them.
Method 1 – How to Schedule Instagram Stories Using Meta Business Suite
Meta Business Suite makes it possible to schedule Instagram Stories directly from both your mobile device and desktop.
However, to use this method, you will need to have a Facebook page and have it linked to your Instagram account.
So, if you don’t have a Facebook page yet, you should create one. Once you’re all set up, follow the walkthrough below.
Step 1: Open Instagram and link your Facebook page
- Start by opening the Instagram app and navigating to your profile.
- Tap ‘Edit Profile’ and scroll down to the ‘Public Business Information’ section.
- Under this section, select ‘Page.’ Choose an existing Facebook Page from the list, or create a new one if necessary.
- Follow the prompts to link your Instagram account to your Facebook Page.
Step 2: Go to your Facebook page
Once you’re logged into your Facebook account, navigate to your Facebook page.
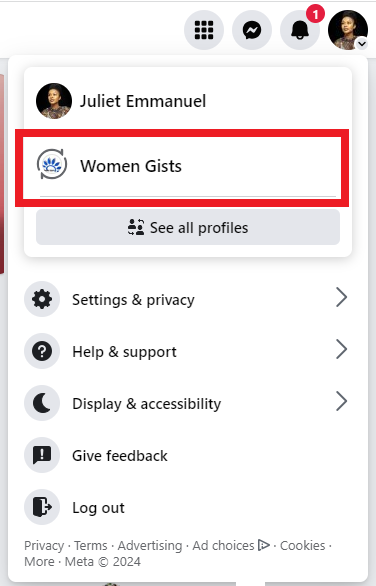
To find this, click on your profile picture in the right corner of the page. Now, click on the smaller profile picture at the bottom to go to your page.
Step 3: Open Meta Business Suite
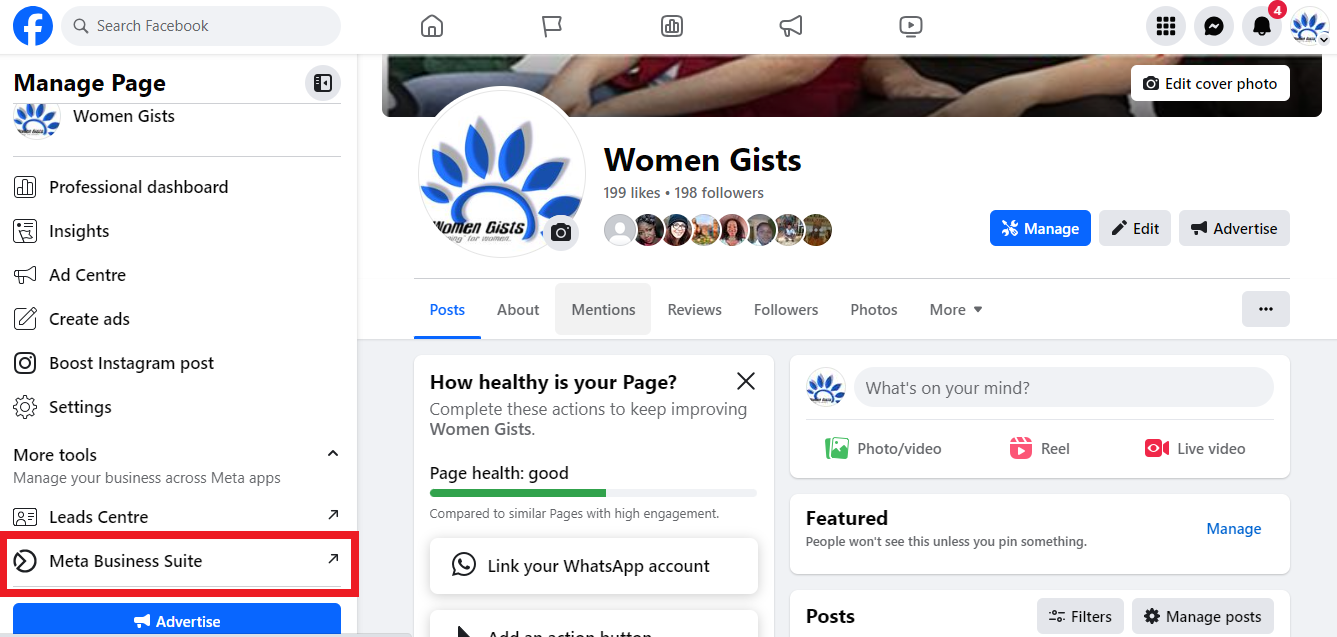
From your business Facebook page, find the Meta Business Suite button on the left-hand side of the page. Click on it to open the Meta Business Suite page in another tab.
Step 4: Create your Story
From the Meta Business Suite homepage, click on ‘Create Story.
To the left of this button are also some other options that allow you to choose whether you would like to create a Post, Ad, or Reel instead.
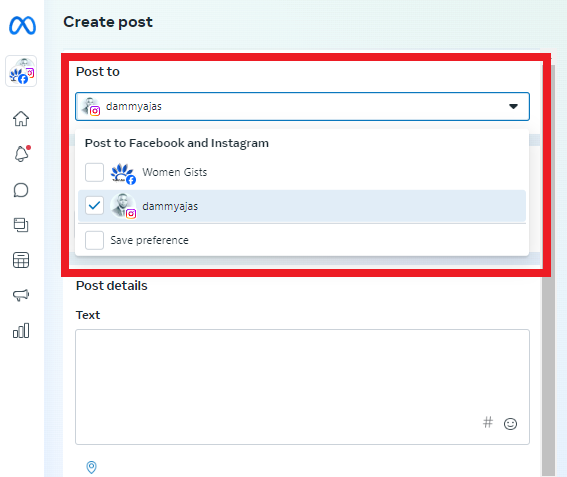
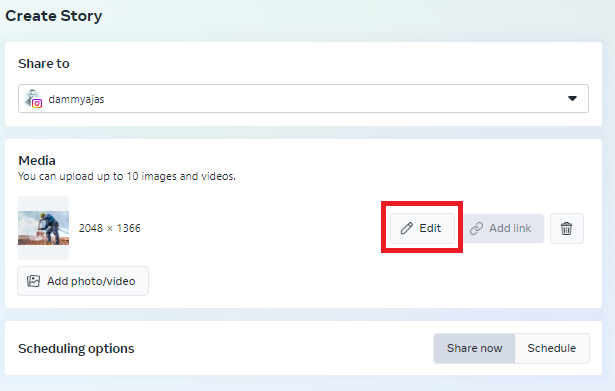
Choose your Instagram account under ‘Post to’ and then add the media you want to use for your Story.
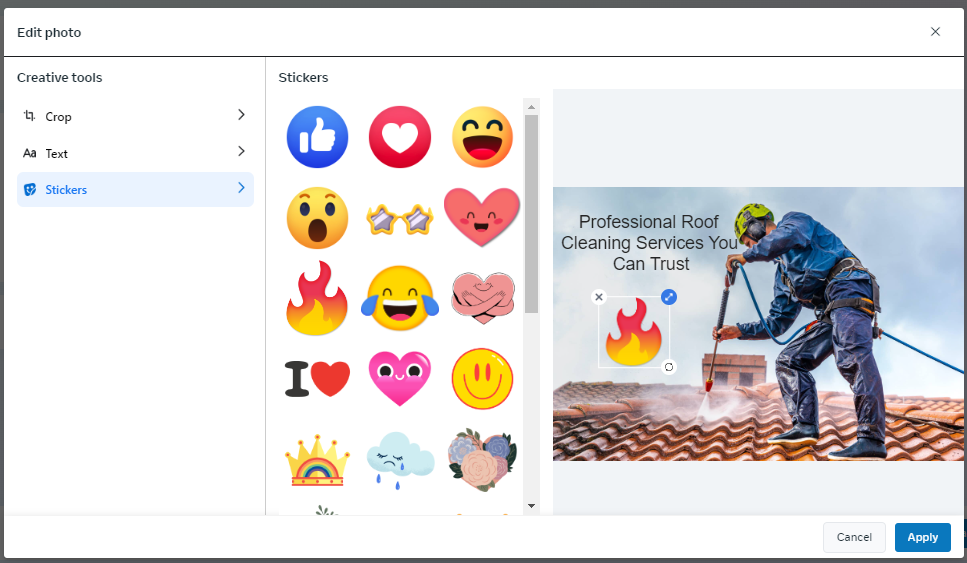
Click on the ‘Edit’ button on the page to further customize your Story, such as adding texts and stickers.
Step 5: Schedule your Story
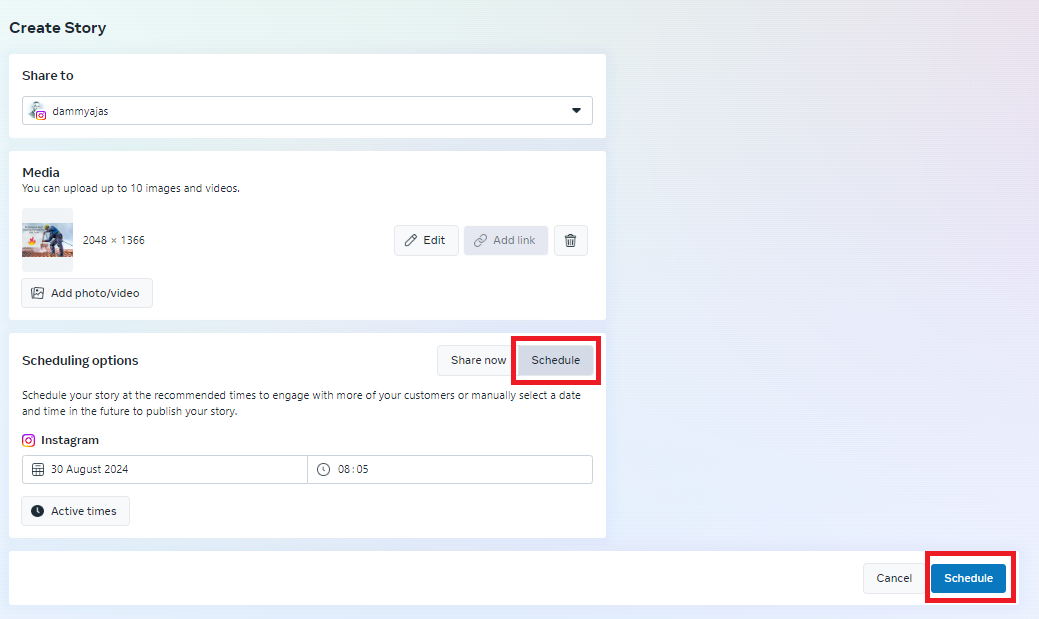
Once you’re happy with the preview of your Story, click on ‘Schedule’.
Set the desired time you would like the Story to go live. Once that is all set, finally click on ‘Schedule’ to schedule your Instagram Story.
That’s how you schedule Instagram Stories using Meta Business Suite desktop.
Method 2: How to Schedule Instagram Stories with OnlySocial
If you’re looking for a more user-friendly and flexible option to schedule Instagram Stories, OnlySocial is an excellent choice.
Here’s how you can easily schedule your Stories using the platform:
Step 1: Connect Your Instagram Profile to OnlySocial
Start by logging into your OnlySocial account. If you’re new to the platform, you can quickly sign up and get started.
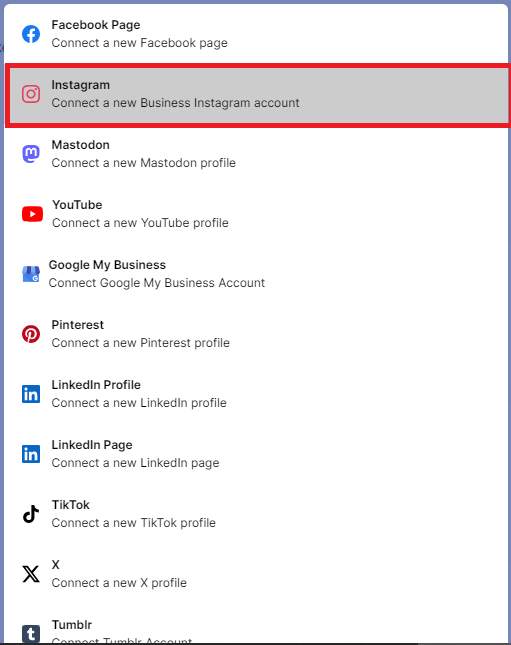
Once you’re in, the first thing you’ll need to do is connect your Instagram Business account to OnlySocial. This connection enables you to manage and schedule posts seamlessly.
To do this, go to the ‘Accounts’ section on the left side of your dashboard. Click on ‘Instagram’ and follow the prompts to link your account.
Step 2: Create Your Story
With your Instagram Business account connected, it’s time to craft your Story.
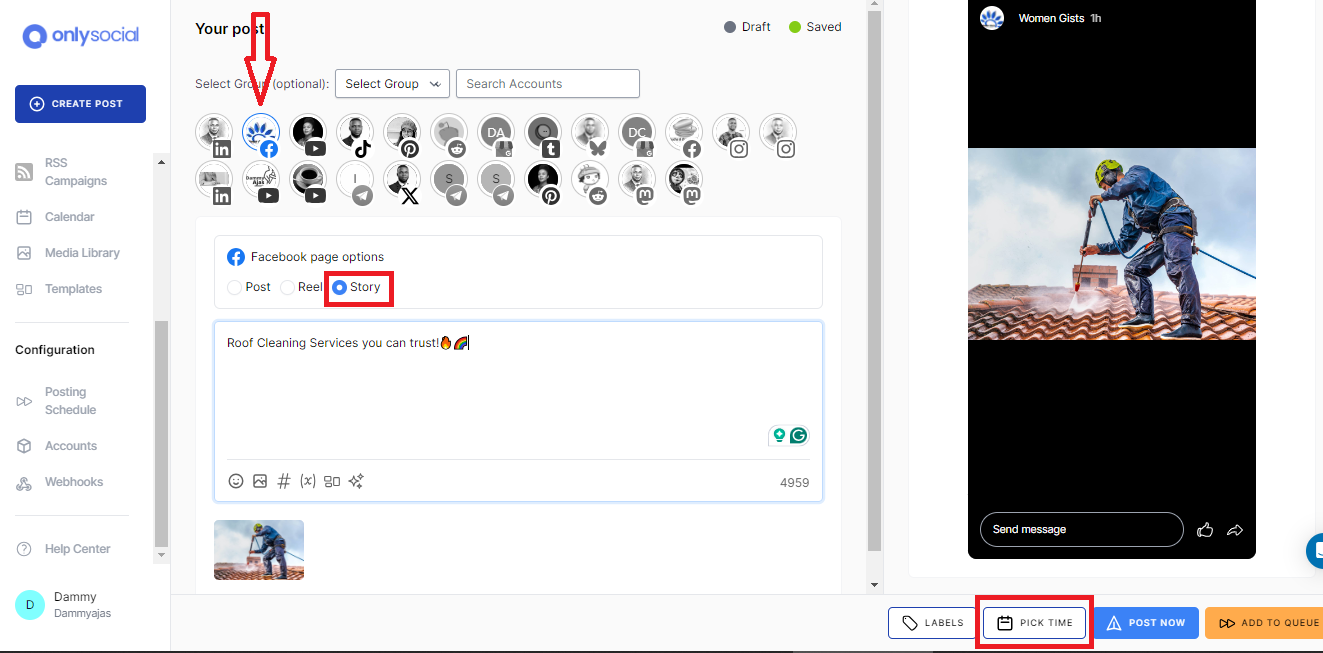
Click on the ‘Create Post’ button located in the sidebar. If you manage multiple Instagram accounts, you can select one or more to post to simultaneously.
In the text field provided, add any content, stickers, or emojis you’d like to include in your Story to make it more engaging.
Step 3: Schedule Your Instagram Story
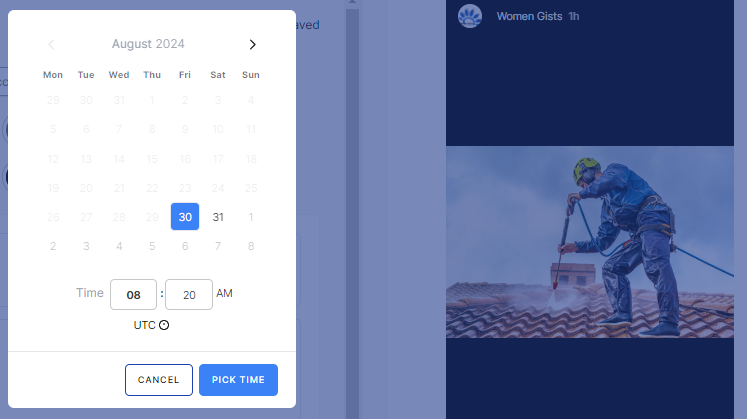
Once your Story is ready, scroll down and click on ‘Pick Time.’
A scheduling box will appear, allowing you to set the exact date and time you want your Story to be published. After selecting the desired time, simply click the ‘Schedule’ button at the bottom of the screen.
And there you have it! Your Instagram Story is now scheduled and you can relax and watch it go live at the optimal time.
Thinking of also using this tool to schedule your posts on Instagram? Here is a comprehensive guide on how to schedule posts on Instagram!
How to Edit Your Scheduled Instagram Story
OnlySocial provides the flexibility to edit your scheduled Instagram Stories, ensuring they appear exactly as you want when they go live.
However, remember that this is only possible if the Story hasn’t already been published. Here’s how to make edits to your scheduled Story:
- Log into Your OnlySocial Account: Begin by logging into your OnlySocial account. Once you’re in, click on ‘Posts’ in the sidebar to view all your scheduled content.
- Find and Select the Post: Scroll through your scheduled posts to locate the Instagram Story you want to edit. Click on it to bring up a preview.
- Enter Edit Mode: At the bottom of the preview screen, you’ll see a ‘Pencil icon.’ Click on it to enter edit mode, where you can make the necessary changes to your Story.
- Reschedule the Post: After making your edits, click on ‘Schedule’ again to save your changes. Your updated Story will be published at the time you’ve set.
OnlySocial; Not Just Any Instagram Scheduler
OnlySocial isn’t just another Instagram scheduling tool. It’s a powerful, all-in-one social media management platform designed to simplify your life.
With its intuitive interface, scheduling posts is super easy, even if you’re juggling multiple accounts.
But OnlySocial offers much more than just ease of use. It allows you to schedule content across multiple Instagram accounts at the same time, saving you valuable time and effort.
Plus, it’s not limited to just Instagram; OnlySocial supports a wide range of social media platforms, making it the ultimate tool for managing all your social media activities in one place.
Whether you’re posting on Instagram, Twitter, Facebook, or TikTok, OnlySocial ensures that your content is always on point and on time.
Comparing Meta Business Suite and OnlySocial for Scheduling Instagram Stories
| Feature | Meta Business Suite | OnlySocial |
| No of Connected Accounts | Limited to Facebook and Instagram accounts | Supports multiple social media platforms, including Twitter, TikTok, Mastodon, GMB, Pinterest, and more |
| Cross Platform Scheduling | Only supports posts to Facebook and Instagram | Allows scheduling across multiple platforms, making it easy to manage your content seamlessly |
| Content Calendar | Basic calendar for Facebook | Comprehensive calendar covering all connected platforms |
| Bulk Scheduling | Limited, mostly manual | Supports bulk scheduling for multiple posts |
| Analytics Reporting | Basic insights for Facebook and Instagram | Detailed analytics across all connected platforms |
10 Tips and Tricks to Schedule Instagram Stories Like a Pro
#1: Plan Your Content in Advance
Avoid last-minute rushes by planning your content ahead of time. This ensures consistency and allows you to create high-quality Stories that align with your brand’s message.
#2: Use Story Templates
To maintain a cohesive look, use story templates that match your brand’s aesthetic. Tools like Canva offer customizable templates that can make your Stories visually appealing and consistent.
#3: Optimize Posting Times
There is no point in posting Stories no one would see. So, take time to analyze your audience’s activity to identify the best times to post.
Use tools like OnlySocial to schedule your Stories when your followers are most active for maximum engagement.
#4: Incorporate Interactive Elements
Boost engagement by adding polls, quizzes, or questions to your Stories. These interactive elements encourage viewers to participate and keep your content dynamic.
#5: Leverage Hashtags and Location Tags
Increase your Story’s visibility by including relevant hashtags and location tags. This helps reach a broader audience beyond your followers.
#6: Preview Your Stories Before Scheduling
Many people fall victim to this. You shouldn’t!
Always preview your Stories to ensure they appear as intended. That way, you can easily catch any errors or adjustments needed before the Story goes live.
#7: Create a Story Sequence
Develop a narrative by sequencing your Stories. It’s a smart way of incorporating storytelling into Instagram Stories. This keeps your audience engaged from start to finish, encouraging them to watch all your content.
#8: Use Analytics to Improve
After posting, review analytics to understand what’s working and what’s not. Adjust your future content based on these insights to continually improve your strategy.
#9: Schedule During Peak Engagement Times
Post during peak times when your audience is most active. This increases the likelihood of your Stories being seen and interacted with.
#10: Test Different Content Types
Experiment with various content formats like photos, videos, and text-based Stories. Mixing up your content keeps your audience interested and engaged.
Questions from Instagram Users
Can You Schedule Instagram Stories on Meta?
Yes, you can schedule Instagram Stories using Meta Business Suite. This tool allows you to plan and set your Stories to go live at a specific time, making it easier to manage your content.
Does Instagram Allow Scheduling?
Yes, Instagram does allow scheduling, but only through third-party tools or Meta Business Suite. These platforms enable you to plan your posts and Stories ahead of time. It simply helps you to maintain consistent engagement with your audience.
Can I Schedule Multiple Posts at Once?
Absolutely! With tools like OnlySocial, you can schedule multiple posts and Stories simultaneously across various accounts, saving you time and streamlining your content strategy.
Do Scheduling Tools Work for All Types of Instagram Accounts?
Whether it is personal, business, or creator accounts, scheduling tools work for all types of Instagram accounts. However, some advanced features might be more beneficial for business and creator accounts.
How Many Stories Can I Schedule on Instagram?
There’s no specific limit to the number of Stories you can schedule. You can schedule as many Stories as needed to maintain your content flow. Just do whatever number you think will help you maintain consistent engagement with your audience.
When is the Best Time to Post Instagram Stories?
The best time to post Instagram Stories varies depending on your audience. Generally, early mornings, lunchtime, and evenings tend to be peak times. However, you can use analytics tools to determine when your specific audience is most active.
Does Scheduling Stories Reduce Its Views?
No, scheduling Stories does not reduce its views. In fact, it can help you post at optimal times, potentially increasing visibility and engagement.
Final Words
Scheduling Instagram Stories is a game-changer for anyone looking to save time and streamline their social media strategy.
By planning your Stories in advance, you can focus more on other aspects of your business while ensuring consistent engagement with your audience.
OnlySocial makes this process even easier. It provides a powerful social media management tool that supports not just Instagram but also other social media platforms, including Twitter, Facebook, Pinterest, LinkedIn, Google Business Profile, and more.
To schedule Instagram Stories with OnlySocial, first connect your Instagram account to OnlySocial. Next, Create your Story. Then Use the schedule button at the bottom to schedule it for the perfect time. It’s that simple!
