Can You Schedule Reels On Instagram? Let’s Find Out!
Wondering if you can schedule reels on Instagram? Good news – you absolutely can, and it’s easier than you might think!
No more worrying about posting at the perfect time or juggling multiple tasks. Scheduling your reels will make your content planning smoother and more efficient.
In this guide, we’ll reveal three simple methods to help you schedule your reels like a pro, so you can focus on creating content without the hassle of manual posting.
Table of Contents
- 1 How to Schedule Reels on Mobile Using the Instagram App – Method 1
- 2 How to Schedule Reels on Instagram Using Meta Business Suite – Method 2
- 3 How to Schedule Reels on Instagram Using Third-Party Apps – Method 3
- 4 Benefits of Scheduling Instagram Reels
- 5 Other Features of OnlySocial
- 6 Tips for Using Instagram Reels More Effectively
- 7 Questions from Instagram Users
- 8 Final Words
How to Schedule Reels on Mobile Using the Instagram App – Method 1
This is the first method available for you to schedule reels on Instagram, especially if you are looking for a seamless way to do this on the go.
Instagram makes it possible to schedule content directly from your mobile device. That way, you will be enjoying an easier route to planning your content ahead of time – up to 75 days in advance!
Here’s how to do it:
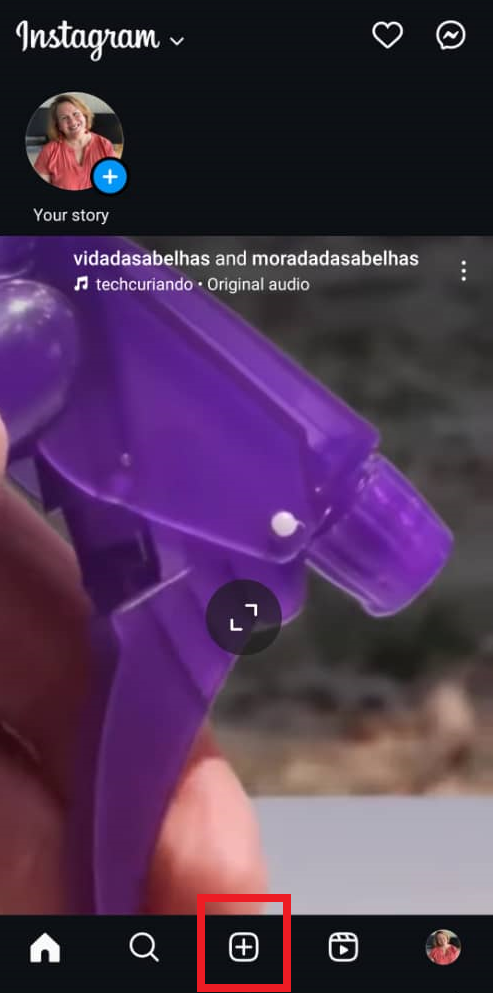
Step 1: Open the Instagram app
Open the Instagram app on your mobile device and tap the “+” icon at the bottom of the screen. Then, choose the “Reel” option.
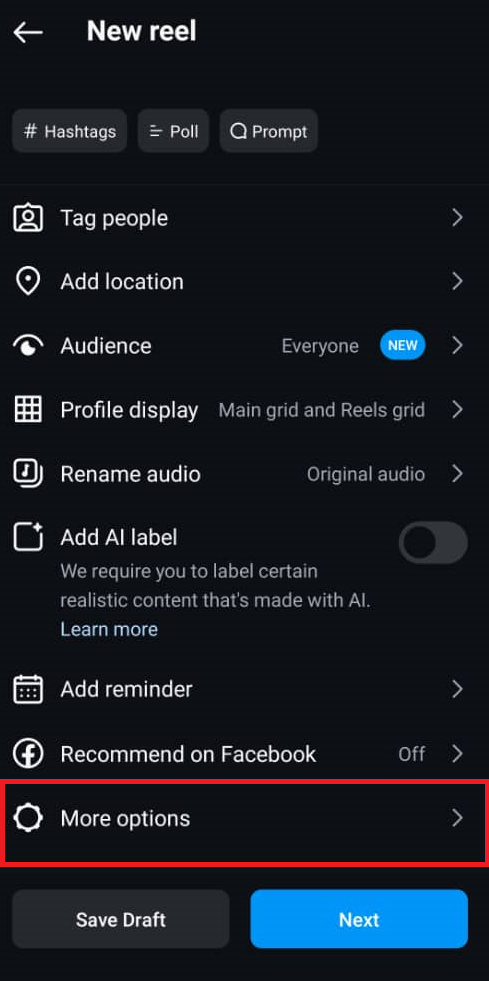
Step 2: Create your real
The next thing is to create the reel you want to schedule. Once you choose the reel as stated in the above step, select a video from your Gallery or capture a new one.
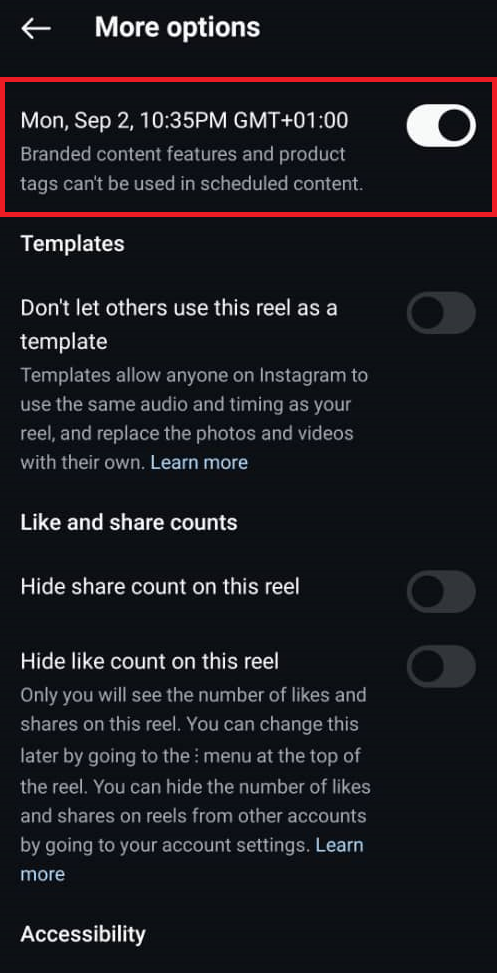
After that, scroll down to find the “More options” button at the bottom. You’ll see an option labeled “Schedule this reel.” Toggle the switch to turn it on.
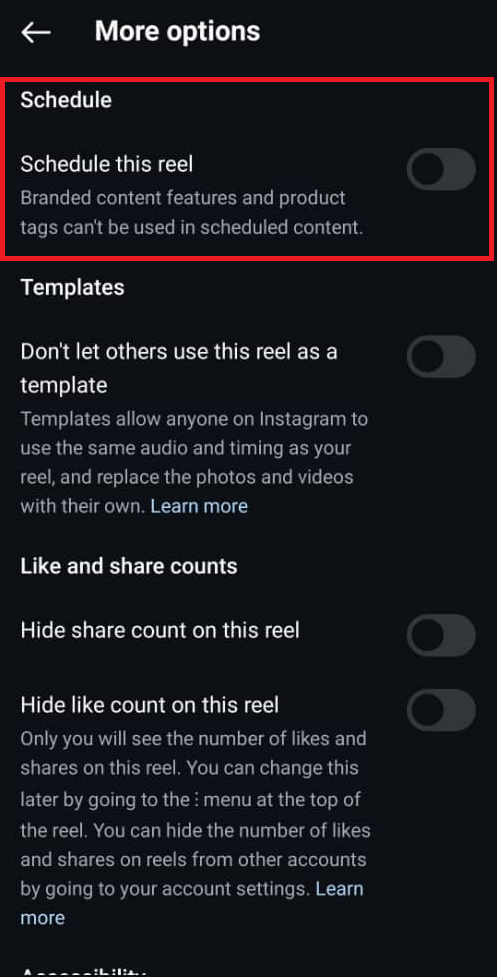
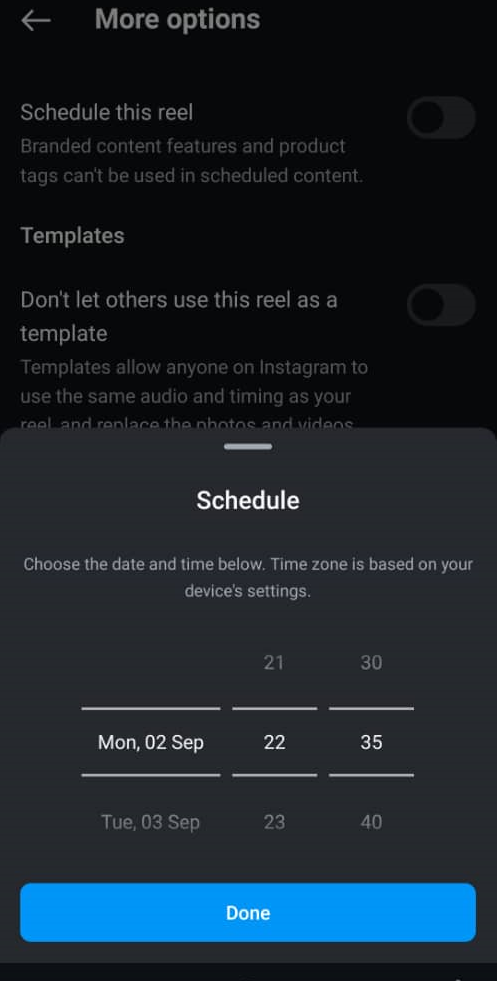
Step 3: Schedule your Reel
A calendar will appear, allowing you to choose the date and time for your Reel to go live. Once you’ve set the schedule, tap “Done.”
And that’s all there is to it! You’ve just scheduled your Instagram Reel directly from the app.
If you need to make any changes to the scheduled reel before the date it goes live, you can easily do that on your Instagram app too. Yes, you can edit your scheduled reels. Just:
- Open the Instagram app
- Navigate to your profile page and tap on the three lines at the top right corner
- Scroll down to find ‘Scheduled content.’ This will show you the list of all your scheduled posts.
- Find the reel you want to edit and tap on it.
- Once it’s opened, tap on the three dots at the top right corner and choose ‘Edit post’ from the options.
Easy, right? Just keep reading to see how much flexibility and functionality you can enjoy from the other methods of scheduling Instagram Reels.
How to Schedule Reels on Instagram Using Meta Business Suite – Method 2
Another efficient way to schedule Instagram Reels is by using the Meta Business Suite.
Whether you’re on your mobile device or computer, this method is straightforward and allows you to manage both your Instagram and Facebook accounts simultaneously.
Here’s how you can do it using the desktop version:
Step 1: Open Meta Business Suite
Start by accessing Meta Business Suite, the tool that lets you manage your Instagram and Facebook accounts in one place.
Select your Instagram account, and if you want, you can choose your Facebook account to post your Reel on both platforms simultaneously.
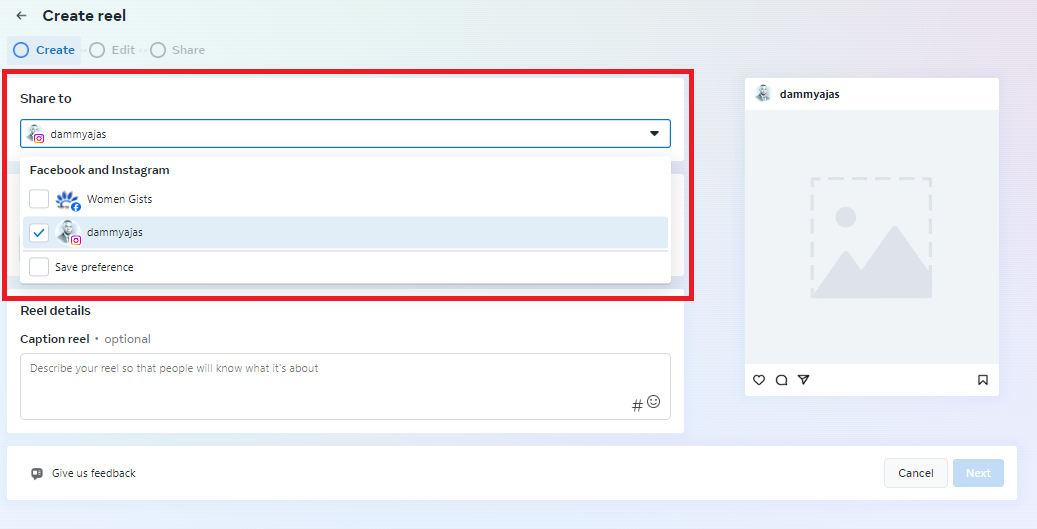
Step 2: Create Your Reel
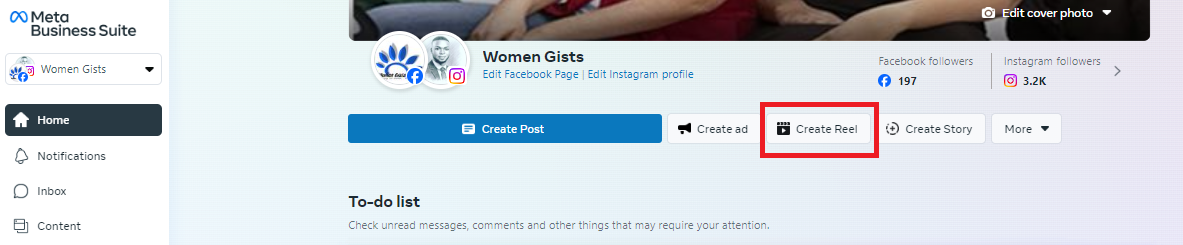
Click on the “Create Reel” option. You’ll see additional options to create a Post, Ad, or Story, but for now, focus on your Reel.
Choose the video or media you want to use and enhance it by adding stickers, effects, text, or audio to make it more engaging.
Step 3: Schedule Your Reel
Once you’re done creating and editing your Reel, click ‘Next.’ A new window will pop up, giving you the option to either publish your Reel immediately or schedule it for later. Choose the ‘Schedule’ option.
Step 4: Finalize Your Schedule
Set the desired date and time for your Reel to be posted. Once you’ve selected the perfect time, click on ‘Schedule Reel’ to confirm.
Your Reel is now scheduled and will automatically post at the specified time.
Editing Your Scheduled Reel
Can you edit your reels after they are scheduled? Absolutely!
If you need to make changes to a scheduled Reel in Meta Business Suite, follow these simple steps:
- Start by navigating to the ‘Planner’ section, located on the left side of the Meta Business Suite homepage.
- In the Planner, you’ll find a list of all your scheduled posts.
- Locate the specific post you want to edit and click on it to bring up the preview page.
- On the preview page, select the edit option, make the necessary adjustments, and save the post to update your schedule.
This quick process ensures that your content is always exactly how you want it before it goes live.
How to Schedule Reels on Instagram Using Third-Party Apps – Method 3
While the native methods for scheduling Instagram Reels are effective, using a third-party app can provide even greater flexibility and functionality.
Tools like OnlySocial offer features like bulk scheduling and cross-platform posting, making social media management more streamlined and efficient.
There is a reason many businesses and content creators on Instagram prefer using the tool to schedule their content.
Now, let’s see how you can schedule your Instagram Reels using OnlySocial too:
Step 1: Connect Your Instagram Account to OnlySocial
Start by logging into your OnlySocial account. If you don’t have one yet, you can easily sign up now.
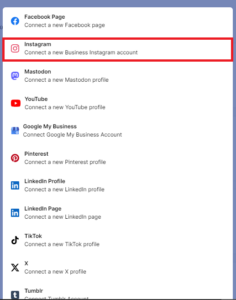
Once logged in, connect your Instagram account to OnlySocial by navigating to ‘Accounts’ on the sidebar and selecting ‘Instagram.’
Once your account is connected, then you are ready to start scheduling your Instagram content with ease.
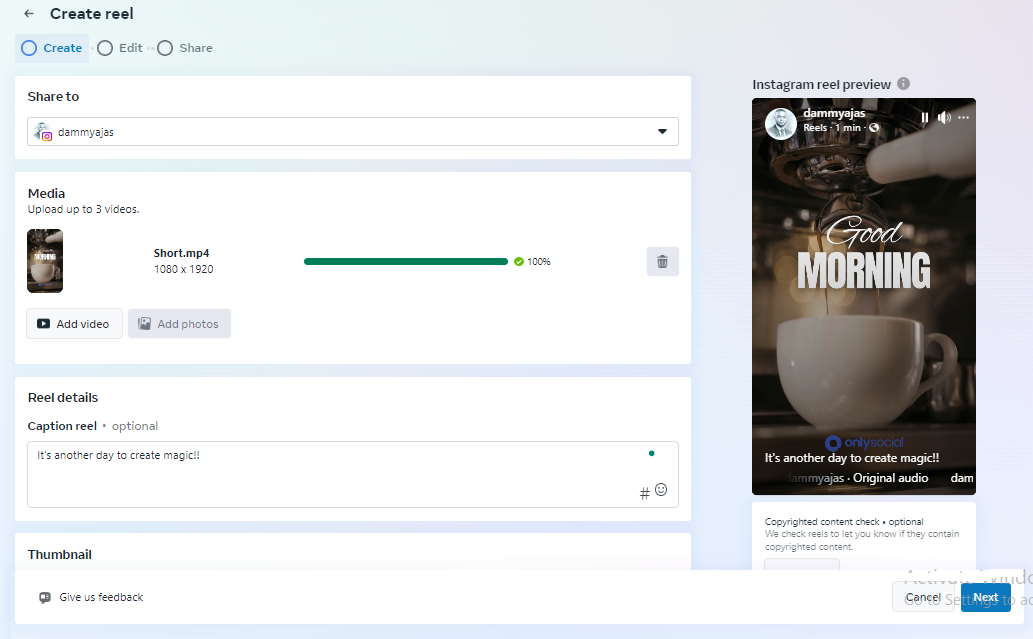
Step 2: Create Your Reel
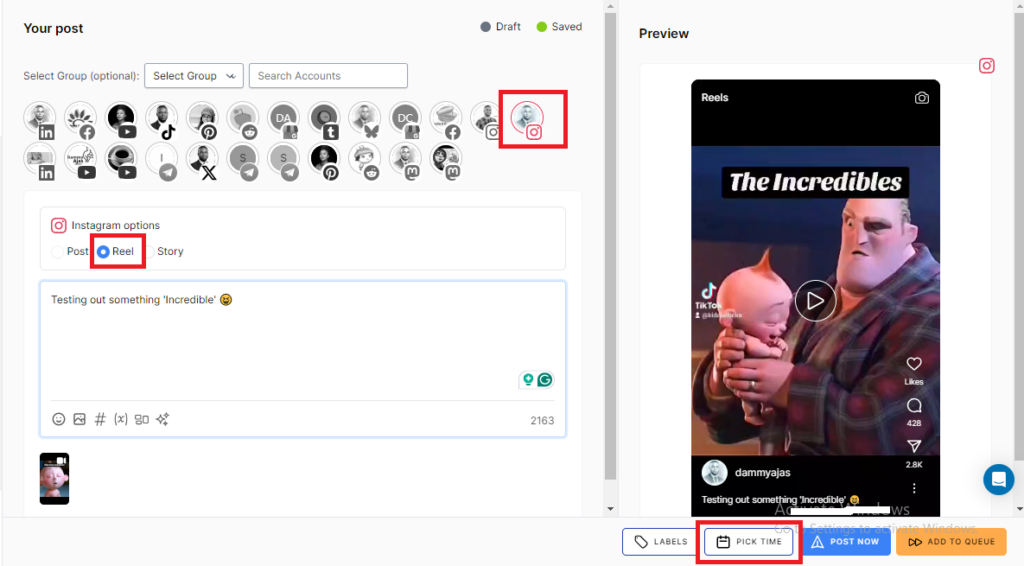
After linking your Instagram account, click on the ‘Create Post’ button at the top-left corner to start crafting your Reel.
You’ll be prompted to select the Instagram account(s) where you want the Reel to be posted. If you manage multiple accounts, you can select one or more.
Upload the video you want to use for your Reel and add a caption in the text field provided. A preview on the right side of the screen will show you how your Reel will look once it’s published.
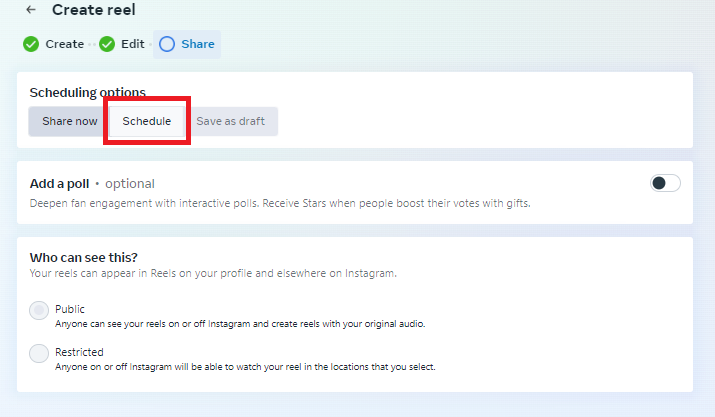
Step 3: Schedule Your Reel
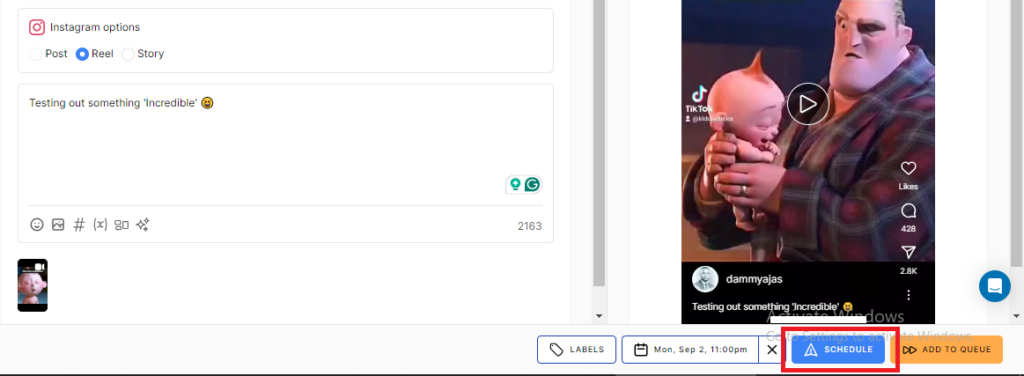
When your Reel is ready, scroll to the bottom of the screen and click on ‘Set Time.’
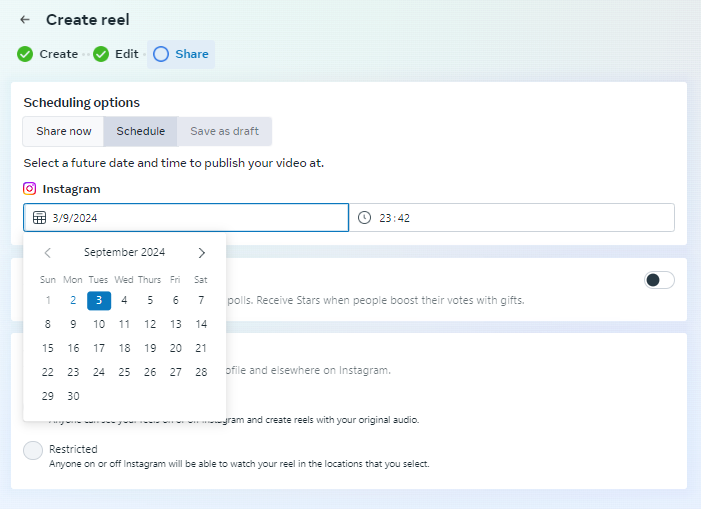
A calendar will appear, allowing you to choose the exact date and time you want your Reel to be published. After setting the schedule, click the ‘Schedule’ button to confirm.
Your Instagram Reel is now set to be posted at your chosen time.
Using OnlySocial not only simplifies the scheduling process but also gives you more control over your content strategy, allowing you to focus on growing your brand without stress.
Editing Your Scheduled Reel on OnlySocial
Like on Meta Business Suite, editing a scheduled reel on OnlySocial is also easy and straightforward.
If after scheduling your Instagram reel, you notice you need to make some changes to either the caption or the scheduled date, you can easily do that by following the steps below:
- Log into your OnlySocial account
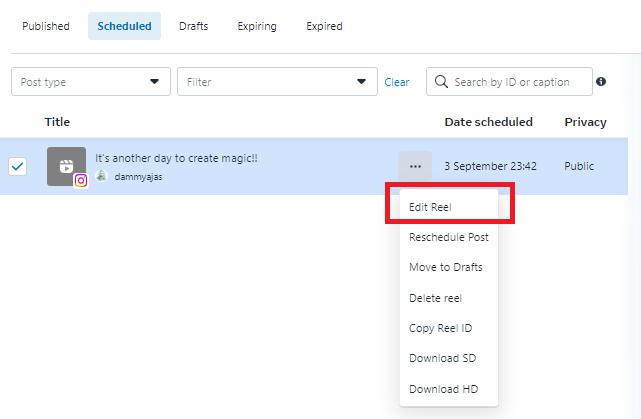
- Click on the ‘Posts’ section in the sidebar to access all your scheduled content.
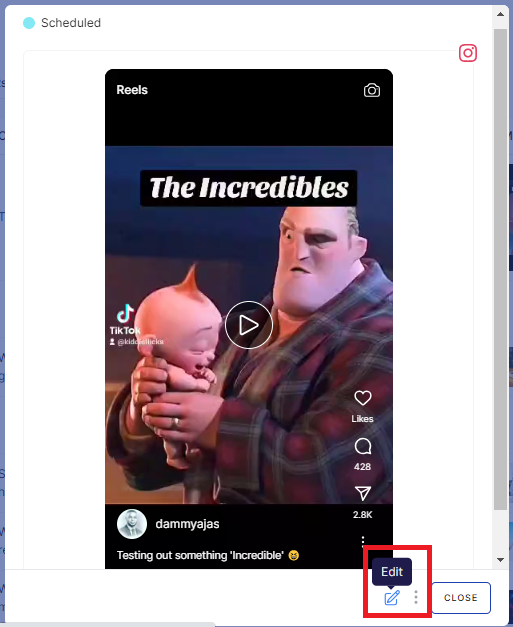
- Find the specific reel you want to modify and click on it.
- A preview of the post will appear. At the bottom of this preview, you’ll see a ‘Pencil icon’ – click it to enter edit mode.
- Make the necessary changes, then click ‘Schedule’ to update the post and requeue it for publication.
Benefits of Scheduling Instagram Reels
#1: Consistency Without the Stress
Consistency is key on Instagram, but it can be tough to keep up with daily posting. Scheduling your Reels lets you maintain a regular posting schedule without the daily grind.
You can batch-create your content in advance. That way, you can ensure your feed stays active and engaging without the stress of last-minute posts.
#2: Post at Peak Times
Knowing when your audience is most active is crucial. Scheduling your Reels allows you to post during those peak times, even if you’re busy.
This ensures your content reaches the maximum number of viewers, boosting engagement and visibility without you needing to be online.
#3: Better Time Management
Let’s face it – social media can be a time sink. By scheduling your Reels, you can free up your day for other important tasks.
Spend less time worrying about when to post and more time focusing on what really matters in your business or personal life.
#4: Flexibility to Plan Ahead
Got a big campaign coming up? Scheduling gives you the flexibility to plan your content well in advance. Whether it’s a product launch, holiday promotion, or just keeping your content calendar full, you can ensure everything is ready to go without any last-minute scrambles.
#5: Increased Engagement
When you schedule Reels, you can focus on crafting quality content rather than rushing to post. This often leads to more thoughtful, engaging posts that resonate better with your audience. More engagement means more likes, comments, and shares, helping your content spread further.
#6: Enhanced Content Strategy
Scheduling tools often come with analytics features that allow you to track what works and what doesn’t.
By planning and scheduling your Reels, you can test different strategies, analyze the results, and refine your approach over time. This data-driven strategy helps you grow your presence more effectively.
Other Features of OnlySocial
![]()
Multi-Platform Scheduling
OnlySocial isn’t just for Instagram Reels; it’s a comprehensive tool that lets you manage and schedule posts across various social media platforms.
Whether you’re juggling Facebook, Twitter, Pinterest, or LinkedIn, OnlySocial makes it easy to keep all your accounts active and in sync with a single dashboard.
User-Friendly Interface
One of the best things about OnlySocial is its intuitive design. The platform is built with ease of use in mind, making it accessible even for those who aren’t tech-savvy.
You can quickly navigate through your social media accounts, create posts, and schedule them without any hassle.
Bulk Scheduling
Have a lot of content ready to go? With OnlySocial, you can schedule multiple posts at once. This bulk scheduling feature is perfect for content creators and businesses who want to plan their social media strategy in advance, saving time and effort.
Advanced Analytics
Want to know how your posts are performing? The tool also provides detailed analytics to help you track engagement, reach, and other key metrics. This data is invaluable for refining your content strategy and ensuring that your posts are hitting the mark.
Content Calendar
The content calendar feature in OnlySocial lets you see all your scheduled posts at a glance. This makes it easier to plan your content, spot any gaps, and ensure a consistent posting schedule.
You can also drag and drop posts to reschedule them easily if plans change.

Tips for Using Instagram Reels More Effectively
Before we round up this post about how to schedule reels on Instagram, let’s show you some tips you can leverage to get the most out of posting reels on the platform.
- Keep It Short and Engaging
The first few seconds of your Reel are crucial in capturing attention. Aim to make your content engaging from the start. Keeping your Reels short and to the point helps maintain viewer interest and encourages them to watch until the end.
- Leverage Trending Music and Sounds
Using popular music or sounds in your Reels can significantly boost their visibility. Instagram often promotes content that aligns with current trends, so keeping an ear out for trending audio can help your Reels reach a broader audience.
- Use Hashtags Strategically
Incorporating relevant hashtags in your Reels can improve their discoverability. Research and use hashtags that are popular in your niche to ensure your content reaches the right audience. Don’t overdo it, though – stick to a handful of targeted hashtags.
- Add Text Overlays for Clarity
Adding text overlays can make your Reels more accessible and easier to understand, especially for viewers who watch without sound. Highlight key points or calls to action with clear, readable text to enhance your message.
- Engage with Your Audience
Don’t just post and forget – make sure to engage with your audience by responding to comments and encouraging interaction. This not only boosts your Reel’s visibility but also helps build a loyal following over time.
Questions from Instagram Users
What is the best time to schedule Instagram Reels?
The best time to schedule your reels on Instagram largely depends on your target audience’s activity. Generally, posting during early mornings, lunchtime (around 12 PM – 1 PM), or evenings (around 6 PM – 9 PM) works well.
However, using Instagram Insights to track when your followers are most active will give you the most accurate timing.
How long should my reels be for maximum engagement?
Instagram Reels can be up to 90 seconds long, but for maximum engagement, it’s best to keep them between 15 to 30 seconds. This short duration ensures that viewers watch the entire Reel, increasing the likelihood of engagement and shares.
How far in advance can I schedule Instagram Reels?
You can schedule Instagram Reels up to 75 days in advance using Instagram’s native scheduling features. This allows you to plan and maintain a consistent content calendar well ahead of time.
How many Instagram Reels can I schedule at once?
There isn’t a strict limit to the number of Instagram Reels you can schedule at once. Using Instagram’s native tools or third-party schedulers like OnlySocial, you can plan and schedule as many Reels as you need. This makes it easy to maintain a consistent posting schedule without worrying about hitting a limit.
Can I make changes to my scheduled Reels before they go live?
Yes, you can make changes to your scheduled Reels before they go live. Whether you’re using Instagram’s native scheduler or OnlySocial, you can edit the content, caption, or scheduled time.
Just find the scheduled post, make the necessary changes, and resave it with the updated information.
Final Words
Now that you know how to schedule Reels on Instagram, it’s time to leverage this powerful feature to your advantage.
Scheduling your Reels allows you to stay consistent, save time, and ensure your content reaches your audience at the optimal times.
We have already shown you three effective methods you can use to schedule reels on Instagram. Whether you choose to use the feature on the Instagram app, Meta Business Suite, or OnlySocial, you can bet you will enjoy the most benefit from it.
So, don’t let anything hold you back again. Start implementing scheduling your content today, and watch your engagement grow as you gain more visibility and authority on Instagram.
Got any more questions concerning this subject, don’t hesitate to reach out to us. We will be glad to write an informative blog on your concerns to help you out!