How to Schedule YouTube Videos [3 Ways]
This guide will show you how to schedule YouTube videos!
Starting a YouTube channel is an exciting journey filled with opportunities to share your passions and connect with a global audience.
However, managing a consistent posting schedule can be challenging, especially when life gets busy. That’s where learning how to schedule YouTube videos comes in handy.
By scheduling your videos to go live automatically, you can save time and ensure that your content reaches your audience at the optimal time, even when you’re busy with other things.
This simple yet powerful tool can help boost your views and subscribers, making it an essential skill for both new and experienced creators.
In this guide, we will show you various scheduling methods you can use to schedule YouTube videos while also offering you some pro tips to help you make the most of the scheduling.
![]()
Table of Contents
Key Benefits of Scheduling Your Videos on YouTube
Scheduling your YouTube videos offers several key benefits that can help you manage your channel more effectively and boost your success.
Before we go to see how to schedule YouTube videos, let’s quickly take a closer look at why it’s worth incorporating scheduling into your strategy.
Consistency
Regularly posting content is crucial for building and maintaining an audience. Scheduling ensures your videos go live at the same time each week, helping you stay consistent without the stress of manual posting.
Time Management
By scheduling videos in advance, you free up time to focus on other important aspects of your channel, like content creation and audience engagement. It’s like having a personal assistant for your uploads.
Audience Targeting
Scheduling allows you to post videos at times when your audience is most active. This can lead to higher engagement rates, as your videos are more likely to be seen when your viewers are online.
Global Reach
If you have an international audience, scheduling videos at different times can help you reach viewers in various time zones. This ensures your content is accessible to everyone, no matter where they are.
Flexibility
Life can be unpredictable, but with scheduling, your content plan doesn’t have to be. Even if you’re busy or on vacation, your videos will still be published as planned, keeping your channel active.
Enhanced Planning
Scheduling videos encourages you to plan your content calendar in advance. This not only helps you stay organized but also allows you to strategically align your content with important dates, events, or trends.
You can now see how many goodies are loaded in scheduling your videos on YouTube. Now let’s go see the steps involved in the process.
How to Schedule YouTube Videos – A Complete Guide
Unlike what many people often assume, scheduling YouTube videos is a straightforward process once you know the steps.
Luckily there are different methods to make this happen. That way, you can easily choose one that best suits your needs and preferences.
You can either choose to use the platform’s native scheduler – both on desktop and mobile or use a third-party scheduler. Let’s walk through how to use all these avenues.
1. How to Schedule Videos Directly on YouTube Desktop
Step 1: Sign In
Begin by logging into your YouTube Studio account. This is where you manage everything related to your channel, from uploads to analytics.
So, when looking to schedule your videos, that’s the same place you make it happen. If you’re new to YouTube, you’ll need to create a channel before you can start scheduling videos.
Step 2: Upload Your Video

Once you’re logged in, look for the camera icon with a “+” sign. This is usually located on the top right corner of the homepage.
Click on this icon and select “Upload videos” from the dropdown menu. You’ll be taken to the upload screen, where you can choose the video file you want to upload.
However, before you upload, make sure your video meets YouTube’s specifications, such as the correct resolution, aspect ratio, and supported file format. This ensures your video plays smoothly once it’s live on your channel.
Step 3: Add the Details
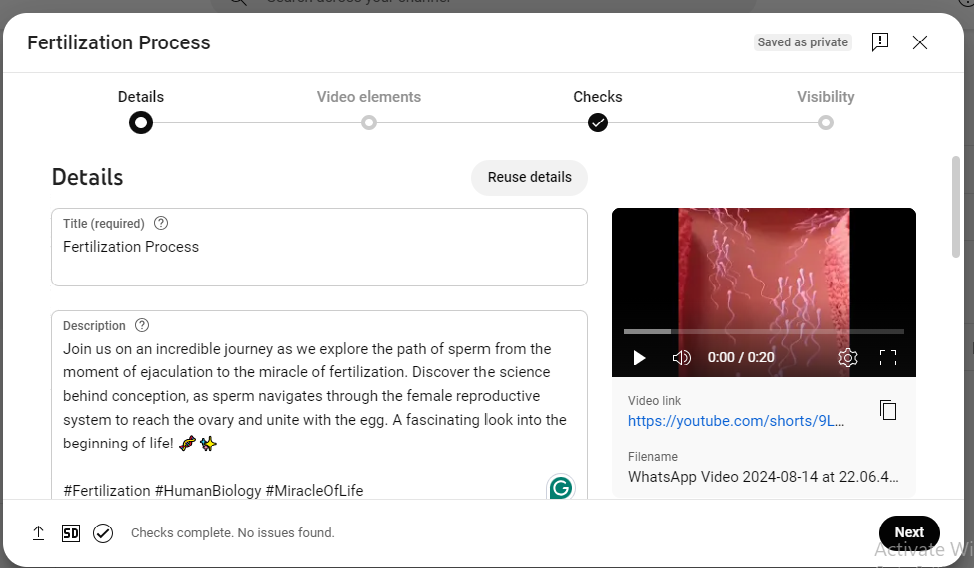
Once your video is uploaded, it’s time to fill in all the essential details. But do you know what each of these details are? Let’s do a quick rundown:
- Title: This is the title of the video you just uploaded. Make it catchy and relevant to grab attention.
- Description: This is a brief summary of your video’s content. Ensure you include relevant keywords to improve discoverability.
- Thumbnail: This is the image people see when your video is displayed – before they get to see its content. Choose an eye-catching custom image that represents your video.
- Playlist: (Optional) Add your video to a playlist to keep your content organized and improve viewer retention.
- Tags: Use relevant keywords to describe your video, which helps boost searchability.
- Recording Date: Input the date you filmed the video to provide context to your viewers.
- YouTube Timestamps: (Optional) This option will allow you to break your video into chapters for easier navigation. It helps a lot in enhancing the viewer experience.
Take your time optimizing these details to increase your video’s chances of gaining views, even if your channel is small.
Step 4: Video Element Setup
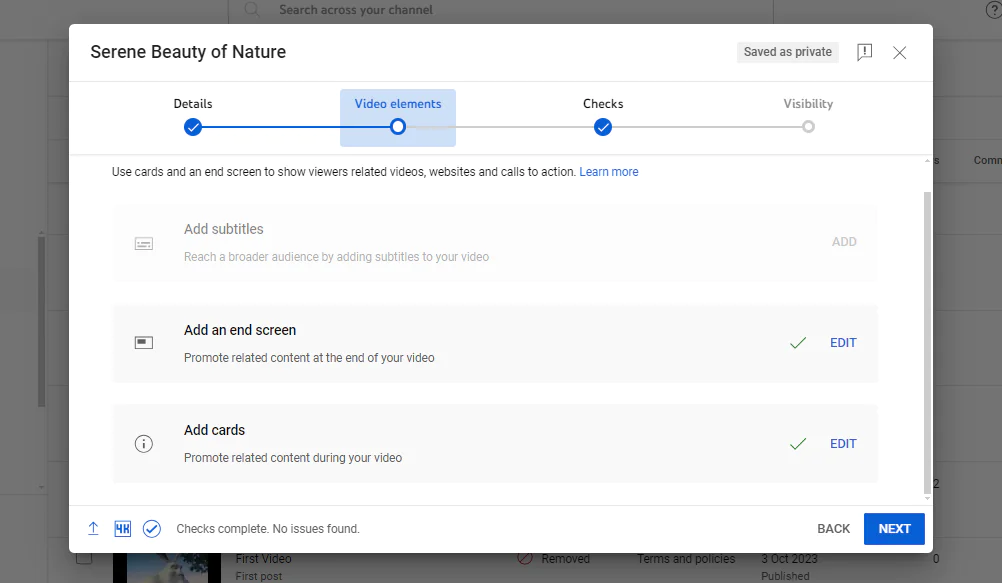
This step allows you to add additional features to make your video more engaging and informative:
- Subtitles: Subtitles are text that appears at the bottom of your video, translating or transcribing the spoken content. This is useful for viewers who are deaf, hard of hearing, or speak different languages.
- End Screen: Create a special screen that appears at the end of your video, where you can promote other videos, channels, or websites.
- Cards: These are small interactive boxes that pop up during your video, linking to other videos, playlists, merchandise, or fundraising campaigns.
Step 5: Checkpoint
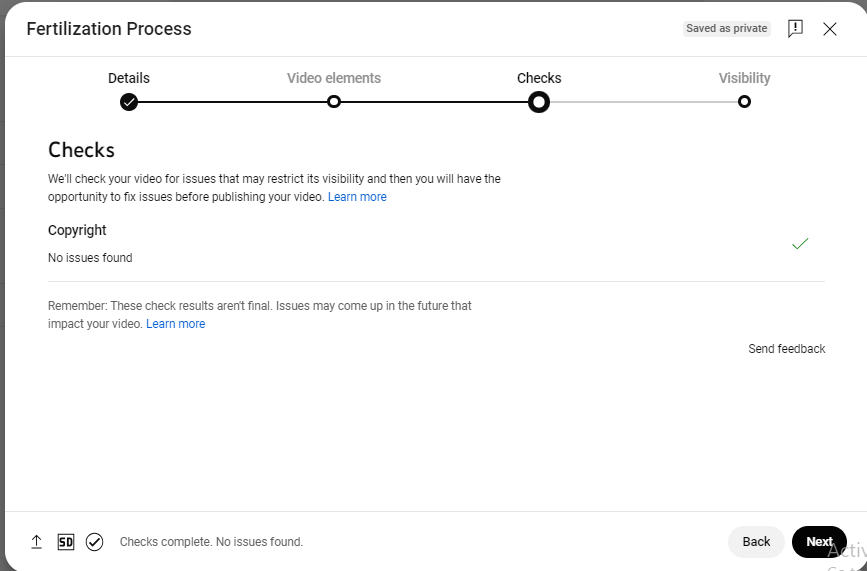
This step is just what it says it is – a checkpoint. The step is to help you check if the video you’re about to schedule is compliant with YouTube guidelines and regulations.
So, before you schedule your video, take a moment to review what YouTube has to say about it. This will alert you to any potential issues, such as copyright claims or other concerns that could prevent your video from going live.
For instance, if a copyright claim is flagged, it means that some content in your video (like music or clips) is owned by someone else. You may need to remove this content or seek permission to use it.
Step 6: Set Visibility
Now, decide who can see your video. You have three visibility options here:
- Private: Only you and specific people you invite can view the video.
- Unlisted: Anyone with the link can watch the video, but it won’t appear in search results or on your channel.
- Public: The video is available to everyone, appearing in search results and on your channel. This is the usual setting for most YouTube videos.
Step 7: Schedule Your Video
Finally, after completing all the necessary fields, you can choose to either publish your video immediately or schedule it for a later date and time.
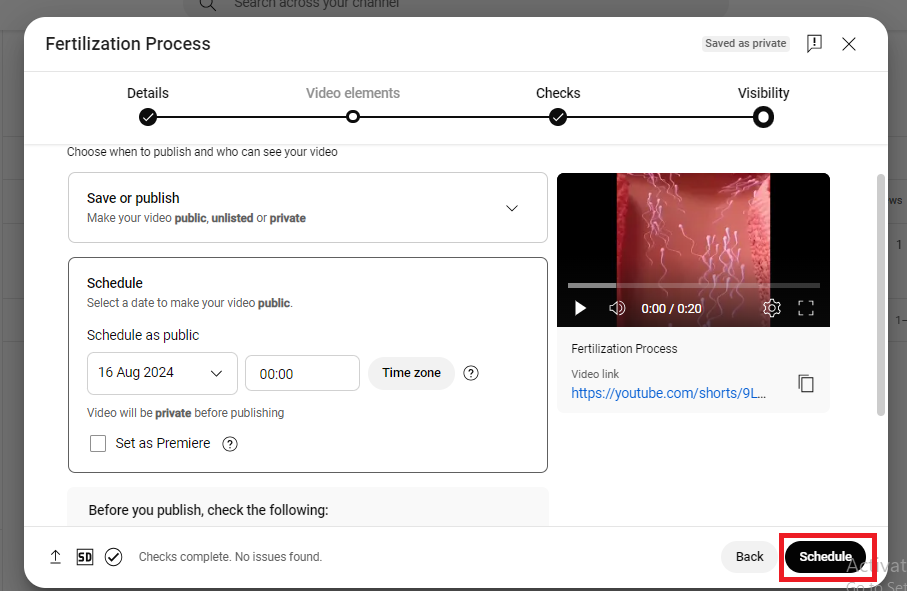
Simply click the “Schedule” button, select your desired date and time for the video to go live, and you’re all set!
How to Schedule YouTube Videos on Mobile
For creators who are always on the move or prefer using their smartphones, YouTube makes it easy to schedule uploads directly from your mobile device.
Here’s a step-by-step guide on how to schedule YouTube videos on both Android and iPhone:
Step 1: Open the YouTube Mobile App
Begin by opening the YouTube app on your smartphone. Log in to the account where you plan to upload and schedule your video.
Step 2: Tap the “+” Icon
At the bottom center of the screen, you’ll see a “+” button. Tap on it and select “Upload a video.” This will allow you to choose a video file from your phone’s gallery.
Step 3: Add Details
Once you’ve selected your video, you’ll be prompted to enter important details like the title, description, and tags. These details are crucial for optimizing your video’s visibility, so take your time to craft them carefully.
Step 4: Add a Custom Thumbnail
After entering your video details, tap the pencil icon to make further edits.
Here, you can select a thumbnail for your video. You can choose from YouTube’s auto-generated options or upload your own custom thumbnail for a more personalized touch.
Step 5: Schedule Your Video
Within the same section where you enter your video details, you’ll find the option to schedule your video.
Tap on “Schedule,” select your preferred date and time, and confirm. Your video will then be automatically published at the time you’ve chosen.
Scheduling your videos on mobile is incredibly convenient, especially for creators who prefer managing their YouTube channel on the go.
This feature ensures that your channel remains active and your content reaches your audience consistently, no matter where you are.
How to Schedule YouTube Videos Using Third-Party Tools like OnlySocial
![]()
While scheduling videos directly from YouTube’s native scheduler is great, there are some instances when you just need something more. That is where third-party tools like OnlySocial come in.
They are invaluable if you’re managing multiple social media accounts or need an all-in-one solution for scheduling your YouTube videos.
With OnlySocial, you can schedule your YouTube videos alongside content for other platforms, all from a single dashboard. Here’s how to schedule your YouTube videos using OnlySocial:
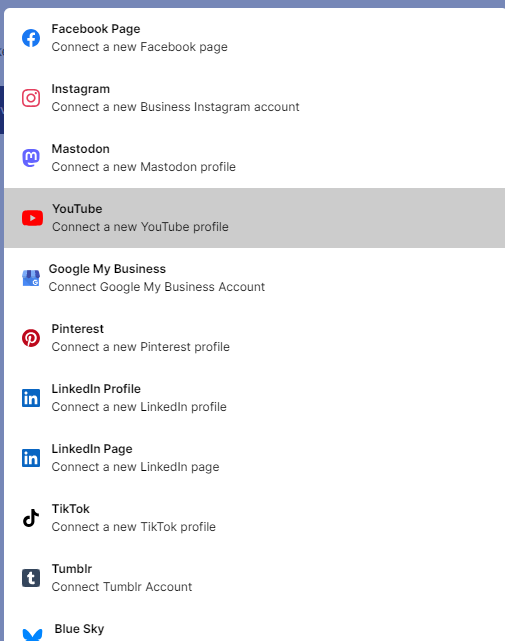
Step 1: Login and Add Your YouTube Channel to OnlySocial
First, log in to your OnlySocial account to add your YouTube profile. If you don’t have an account yet, you can quickly create one.
Upon logging in, you’ll be directed to the dashboard, which is the hub for all your scheduling activities. Now, click on the ‘Account’ button on the sidebar to add your YouTube profile.
Step 2: Select the Account and Upload the Video
In the dashboard, choose the YouTube account where you want to upload your video. Next, find the media button at the bottom of the page to upload your video from your system.
Step 3: Fill Out All Details
After uploading the video, you’ll need to fill in all the relevant details. This includes the title, description, and privacy configuration (who gets to see the video to optimize your video for search and increase viewer engagement.
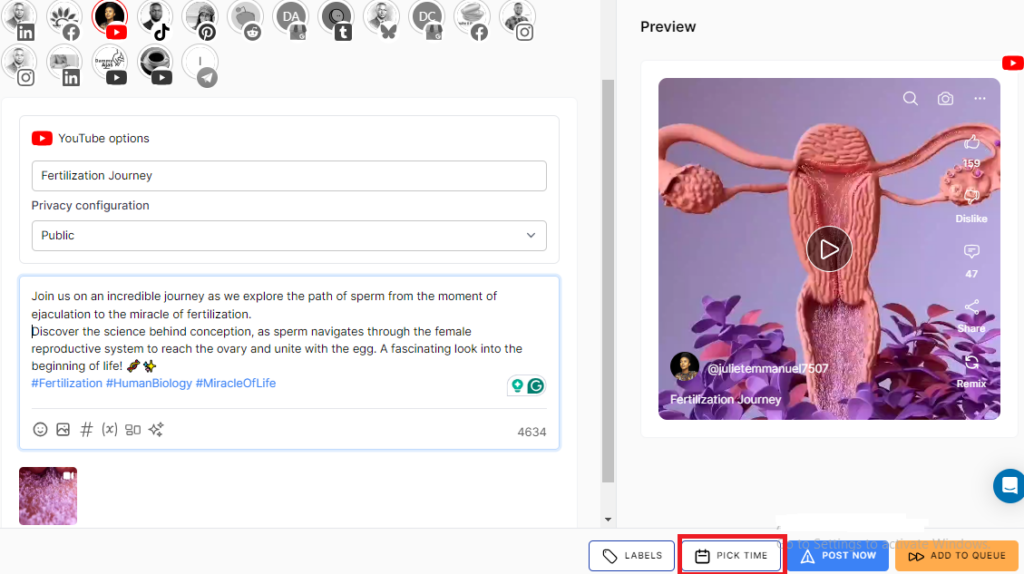
Step 4: Schedule Your Video
Once your video is uploaded and all details are complete, the final step is to schedule it.
OnlySocial’s scheduling tool allows you to pick the exact date and time for your video to be posted. So, click on ‘Pick Time’ at the bottom right corner of the screen. Then select the time and date you would like your video to go live.
Once the date is set, finally click on ‘Schedule’ to finish the process.
That’s it! Your YouTube video is now scheduled and will be published on your channel at the time you have set.
But which of these methods is best for you? Well, let’s compare OnlySocial with YouTube’s native scheduler so you can be the judge!
Comparing OnlySocial with YouTube’s Native Scheduling
|
Feature |
YouTube Native Scheduling |
OnlySocial |
| Scheduling Options | Allows scheduling directly within the YouTube platform. | Supports scheduling for YouTube videos and other social media platforms. |
| User Interface | Simple interface integrated into YouTube Studio. | User-friendly dashboard for managing multiple platforms. |
| Multi-account Management | Limited to the logged-in YouTube account. | Allows management of multiple YouTube accounts from one dashboard. |
| Content Calendar | No calendar view for scheduled videos. | Offers a comprehensive content calendar for all scheduled posts across platforms. |
| Bulk Scheduling | Videos must be scheduled individually. | Supports bulk scheduling, allowing multiple videos to be scheduled at once. |
| Analytics | Provides detailed analytics within YouTube Studio. | Offers basic cross-platform analytics, not limited to YouTube. |
| Recurring Posts | Does not support recurring video schedules. | Allows scheduling of recurring posts for easier content reposting. |
| Cost | Free for all YouTube creators. | Offers a 7-day free trial with a variety of paid plans. |
Detailed Comparison of Features
Scheduling Options
YouTube’s native scheduling allows you to schedule videos directly on the platform, which is convenient for those focused solely on YouTube.
However, OnlySocial extends this capability by allowing you to schedule content across multiple social media platforms from one place. This is especially useful for creators who manage more than just a YouTube channel.
User Interface
YouTube’s interface is straightforward and integrated within YouTube Studio, making it easy for users familiar with the platform.
In contrast, OnlySocial provides a user-friendly dashboard that simplifies managing content across various platforms.
This interface is designed to be intuitive, even for those who manage multiple accounts, making it easy to oversee all your social media activity in one place.
Multi-account Management
With YouTube’s native tools, scheduling is restricted to the account you’re logged into, which can be limiting if you manage multiple YouTube channels.
OnlySocial addresses this by allowing you to manage and schedule posts across several YouTube accounts simultaneously, all from a single dashboard.
This feature is a time-saver for those juggling multiple channels.
Content Calendar
YouTube’s scheduling lacks a calendar view, making it harder to visualize your content plan.
On the other hand, OnlySocial offers a comprehensive content calendar that displays all your scheduled posts across different platforms, including YouTube.
This feature provides a clear overview of your content strategy, helping you stay organized and on track.
Bulk Scheduling
YouTube requires you to schedule each video individually, which can be time-consuming. OnlySocial streamlines this process with bulk scheduling, allowing you to plan and schedule multiple videos at once.
Analytics
YouTube provides detailed analytics within YouTube Studio, giving you insights into how your videos perform on the platform.
While OnlySocial’s analytics are more basic, they cover multiple platforms, offering a broader view of your content’s performance across all your social media channels.
Recurring Posts
YouTube does not support the scheduling of recurring videos. In contrast, OnlySocial allows you to set up recurring posts, making it easier to repost popular content on a set schedule.
This feature is particularly useful for maintaining a consistent presence without having to manually repost content.
Cost
YouTube’s scheduling tools are free for all content creators, which is great for those just starting out. OnlySocial offers a 7-day free trial, with various paid plans that provide access to a broader range of features.
This, of course, makes it a valuable investment for serious content creators and social media managers.

YouTube Analytics – Key YouTube Metrics You Should Monitor
When it comes to managing a channel on YouTube, it’s more than just uploading videos and forgetting them there. There is a need to track your video performance on the platform.
This is important in helping you understand how your content resonates with your audience and how you should optimize future videos.
By monitoring key metrics, you can gain insights into what works and what doesn’t. it allows you to refine your content strategy and grow your channel more effectively.
Let’s take a quick look at some essential YouTube metrics you should keep an eye on.
#1: Views
The number of views your video receives is a fundamental metric that indicates its overall popularity.
While views alone don’t tell the full story, they provide a baseline for measuring the reach of your content.
Monitoring views over time can help you identify trends and understand which types of videos resonate most with your audience.
#2: Traffic Sources
You also need to understand where your viewers are coming from. This is very important.
Traffic sources show you how viewers are finding your videos – whether through YouTube search, external websites, social media, or suggested videos.
With this data at your disposal, you can focus your promotional efforts on the channels that drive the most traffic to your content.
#3: Average View Time
This metric measures how long viewers watch your video before clicking away. A higher average view time suggests that your content is engaging and holds the audience’s attention.
Monitoring this metric can help you identify the optimal video length and the points at which viewers might lose interest.
#4: Engagement
Engagement metrics, including likes, comments, shares, and subscriptions, reflect how actively your audience interacts with your content.
High engagement levels are often a sign of strong viewer interest and can improve your video’s visibility within YouTube’s algorithm.
If you manage a YouTube channel, you need to regularly monitor these key metrics we have mentioned.
They will help you make informed decisions to improve your YouTube strategy. You will be able to create more compelling content and ultimately grow your channel’s reach and influence.
How to Make the Most from Scheduling YouTube Videos
Scheduling your YouTube videos is more than just a time-saving tactic – it’s a strategic tool that can significantly enhance your channel’s performance.
To get the most out of scheduling, here are some tips to maximize its benefits:
Post at Optimal Times
Scheduling allows you to publish your videos when your audience is most active. Use YouTube analytics to determine the best times to post based on when your viewers are online.
By aligning your schedule with peak activity times, you can increase engagement and reach a wider audience.
Plan Your Content Calendar
With scheduling, you can plan your content well in advance.
Create a content calendar that outlines your video topics, posting dates, and any relevant events or holidays. This ensures a steady flow of content. That way, you can easily maintain consistency and keep your audience engaged.
Batch Create and Schedule
To save time and reduce stress, consider batching your content creation. Record multiple videos in one session and schedule them to be published over the coming weeks.
This approach keeps your channel active even when you’re busy with other tasks. You can bet you will never miss a posting deadline.
Leverage YouTube Analytics
After scheduling and publishing your videos, monitor their performance using YouTube Analytics.
Pay attention to the metrics we have discussed above to see how well your content is performing. Use these insights to tweak your strategy and improve future videos.
Promote Your Scheduled Content
Don’t just rely on YouTube’s algorithm to bring viewers to your scheduled videos. Promote your upcoming content on your social media channels, website, and email newsletters.
Let your audience know when a new video is about to go live to build anticipation and drive more views.
Use Custom Thumbnails and Compelling Titles
Your video’s thumbnail and title are the first things viewers see, so make them count.
Design eye-catching thumbnails and craft compelling titles that entice viewers to click. Even though the video is scheduled, these elements play a crucial role in attracting viewers once it’s live.
Experiment and Adapt
Don’t be afraid to experiment with different posting times, video lengths, and content styles. Scheduling gives you the flexibility to test what works best for your audience.
Keep track of the results and adapt your strategy based on what resonates most with your viewers.

FAQs
What happens when you schedule a YouTube video?
When you schedule a YouTube video, it’s uploaded to your channel but remains private until the scheduled date and time.
Once the scheduled time arrives, the video automatically goes public, making it available to your audience without you needing to manually publish it.
How can I privately schedule a video on YouTube?
To privately schedule a video on YouTube, follow the regular steps to upload and schedule your video. When selecting visibility, choose “Private” before setting the schedule.
This way, your video will be scheduled to go live at the designated time, but it will only be viewable by those you specifically share it with.
How far in advance can you schedule YouTube videos?
You can schedule YouTube videos up to one year in advance. This feature allows you to plan your content well ahead, ensuring a consistent posting schedule without worrying about future uploads.
Can I edit an already-scheduled YouTube video?
Yes, you can edit an already scheduled YouTube video. You can change details such as the title, description, thumbnail, or even the scheduled date and time.
Simply go to YouTube Studio, find your scheduled video, make the necessary edits, and save your changes.
How can I delete a scheduled video on YouTube?
To delete a scheduled video on YouTube, navigate to YouTube Studio and locate the video under “Content” in the “Scheduled” tab.
Click on the options menu (three dots) next to the video and select “Delete forever.” Confirm the deletion, and the scheduled video will be permanently removed from your channel.
How many videos can I schedule on YouTube?
There’s no set limit on the number of videos you can schedule on YouTube. You can schedule as many videos as you like.
Does scheduling a YouTube video affect views?
Scheduling a YouTube video does not negatively affect views. In fact, it can help improve viewership by ensuring your content is published at the optimal time when your audience is most active. The result is higher engagement and better overall performance.
Final Note
Now that you’ve seen how scheduling YouTube videos can be much easier than many people think, and the numerous benefits it offers, it’s time to take action.
Whether you choose to use YouTube’s native scheduler or opt for a third-party tool like OnlySocial for more functionality and flexibility, scheduling your content can help you a lot.
It can help you stay consistent, reach your audience at the best times, and free yourself from the stress of manual posting.
So, why not embrace the convenience and efficiency of scheduling, and start optimizing your content strategy today?
Remember, understanding how to schedule YouTube videos is a game-changer for any content creator looking to grow their channel and maintain a steady flow of high-quality videos.