How to Schedule Mastodon Thread – Step By Step

Let’s show you how to schedule Mastodon thread and get on the new Fediverse wave!
Mastodon is growing fast, especially after Twitter’s change in leadership which led many users to search for an alternative.
With features that closely resemble Twitter, Mastodon has quickly become a popular landing spot for those making the switch.
Recently, Mastodon took a step further in making the platform more homely for its users by adding the thread feature, much like Twitter’s version. This allow users to connect posts in a sequence just like they will on Twitter.
If you’re looking to build a strong presence on Mastodon, leveraging this thread feature is a smart move. Threads are great for storytelling, engaging followers, and keeping conversations going.
So, in this guide, we’ll walk you through the step-by-step process of how to schedule Mastodon threads to help you stay consistent and grow your influence on the platform. Just keep reading!
Table of Contents
Thread: The New Mastodon Feature
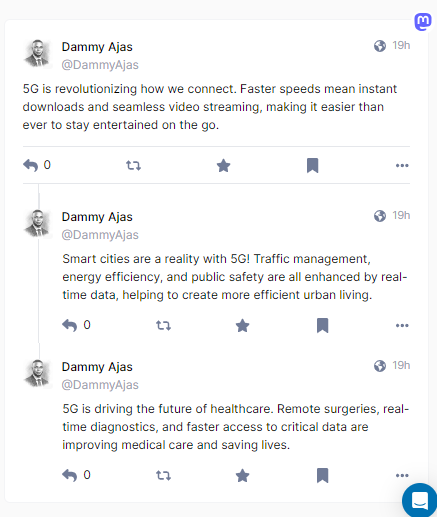
Mastodon has introduced a new feature – threads – which works much like Twitter’s, making it easier or users to share longer stories or a series of connected posts.
This addition allows you to break free from the character limit while keeping your thoughts organized.
Threads are great for sharing updates, tutorials, or in-depth insights without overwhelming your followers with one long post. That means with threads, you can engage your audience more effectively and keep them hooked on your content.
So, how do you create a thread on Mastodon?
It’s simple! Just like Twitter, you start by composing your first post and publishing it. Then, you reply to that post to add the next part of your thread. Continue replying to each post to build the full thread.
But here’s a neat difference – if your first post is public, you can make all the following ones Unlisted.
This way, users can still follow your entire thread by clicking on the first post without flooding their timelines with every update.
It’s a subtle but useful feature that keeps your followers engaged without overwhelming them.
So, Why Schedule Threads on Mastodon?
Well, consistency is key when it comes to growing your presence on any platform, and Mastodon is no different.
By scheduling your threads, you can maintain a regular flow of content without needing to be online all the time. Imagine having your most important posts go live when your audience is most active, even when you’re away.
Scheduling threads lets you plan ahead, keep conversations going, and stay top-of-mind with your followers. It’s a smart move that saves you time and helps you build meaningful engagement effortlessly.
However, like it is for scheduling posts on Mastodon, it can also be very tricky and cumbersome to schedule Mastodon thread.
To make the job easier, we will be using OnlySocial – a social media scheduling tool that takes off the stress of managing content posting across all social media platforms.
Let’s see how OnlySocial can help you schedule Mastodon threads.
How to Schedule Mastodon Thread with OnlySocial
Scheduling a Mastodon thread with OnlySocial is easy and efficient. Follow these simple steps to get your threads posted automatically:
Step 1: Connect Your Mastodon Account in OnlySocial
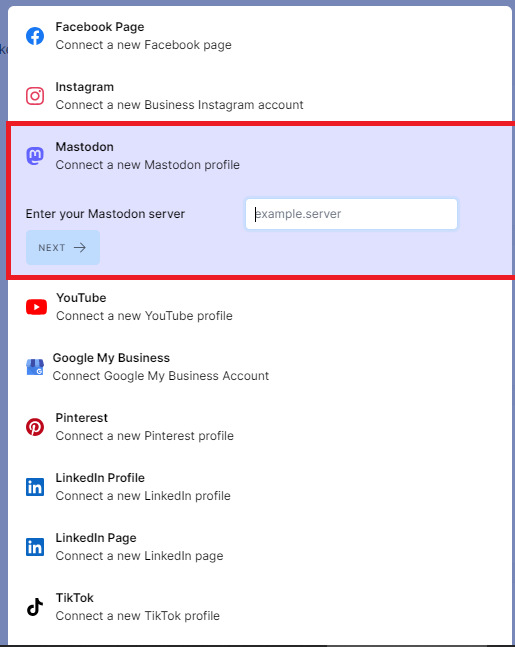
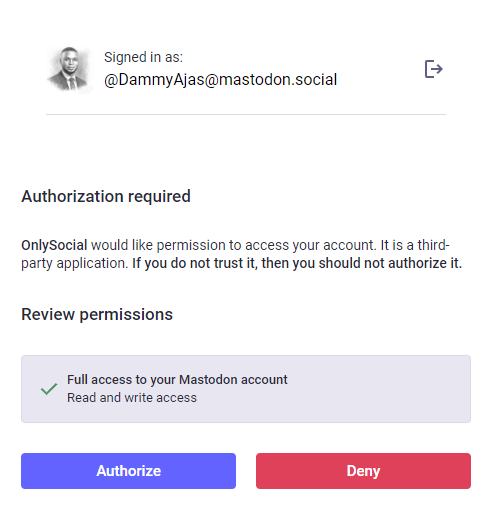
First, log into your OnlySocial account. On the left side of your dashboard, click on “Accounts.”
At the top, hit the ‘Add Account’ button and select Mastodon from the options. Follow the prompts to link your Mastodon account, and you’re ready to start scheduling.
Step 2: Create Your Mastodon Thread
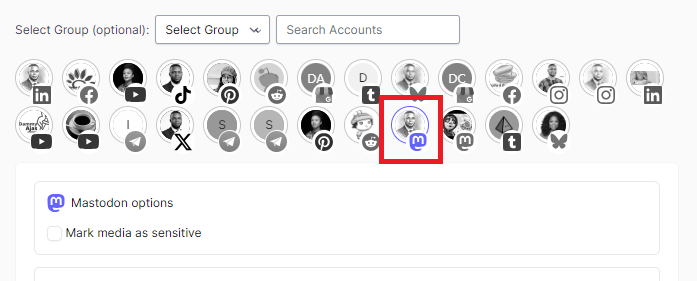
Once your Mastodon account is connected, it’s time to create your thread. Click on ‘Create Post’ in the top left corner of your dashboard.
Choose the Mastodon account you want to post to (OnlySocial lets you select multiple accounts if necessary).
In the text field, start composing your post. If you want to make your post more engaging, you can add images or videos using the media button at the bottom.
Step 3: Add Your Toots
To build your thread, compose your first toot. Then, click the ‘+’ icon at the bottom of the text field to add a follow-up toot.
This will open a new text field for your next toot in the thread. Continue clicking the ‘+’ icon to add more toots, with a limit of up to 25 per thread.
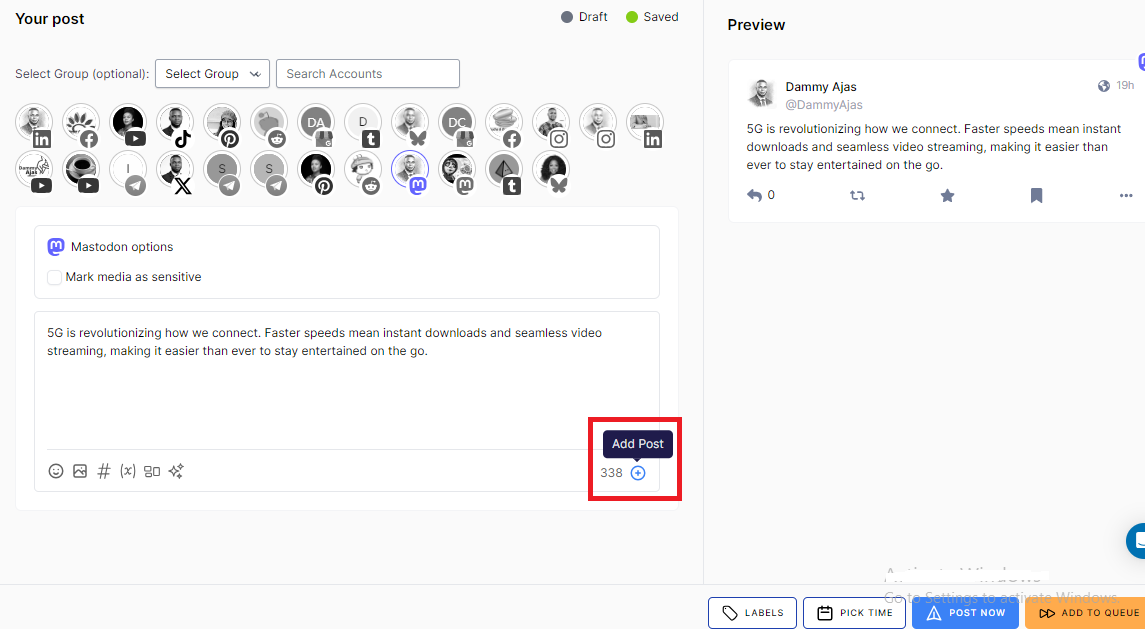
And just like scheduling Mastodon posts, you can also enrich your thread by adding images, GIFs, videos, hashtags, links, or @mentions to make your content more interactive.
Step 4: Schedule Your Thread
Once your thread is complete, scroll down and click on ‘Pick Time’ to open the scheduling calendar. Choose the exact date and time you want your thread to go live.

After setting the time, click ‘Schedule,’ and you’re all set!
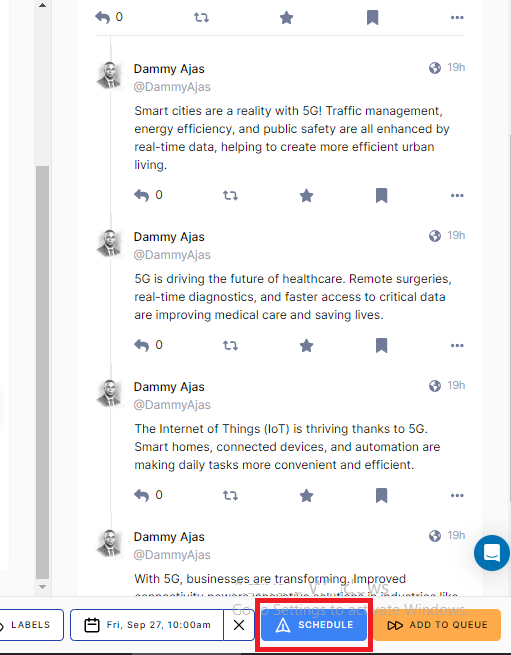
Your Mastodon thread will automatically post at your chosen time. You can now see how easy it can be to maintain a consistent and engaging presence on Mastodon.
Can You Edit Your Scheduled Thread on Mastodon?
Interestingly, you can edit your posts or threads on Mastodon even after scheduling them.
It happens; you might have scheduled a thread and later realize you need to tweak something. But that is not a problem at all – it’s super easy to make changes before your thread goes live.
That way, you can ensure your content is just the way you want it before it reaches your audience.
Here’s how to edit your scheduled toots:
Access Your Scheduled Posts:
Log into your OnlySocial account, and on the sidebar, click on ‘Posts.’ This will take you to a page where all your scheduled posts are listed.
Select the Post to Edit:
Scroll through your scheduled posts to find the thread you want to edit. Click on it to view the post details.
Enter Edit Mode:
A preview of your scheduled post will appear. At the bottom of this tab, you’ll see a ‘Pencil icon.’ Click on it to enter edit mode and make any necessary changes to your post or thread.
Reschedule the Post:
After you’ve made your adjustments, click on ‘Schedule’ again to confirm the changes. Your updated thread will now be saved and published at the scheduled time.
Other Interesting Mastodon Features You Should Know About
Mastodon may often be compared to Twitter, but it offers several unique features that really set it apart and enhance your social media experience. Curious to know some of them? Then you have it!
#1: Automatic Deletion of Old Posts
If you’re the type who likes to keep things neat and tidy, you’ll love Mastodon’s automatic post deletion feature.
Instead of manually scrolling through old posts to delete outdated content, you can set a time frame for automatic removal.
Whether it’s after a few weeks or a few months, Mastodon will clean up your timeline for you, keeping everything fresh and relevant.
#2: Edit Button
We’ve all had that moment where we post something, only to spot a typo or realize we missed a crucial point. Mastodon has your back with its edit button.
Instead of deleting and reposting, you can simply go back and fix those errors. It’s like a magic eraser for those little online slip-ups, allowing you to polish your posts without the hassle.
#3: Content Warnings for Sensitive Posts
Ever come across something you weren’t quite prepared to see? Mastodon helps prevent that with its content warning feature.
Before posting something sensitive, you can add a ‘Content Warning’ label, giving your followers the option to decide if they want to view it.
It’s like a little courtesy nudge before they dive into a post – perfect for handling topics that need a heads-up.
#4: Mute Feature
Need some peace and quiet without the drama of blocking or unfollowing? Mastodon’s mute feature lets you temporarily silence users or conversations without permanently removing them from your timeline.
Whether you’re overwhelmed by a flood of posts or just want a break, the mute feature gives you control over your feed without causing a stir.
Final Note
Now that you know how to schedule threads on Mastodon, it’s time to put this knowledge to work and boost your engagement and presence on the platform.
With the ability to plan and automate your threads, you can maintain a consistent posting schedule, reach your audience at the right times, and keep the conversation going without the stress of manual updates.
So, get started with scheduling, and watch your influence grow on Mastodon!
FAQs
How far in advance can I schedule a Mastodon thread?
With OnlySocial, you can schedule Mastodon threads as far in advance as you’d like!
Whether you’re planning content for the next day or the next month, OnlySocial allows you to set the exact date and time for your thread to go live, giving you full control over your posting schedule.
Does OnlySocial allow me to schedule the same thread to Mastodon and Twitter at once?
Yes, you can schedule the same thread to both Mastodon and Twitter simultaneously. This cross-platform scheduling feature saves you time by allowing you to manage content for multiple platforms in one go. That way, you can easily build consistency across your social media presence.
Can I schedule to multiple Mastodon accounts at once?
Absolutely! OnlySocial allows you to schedule posts and threads to multiple Mastodon accounts simultaneously.
If you manage several accounts, this feature makes it easy to create and publish content across all of them without the need to repeat the process for each account.
What is the downside of scheduling threads on Mastodon?
One potential downside of scheduling posts – not only on Mastodon but also on other social media platforms – is the lack of real-time interaction.
If you’re scheduling threads far in advance, you might miss the opportunity to engage in timely conversations or respond to trending topics.
How can I make my scheduled thread get more visibility?
To maximize the visibility of your scheduled Mastodon thread, make sure to use relevant hashtags, tag other users, and schedule your posts during peak engagement times when your audience is most active.
You can also add engaging elements like images or videos to make your thread more eye-catching and interactive. And don’t forget; sharing your thread across different platforms can increase its reach.