How to Schedule a Live Stream on YouTube – A Complete Guide
Live streaming is a powerful way for creators to connect with their audience in real-time.
Whether you’re a gamer, comedian, vlogger, or running a social media agency, YouTube Live offers an incredible platform to engage with your viewers directly and bring your content to life.
One of the best features of YouTube Live is the ability to schedule your live streams in advance. By scheduling your stream, you can build anticipation, and give your audience ample time to prepare and promote the event ahead of time.
This not only helps attract a larger audience but also gives you the chance to fine-tune your content, ensuring a smooth and captivating live experience for everyone who tunes in.
So, in this guide, we will be showing you how to schedule a Live stream on YouTube – 2 effective methods you can use. This will go a long way in making engaging with your audience on YouTube more seamless and effective.
Table of Contents
- 0.1 Can You Schedule a Live Stream on YouTube?
- 0.2 Scheduling a Live Stream on YouTube: What Do You Need?
- 0.3 How to Schedule a Live Stream on YouTube Through YouTube Studio
- 0.4 How to Schedule a Live Stream on YouTube Using a Third-Party Tool
- 0.5 Best Practices for a Successful Stream
- 1 Scheduling Pre-Recorded Videos: Things to Bear in Mind for the Best Results
Can You Schedule a Live Stream on YouTube?
Let’s get this straight first. The deal is that you can absolutely schedule a live stream on YouTube! And this comes with several benefits.
It helps build anticipation among your audience, giving them a chance to prepare and tune in when the stream goes live.
It also allows you to promote the event ahead of time, reaching a wider audience and increasing the chances of higher engagement.
There are two main ways to schedule a live stream on YouTube: using YouTube’s native scheduler or a third-party tool like OnlySocial.
YouTube’s native scheduler is built right into the platform, making it easy to set up your stream directly from your YouTube account.
However, if you’re looking for more advanced features and flexibility, a tool like OnlySocial can help you manage multiple streams, schedule across different platforms, and gain deeper insights into your audience’s engagement.
Scheduling a Live Stream on YouTube: What Do You Need?
Before you dive into scheduling your live stream on YouTube, there are a few essential steps you need to complete. Here’s what you need to get started:
Verify Your YouTube Account
The first step is to verify your YouTube account. Verification confirms your ownership and unlocks advanced features like live streaming and the ability to upload videos longer than 15 minutes.
To verify your account, visit youtube.com/verify and follow the on-screen instructions. You’ll need to provide a phone number as part of the process.
Enable Live Streaming in YouTube Settings
Once your account is verified, you’ll need to enable live streaming for your channel. Head over to YouTube Studio, access the settings menu, and navigate to the “Live Stream” section. From there, you can activate live streaming for your channel.
Have a Pre-Recorded Video Ready (If Applicable)
If you plan to schedule a pre-recorded video as a live stream, make sure your video is ready and meets YouTube’s recommended specifications for the best playback quality.
High-resolution videos that comply with YouTube’s guidelines will provide the best viewing experience for your audience.
Once you’ve completed these steps, you’re all set to schedule and publish your live stream. So, let’s go see the steps to follow.
How to Schedule a Live Stream on YouTube Through YouTube Studio
This is the first method we will be talking about. This method allows content creators on YouTube to easily schedule their live streams. To use this route, follow the steps below:
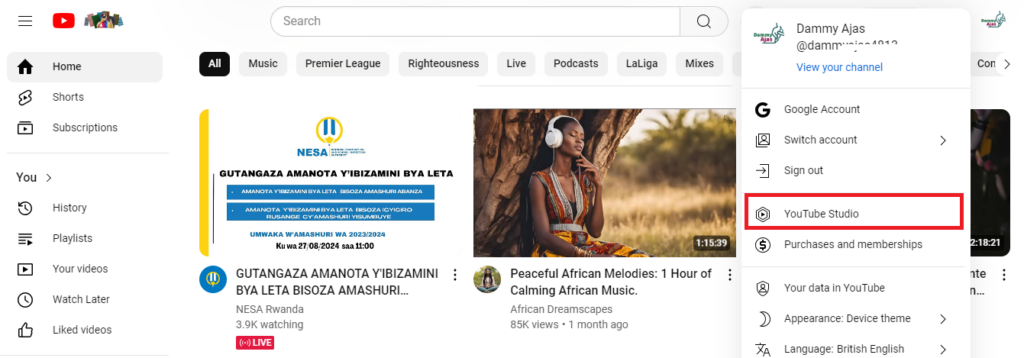
Step 1: Accessing YouTube Studio
Begin by logging into your YouTube account. Click on your profile picture in the top right corner, and from the dropdown menu, select “YouTube Studio.”
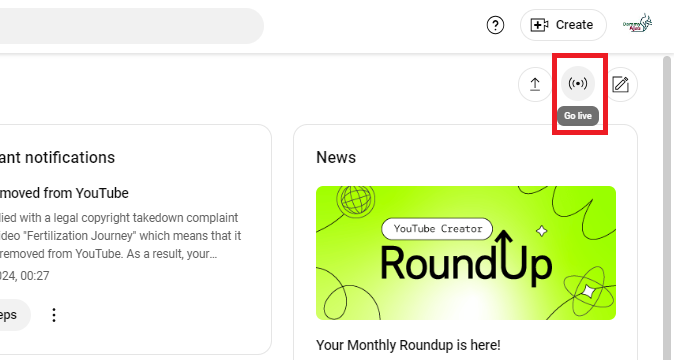
Step 2: Create Your Live Stream
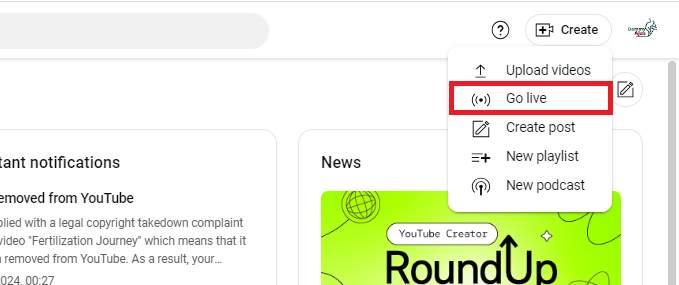
Once inside YouTube Studio, find the “Create” button at the top right to create a new live stream. This is represented by a camera icon with a plus sign.
Click on it and then select “Go Live” from the options to start setting up your live stream.
Step 3: Add the Necessary Details
Now it’s time to make your live stream shine. So add the necessary details to your stream. This includes the title, description, and thumbnail. You will also need to set the privacy settings for the stream. Below is what each of these entities means, so you know how to do it right:
- Title: This is the title of the stream, and it’s very important for engagement. So, craft a clear and compelling title that includes relevant keywords to boost visibility.
- Description: This is meant to provide a detailed description of your live stream, including any important information, sources, or hashtags.
- Thumbnail: Select a vibrant and eye-catching thumbnail that will grab viewers’ attention at first glance.
- Privacy Settings: Choose the audience for the stream. You can choose from Public, Unlisted, or Private, depending on who you want to reach.
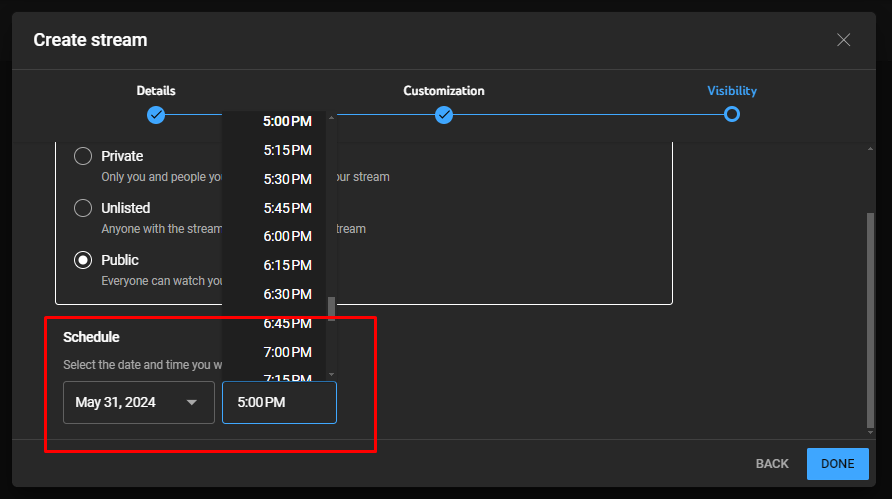
Step 4: Scheduling Your Stream
Now, it’s time to schedule the stream and have it published automatically on your set date and time. So, set the date and time for your live stream using the calendar that is displayed on the screen.
To maximize participation, schedule your stream for when your audience is most active. You can leverage YouTube Analytics here to know the best times to go live.
Now, that you know how to schedule a live stream on YouTube using the platform’s native scheduler, let’s see the second method of getting this done.
How to Schedule a Live Stream on YouTube Using a Third-Party Tool
If you’re planning to schedule a pre-recorded video for your live stream, using a third-party tool like OnlySocial can offer enhanced flexibility and control.
Here’s how to do it:
Step 1: Login and Connect Your YouTube Account
Begin by either creating a new account with OnlySocial or logging into your existing one.
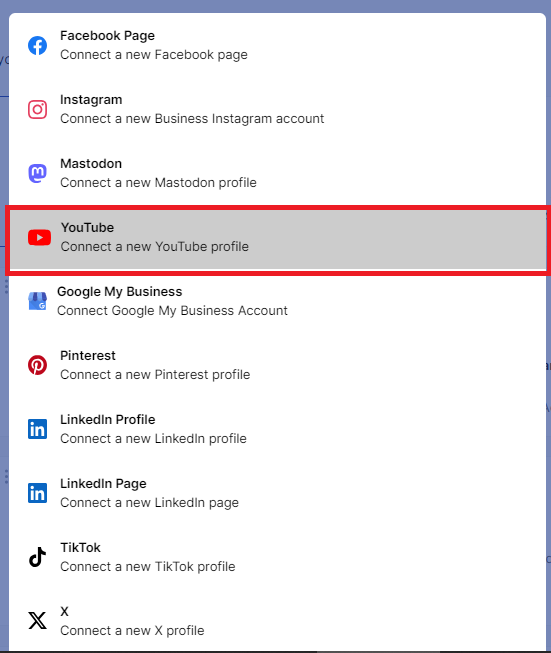
Once you’re logged in, link your YouTube channel to OnlySocial by clicking on “Account” on the sidebar of your dashboard.
If you manage multiple YouTube profiles, you can link them all here. That means if you plan to schedule the stream across all your channels, you can do that from one centralized dashboard.
Step 2: Create Your Live Stream Post
After adding your YouTube accounts, click on ‘Create Post’ at the top left corner of the dashboard.
Here, you can upload your pre-recorded video that you want to stream live. Select which YouTube accounts you’d like to schedule the stream to – you can choose multiple accounts if needed.
Step 3: Add Necessary Details
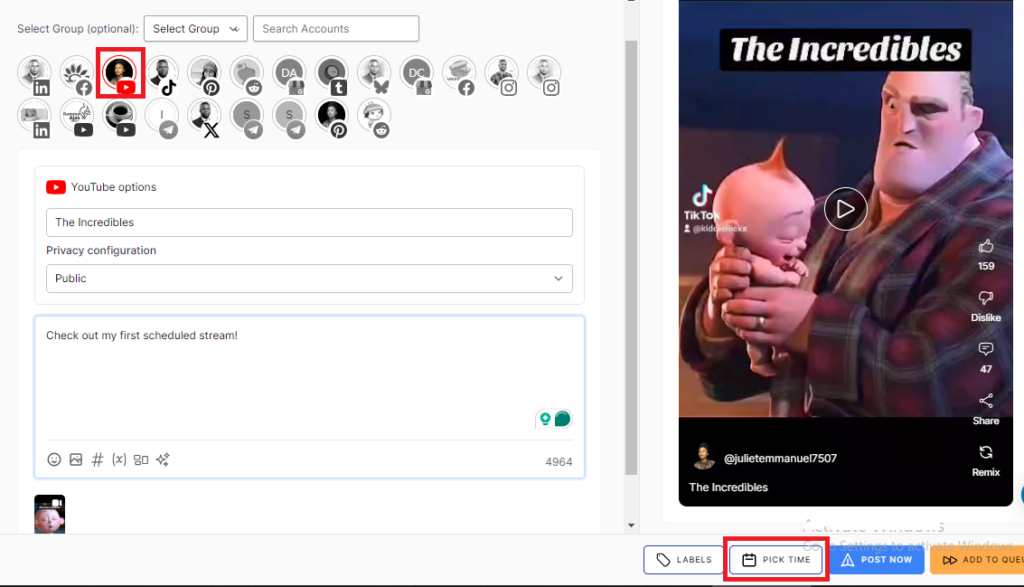
Upload your video using the media icon at the bottom of the text field. Then, fill in essential details like the video title, description, and relevant tags. Don’t forget to set the privacy settings here too.
Step 4: Schedule Your Live Stream
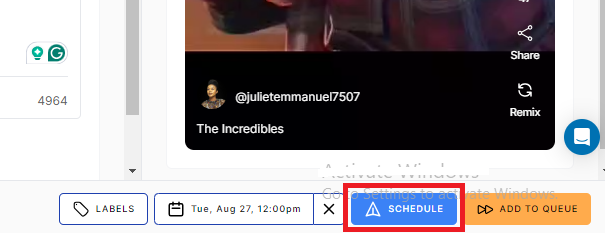
Once you’re satisfied with the details, click on “Pick Time” at the bottom right of the screen to choose when your live stream should go live.
A calendar will appear, allowing you to select the best time for maximum audience engagement. After setting the time, click on “Schedule” to finalize everything.
And that’s it! You’ve successfully scheduled your pre-recorded video to go live at the optimal time. It provides an excellent way to reach the maximum number of viewers with your video.
Best Practices for a Successful Stream
To ensure your live stream on YouTube is a hit, follow these best practices:
#1: Test Your Equipment in Advance
Before going live, make sure all your equipment, including your camera, microphone, and internet connection, are working properly. A quick test run can help you avoid technical glitches during the actual stream.
#2: Promote Your Stream Ahead of Time
Build anticipation by promoting your live stream on social media, email newsletters, and your YouTube channel well in advance. This will give your audience enough time to prepare and ensure a larger turnout.
#3: Engage with Your Audience
Interaction is key to a successful live stream. Encourage viewers to participate by asking questions, responding to comments, and giving shout-outs.
This not only keeps the audience engaged but also makes the experience more interactive and enjoyable.
#4: Stick to a Schedule
Consistency is crucial. If you plan to stream regularly, stick to a schedule so your audience knows when to tune in. Regular streaming builds a loyal viewer base over time.
#5: Optimize Your Stream for SEO
Use relevant keywords in your title, description, and tags to make your stream more discoverable. This helps attract more viewers, even after the live event is over.
#6: Have a Backup Plan
Unexpected issues can arise, so always have a backup plan. This could be an alternative internet connection, a secondary camera, or even a backup recording of your stream.
Being prepared for any hiccups will help you stay calm and keep your stream running smoothly.

Scheduling Pre-Recorded Videos: Things to Bear in Mind for the Best Results
Timing is Everything
Schedule your video to go live at a time when your audience is most active. Use YouTube Analytics to determine when your viewers are usually online, and schedule your stream accordingly to maximize engagement.
Optimize Video Quality
Ensure your pre-recorded video is of high quality, both in terms of resolution and content. A clear, well-edited video will keep viewers engaged and reflect positively on your brand or channel.
Craft an Engaging Thumbnail
Your video’s thumbnail is the first thing viewers will see, so make it count. Use eye-catching visuals and text to attract attention and encourage clicks.
Promote Ahead of Time
Just like with live streams, promoting your pre-recorded video ahead of its scheduled time is crucial. Use social media, email newsletters, and other channels to build anticipation and ensure a strong turnout.
Monitor and Engage
Even though the video is pre-recorded, be available to engage with your audience during the stream. Respond to comments in real time and encourage interaction to make the experience more dynamic and interactive.
Final Note
Scheduling a live stream on YouTube can significantly enhance your content strategy by allowing you to plan, promote, and engage with your audience more effectively.
Now that you know how to schedule your streams, whether using YouTube Studio or OnlySocial, it’s time to put this strategy into action.
Start scheduling your live streams today to maximize your reach and create a more impactful viewing experience for your audience.
FAQs
Do I need to verify my YouTube account to schedule a live stream?
Yes, this is a very important step you need to first take before you can schedule a live stream. Verification unlocks essential features on the platform, including being able to do and schedule live streams.
How long does YouTube verification for scheduling live streams take?
YouTube verification typically takes a few minutes to complete. Once you provide your phone number and follow the on-screen instructions, you should be verified almost instantly, allowing you to access live streaming features.
What is the best time to schedule a live stream?
The best time to schedule a live stream depends on your audience’s habits. Generally, evenings and weekends tend to be popular times, but you should use YouTube Analytics to identify when your specific audience is most active and schedule accordingly.
Why is my scheduled stream not getting enough views?
If your scheduled stream isn’t attracting enough views, it could be due to insufficient promotion, poor timing, or a lack of engagement.
Make sure to promote your stream ahead of time, schedule it for when your audience is most active, and engage with your viewers during the stream to boost participation.
Can I edit my videos after they are already scheduled?
Yes, you can edit your scheduled videos on YouTube before they go live. You can adjust the title, description, thumbnail, and even the scheduled time if necessary.
However, once the video is live, your editing options will be more limited.