How to Plan and Schedule Posts on Instagram – A Complete Guide
Let’s talk about how to plan and schedule posts on Instagram!
Managing Instagram accounts can be time-consuming, especially when trying to maintain a consistent posting schedule.
Whether you’re handling one account or multiple, scheduling posts can take the stress out of daily content creation, allowing you to focus on more important aspects of your business.
No more scrambling for last-minute posts – just a well-planned, consistent presence on the platform.
In this guide, we’ll walk you through the best methods for scheduling Instagram posts in 2025, so you can stay ahead of the game and keep your audience engaged.
Table of Contents
- 1 First, Why You Should Schedule Instagram Posts
- 2 Can You Schedule Instagram Posts Natively – Using the Instagram App?
- 3 How to Plan and Schedule Posts on Instagram Using Meta Business Suite
- 4 4 Instagram Scheduling Tips and Best Practices
- 5 FAQs
- 5.1 Why can’t I schedule posts on Instagram?
- 5.2 Can I schedule posts to multiple Instagram profiles at the same time?
- 5.3 Can I edit already scheduled posts on OnlySocial?
- 5.4 Does OnlySocial support other social media platforms?
- 5.5 Can I schedule Instagram posts in bulk?
- 5.6 Can I schedule IG posts 2 months in advance?
- 5.7 What is the best time to post on Instagram?
- 6 Final Note
First, Why You Should Schedule Instagram Posts
Before we dive into the details of how to schedule Instagram posts, let’s first explore some of the key benefits of doing so.
Scheduling your Instagram posts offers a range of advantages that can help you manage your account more effectively and boost your online presence.
Here are some of the top reasons to consider:
- Consistent Posting
Scheduling ensures that your content goes out regularly. This helps you maintain a steady presence on Instagram.
Consistency is key when it comes to keeping your audience engaged and growing your following. That makes scheduling an important tool you shouldn’t neglect.
- Time Management
By planning your posts in advance, you free up time to focus on other important aspects of your business. This eliminates the need to create and post content on the fly, reducing stress and improving efficiency.
- Reach Optimal Posting Times
The best way to maximize engagement on Instagram is to post at times when your audience is most active. And that is one of the benefits scheduling posts offers you. You can analyze when your followers are online and plan your posts to go live during those peak hours.

- Better Content Planning
With the ability to schedule, you can plan your content strategy more effectively. This helps you in creating a balanced mix of promotional, educational, and entertaining posts. That way, you can ensure a well-rounded presence on Instagram.
- Avoid Last-Minute Panic
No more rushing to create a post at the last minute. Scheduling allows you to plan ahead, ensuring that you always have content ready to go, even during busy periods.
- Enhanced Analytics
When you schedule your posts, you can better track their performance over time. This helps you make data-driven decisions and refine your content strategy to achieve better results.
So, if you have not been leveraging scheduling on your Instagram profile, you are definitely missing out on many goodies.
Now, let’s see how to plan and schedule posts on Instagram.
While there are a few ways to schedule posts on Instagram, using a third-party scheduler can provide a host of additional benefits that make the process even more efficient. So this is where we’re going to start.
However, among the many scheduling tools available, OnlySocial stands out as a top choice for many Instagram business owners.
It’s not just about Instagram; the tool allows you to manage and schedule posts across multiple social media platforms from one convenient dashboard.
OnlySocial simply offers unmatched flexibility and opportunities when it comes to scheduling Instagram posts.
Whether you’re managing one account or several, this one-stop tool makes it easy to plan, create, and schedule posts for multiple Instagram accounts at the same time.
You can maintain a consistent presence across all your profiles without the hassle of logging in and out of different accounts.
Just keep reading to see exactly how you can use OnlySocial to streamline your Instagram scheduling and make the most out of your social media strategy.
Steps to Schedule Posts on Instagram Using OnlySocial
Step 1: Connect Your Instagram Profile to OnlySocial
Begin by logging into your OnlySocial account. If you don’t have an account yet, you can easily sign up and get started.
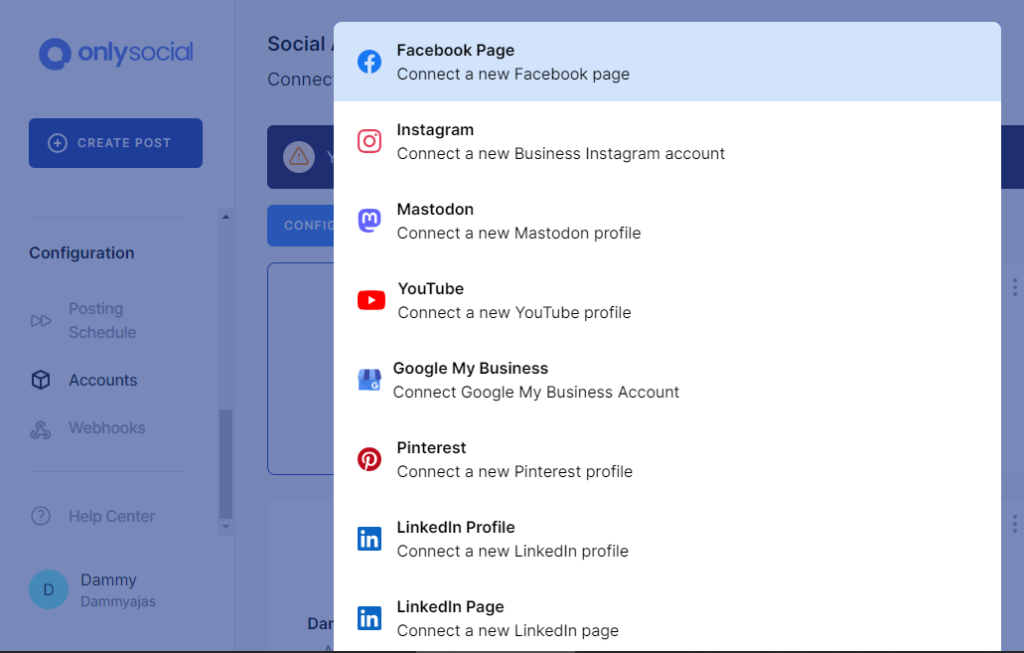
Once logged in, the first step is to connect your Instagram Business account to OnlySocial. This will allow you to manage and schedule posts directly from the platform.
On your dashboard, navigate to the ‘Accounts’ section on the left side of the screen. Then click on ‘Instagram’ and follow the prompts to connect your account.
Step 2: Compose Your Post
With your Instagram Business account connected, it’s time to create your post. Click on the ‘Create Post’ button in the sidebar to begin.
If you have multiple Instagram accounts linked to OnlySocial, you can select one or more accounts to post to simultaneously.
In the text field provided, add your copy for the post. You can also add images or videos to make your post more engaging by using the options at the bottom of the field.
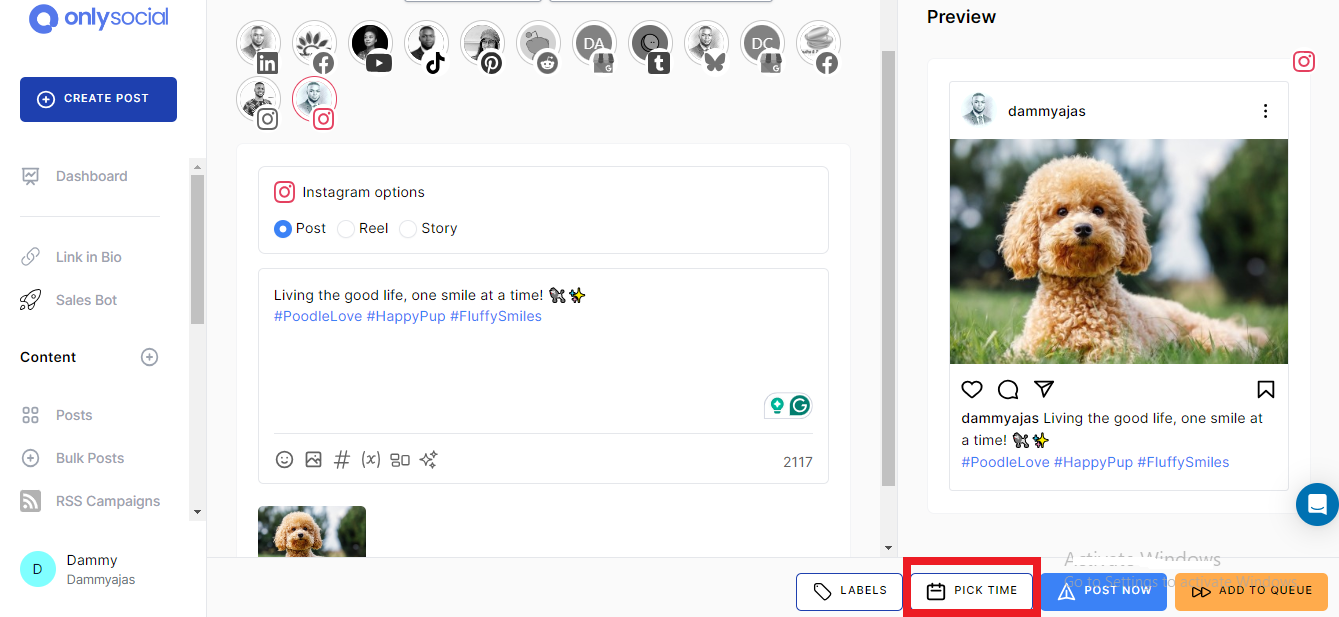
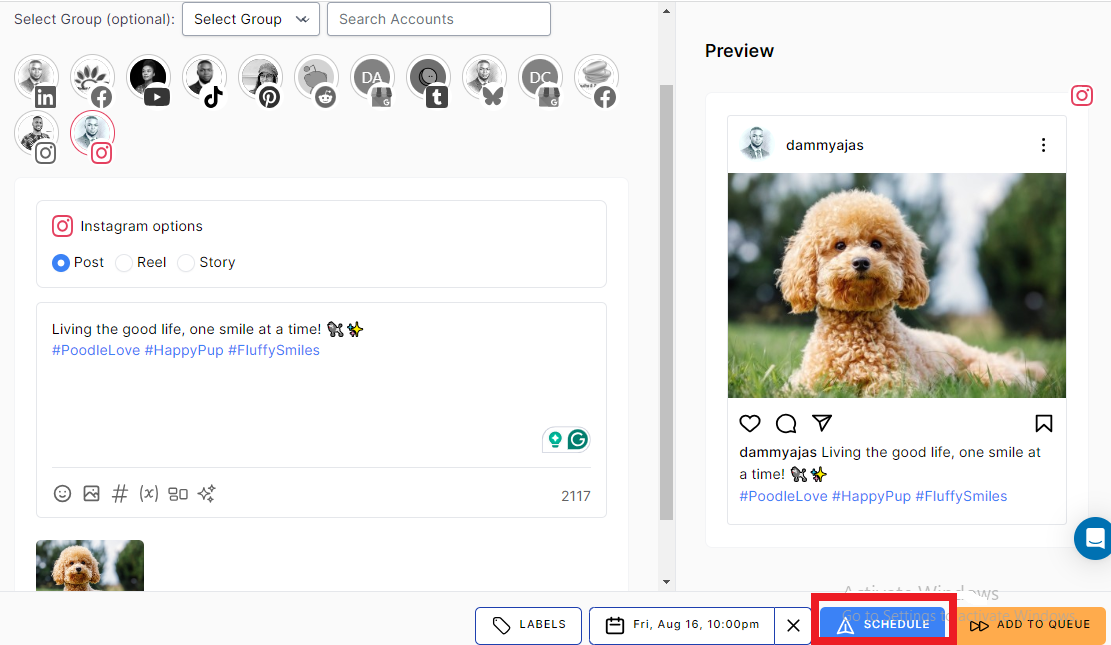
Step 3: Schedule Your Instagram Post
Once you’re happy with your post, scroll to the bottom of the screen and click on ‘Pick Time’.
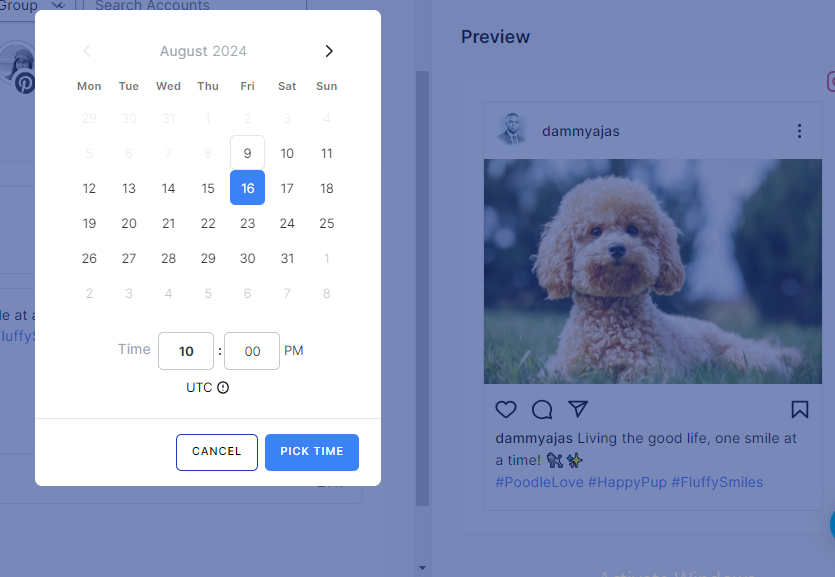
A scheduling box will appear, allowing you to choose the exact time and date you want your post to be published. After setting the time, simply click the ‘Schedule’ button at the bottom of the screen.
And that’s it! You’ve successfully scheduled your Instagram post to go live at your chosen time.
You can review your scheduled posts in the OnlySocial Planner. From there, you can also edit them before they go live.
Can You Schedule Instagram Posts Natively – Using the Instagram App?
While tools like OnlySocial offer a seamless and flexible way to schedule your Instagram posts, they aren’t the only option available.
You can also schedule posts directly within the Instagram app itself.
This native scheduling feature is handy if you prefer to keep everything within the Instagram ecosystem.
Of course, it has its limitations; including having a limit to the number of posts you can schedule a day and how far you can schedule your posts in advance.
Also, to use Instagram to schedule posts, you have to be running a Professional or Business account.
You cannot schedule posts from a personal profile.
So, if your account is personal, you will have to first switch to a professional or business account.
Here is how to do that:
- Open the Instagram app and tap on your profile picture in the bottom right corner to go to your profile page.
- Right under your profile picture, tap on the ‘Edit profile’
- Then scroll down to find ‘Switch to Professional Account’ and tap on it. Now, follow the prompts to switch your account to either a ‘Creator’ or ‘Business’ account and complete the setup.
Now that you have a professional account, follow the steps below to schedule posts on the Instagram app:
Step 1: Create a new post
The first thing to do is to tap the + icon at the bottom of the screen to create a new post just as you would for any post. So don’t worry if this sounds really familiar.
Now, select the photo or video you would like to use in your new post. Remember to keep everything on-bright, right. So, add your desired captions, filters, and filters.
When you are happy with your post, tap ‘Next’ on iOS or hit the arrow button on Android.
Step 2: Schedule your post
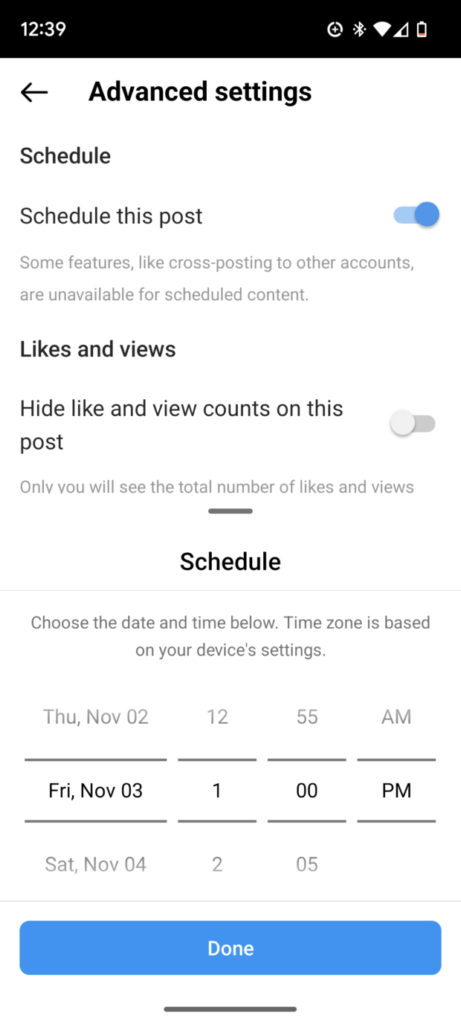
Scroll down to the bottom of the screen and tap the ‘Advanced settings’ button.
Then toggle the ‘Schedule’ switch on and choose the date and time you want your post to go live. You can go as far as 75 days into the future. Once you have chosen the scheduled date and time, tap on ‘Done’.
Step 3: Share your post
Now, hit the back arrow to go to the main post editing screen. There, tap on the ‘Schedule’ button to finally schedule your Instagram post.
How to Plan and Schedule Posts on Instagram Using Meta Business Suite
Another way to schedule Instagram posts is through Meta Business Suite.
It also presents an easy and straightforward method to schedule Instagram posts, including Stories and Reels.
However, to use this method, you will need to have a Facebook page and have it linked to your Instagram account.
So, if you don’t have a Facebook page yet, you will need to first create one.
Once you’re all set up, follow the walkthrough below.
Step 1: Open Instagram and link your Facebook page
- Start by opening the Instagram app and navigating to your profile.
- Tap ‘Edit Profile’ and scroll down to ‘Public Business Information’
- Under this section, select ‘Page.’ Choose an existing Facebook Page from the list, or create a new one if necessary.
- Follow the prompts to link your Instagram account to your Facebook Page.
Step 2: Go to your Facebook page
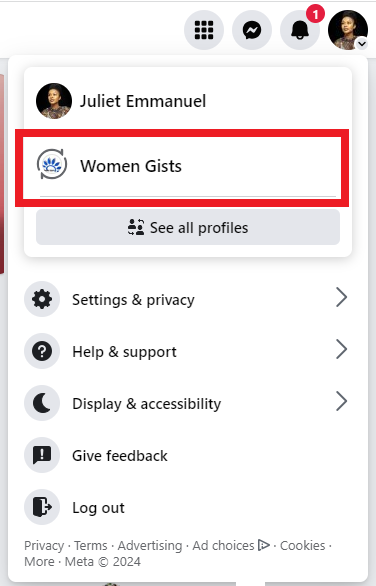
Once you’re logged into your Facebook account, navigate to your Facebook page.
To find this, click on your profile picture in the right corner of the page. Now, click on the smaller profile picture at the bottom to go to your page.
Step 3: Open Meta Business Suite
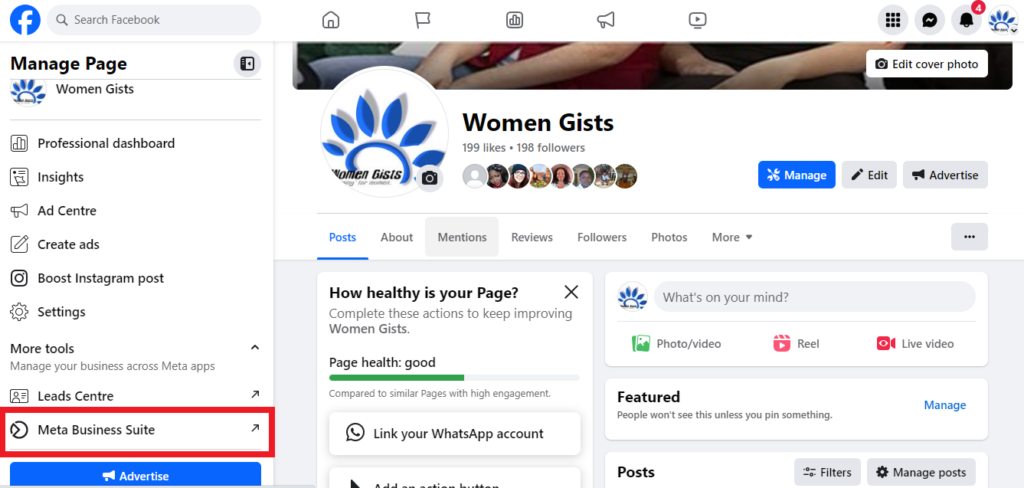
From your business Facebook page, find the Meta Business Suite button on the left hand side of the page. Click on it to open the Meta Business Suite page in another tab.
Step 4: Create your post
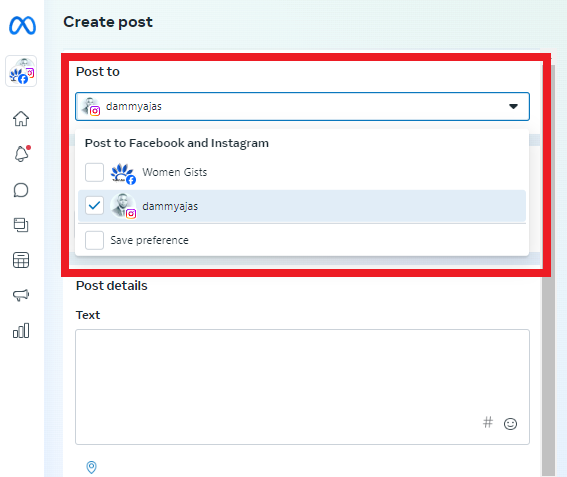
From the Meta Business Suite homepage, click on ‘Create Post’.
To the right on this button are also some other options that allow you to choose whether you would like to create a Story or Reel instead.
Choose your Instagram account under ‘Post to’ and start composing your post in the text field provided on the screen.
You can add images, videos, and stickers to further make your post engaging.
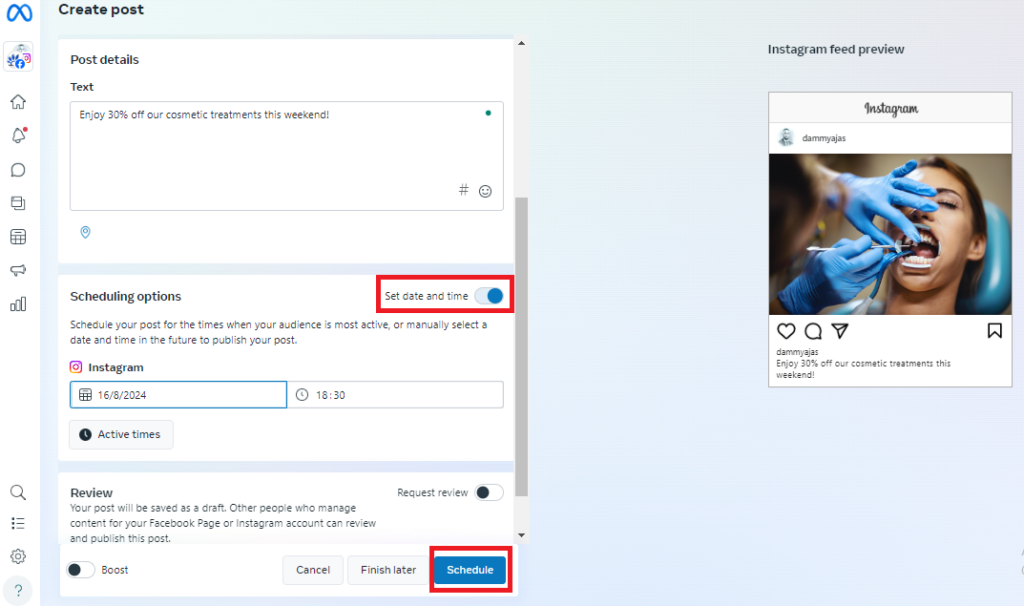
Step 5: Schedule your post
Once you’re happy with the preview of your post or Story, scroll down and toggle next to ‘Set date and time’.
Set the desired time you would like the post to go live. Once that is all set, finally click on ‘Schedule’ to schedule your Instagram post.
4 Instagram Scheduling Tips and Best Practices
Scheduling your Instagram posts is a powerful way to maintain a consistent and engaging presence on the platform.
However, to truly maximize the impact of your scheduled posts, it’s important to follow some best practices.
Before we round up this post about how to plan and schedule posts on Instagram, let’s quickly see some tips you can implement in this regard.
#1: Post at Your Best Time
One of the biggest advantages of scheduling is the ability to post when your audience is most active.
To identify the best times to post, use Instagram Insights or other analytics tools to analyze when your followers are online.
Posting during these peak hours can significantly increase engagement rates, helping your content reach more people.
Remember, what works for one account may not work for another, so tailor your posting times based on your specific audience’s behavior.
#2: Create a Strong Visual First Impression
Instagram is a visual platform, and first impressions matter.
When scheduling your posts, make sure your images or videos are high-quality and aligned with your brand’s aesthetic.
A visually striking post is more likely to grab attention as users scroll through their feeds.
Consider using OnlySocial’s built-in editor or other tools to enhance your visuals before scheduling them. Remember, your visual content is the first thing people see, so make it count.
Don’t forget to use relevant and targeted hashtags in your posts. This can help increase the visibility of the posts to users who are not already following you.
When scheduling your posts, research and include a mix of popular, niche, and branded hashtags that relate to your content.
This strategy helps your posts reach a broader audience and attract more engagement. Just be careful not to overdo it – around 5 to 10 well-chosen hashtags usually work best.
#:4 Include SEO Keywords in Your Captions
Instagram is increasingly becoming a search engine in its own right, with users searching for content using keywords.
When you include SEO-friendly keywords in your captions, you can enhance the discoverability of your posts.
When scheduling, take the time to craft captions that are not only engaging but also optimized with relevant keywords.
This practice helps your content appear in more search results, thereby attracting more views and interactions.

FAQs
Why can’t I schedule posts on Instagram?
If you’re unable to schedule posts on your Instagram account, it could be due to a few reasons.
First, ensure you have a Business or Creator account, as personal accounts don’t have access to scheduling features.
Additionally, make sure your Instagram app or scheduling tool is up to date. If you’re still having trouble, check your account settings to ensure everything is configured correctly for scheduling.
Can I schedule posts to multiple Instagram profiles at the same time?
Yes, with tools like OnlySocial, you can easily schedule posts to multiple Instagram profiles simultaneously.
This feature is especially useful for managing multiple accounts, allowing you to streamline your content strategy and maintain consistency across all your profiles.
Can I edit already scheduled posts on OnlySocial?
Absolutely! OnlySocial allows you to edit posts that have already been scheduled.
If you need to change the content, time, or date of a post, simply access your scheduled posts in the Planner section, make the necessary adjustments, and save the changes.
This flexibility ensures your content remains up-to-date and aligned with your strategy.
Yes, OnlySocial is a comprehensive social media management tool that supports multiple platforms, including Facebook, Twitter, LinkedIn, Pinterest, and more.
This means you can easily manage and schedule posts across various social media channels from a single, unified dashboard.
Can I schedule Instagram posts in bulk?
Yes, OnlySocial allows you to schedule Instagram posts in bulk.
This feature is perfect for planning out your content in advance, saving you time and ensuring a consistent posting schedule.
Bulk scheduling is especially helpful if you have a lot of content to share and want to automate the process.
Can I schedule IG posts 2 months in advance?
Yes, you can schedule Instagram posts up to 75 days in advance using OnlySocial. This extended scheduling window gives you plenty of time to plan and prepare your content, ensuring your posts are timely and relevant.
What is the best time to post on Instagram?
The best time to post on Instagram varies depending on your audience.
Generally, the most effective times are during peak activity hours, such as early mornings (7-9 am), mid-afternoons (1-3 pm), and evenings (7-9 pm).
However, it’s important to use Instagram Insights or other analytics tools to determine when your specific audience is most active and tailor your posting schedule accordingly.
Final Note
If you are looking to maintain a consistent and engaging presence on Instagram, you need to leverage post scheduling.
Whether you’re managing a single account or multiple profiles, OnlySocial makes it easy to plan, create, and schedule your content well in advance.
We have supplied you with effective tips and best practices in this guide. Leverage them to make sure your posts reach the right audience at the right time.
This can go a long way in helping you grow your brand and connect with your followers more effectively.
Take control of your Instagram strategy today and start scheduling your posts for a more organized and impactful social media presence.