How to Add Music to Facebook Posts: A Step-by-Step Guide
You’ve probably seen it happen. Two people post similar photos on Facebook, but one attracts far more likes, comments, and shares than the other. Sometimes, the difference isn’t the photo at all. It’s the music that accompanies it.
The right soundtrack can make a travel photo feel more exciting, turn a simple memory into a story, or help your content stand out as people scroll through their feeds.
It’s a small addition that can make a noticeable difference in how people engage with your post.
In this guide, you’ll learn how to add music to Facebook posts, photos, and videos. You’ll know what to do if the music option isn’t showing up.
Table of Contents
- 1 Can You Add Music to a Facebook Post?
- 2 How to Add Music to a Facebook Photo Post
- 3 How to Add Music to a Facebook Video Post
- 4 How to Add Music to Facebook Reels
- 5 How to Add Music to Facebook Stories
- 6 How to Add Music to Your Facebook Profile
- 7 Tips for Getting Better Results with Music on Facebook
- 8 Why Can’t You Find the Music Option on Facebook?
- 9 Take Your Facebook Strategy Further With OnlySocial
- 10 Final Thoughts
- 11 FAQs
- 11.0.1 Can I add music to a Facebook post after posting?
- 11.0.2 Why is the music option missing on my Facebook Page?
- 11.0.3 Is Facebook music copyrighted?
- 11.0.4 How do I add music to a Facebook post on a laptop?
- 11.0.5 Can you see who viewed the music on your Facebook profile?
- 11.0.6 Why can’t I add music to my Facebook post?
Can You Add Music to a Facebook Post?
Yes, but there’s one thing to know first: not every type of Facebook post supports music.
While Facebook lets you add songs to photos, videos, Stories, and Reels, the options available depend on where you’re posting and what type of account you’re using. That’s why some people see the music option immediately, while others can’t find it at all.
Here’s how it works.
Personal Profiles vs. Facebook Pages
If you’re posting from a personal Facebook profile, you’ll have access to most of Facebook’s music features. You can add songs to photo posts, videos, Stories, and Reels using Facebook’s built-in music library.
Things are a little different for Facebook Pages.
Business Pages often have limited access to popular songs because of music licensing rules. In some cases, you’ll see a smaller music library, while in others, the music option may not appear at all.
If you’re managing a brand or business Page, it’s usually best to use Facebook’s royalty-free audio library or your own original audio to avoid copyright issues.
Where You Can Add Music
Facebook currently supports music in several types of content:
- Photo posts – Add a music clip before publishing to make your photo more engaging.
- Video posts – Include background music while creating or editing your video.
- Stories – Use Facebook’s Music sticker to add songs, lyrics, and album artwork.
- Reels – Access Facebook’s largest music library to pair trending songs with short-form videos.
Each format offers a slightly different experience, but they all allow you to make your content more dynamic.
What You Can’t Do
There are a few limitations worth knowing.
Once a Facebook post has been published, you can’t add music to it later. If you want your post to include a soundtrack, you’ll need to add it before you hit Publish.
Music availability also varies by country. Due to licensing agreements, some songs may not be available in your region, even if they’re accessible elsewhere. If that’s the case, try searching for an alternative track or use Facebook’s royalty-free music collection instead.
How to Add Music to a Facebook Photo Post
Adding music to a Facebook photo only takes a minute, and you can do it directly from the Facebook mobile app. Here’s how.
Step 1: Create a New Photo Post
Open the Facebook app on your smartphone and tap the Photo option in the post composer. Then select the photo you want to share from your gallery.
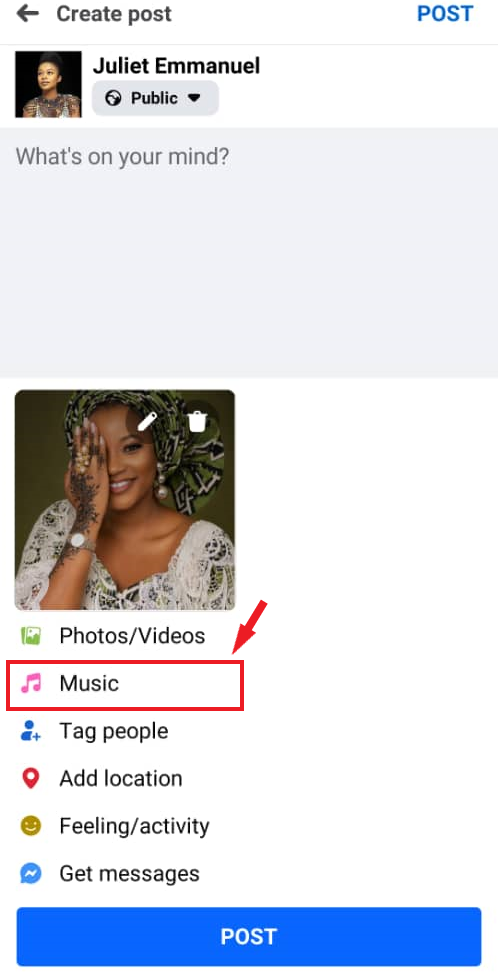
Step 2: Tap the Music Option
After choosing your photo, look for the Music button near the editing options. Tap it to open Facebook’s built-in music library.
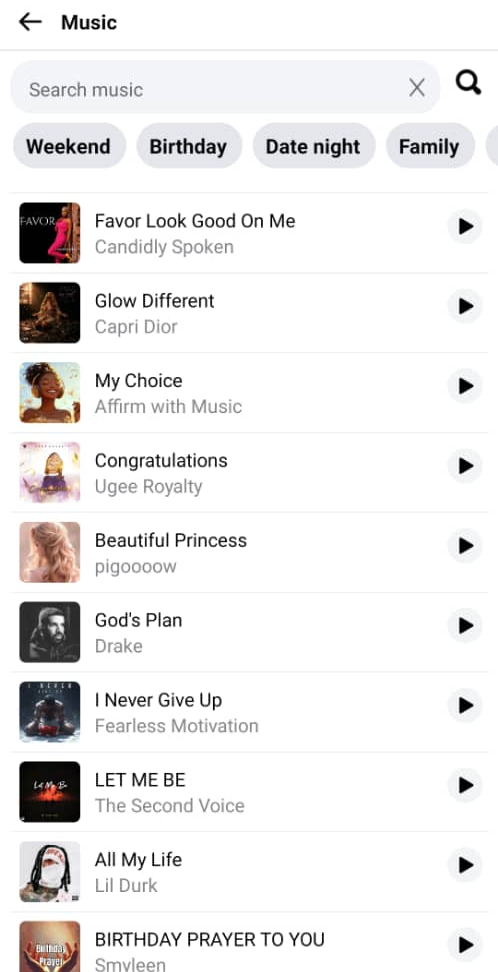
Step 3: Choose a Song
Browse through the suggested tracks or use the search bar to find a specific song, artist, genre, or mood. Once you find a track you like, tap it to continue.
Step 4: Select the Part of the Song
Facebook doesn’t add the entire song to your photo post. Instead, you’ll see a slider that lets you choose the exact section you want people to hear.
Move the slider until you’ve selected the best clip, then tap Done to save your selection.
Step 5: Add Your Caption and Publish
Finish your post by writing a caption, adding hashtags if you’d like, and making any final edits.
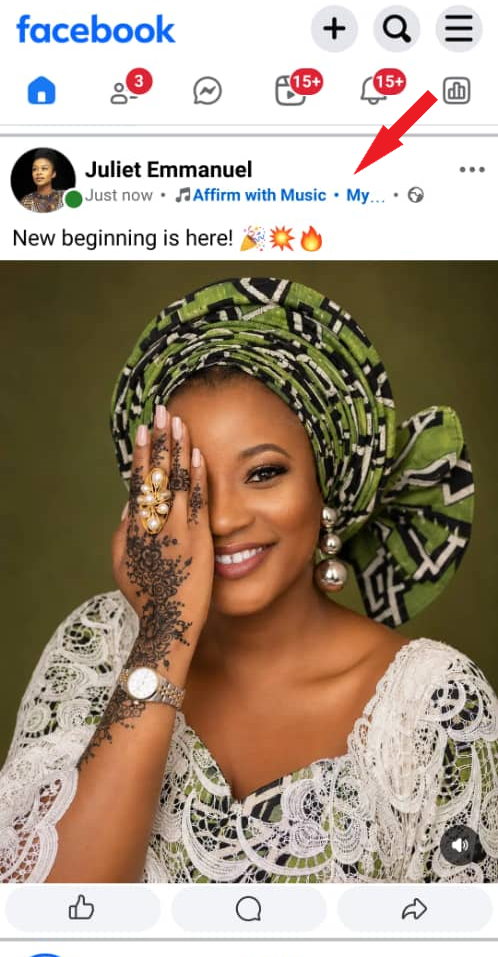
When everything looks good, tap Post.
Your photo will be published with the selected music, making it more engaging for people scrolling through their Facebook feed.
How to Add Music to a Facebook Video Post
Music can completely change how a video feels. The right soundtrack adds emotion and keeps people watching longer. Fortunately, Facebook gives you a couple of ways to add music to your videos.
Option 1: Add Music Before Uploading
If you want the most control over your video’s audio, edit it before uploading it to Facebook.
Video editing apps like CapCut, InShot, or Canva let you:
- Add background music.
- Adjust the music volume.
- Trim the song to the perfect length.
- Sync the audio with your video.
- Add captions and transitions before publishing.
This approach also helps you avoid unexpected edits after uploading and gives you a polished final video.
Option 2: Use Facebook’s Built-in Editor
If you prefer to edit inside Facebook, the process is just as straightforward.
Here’s how:
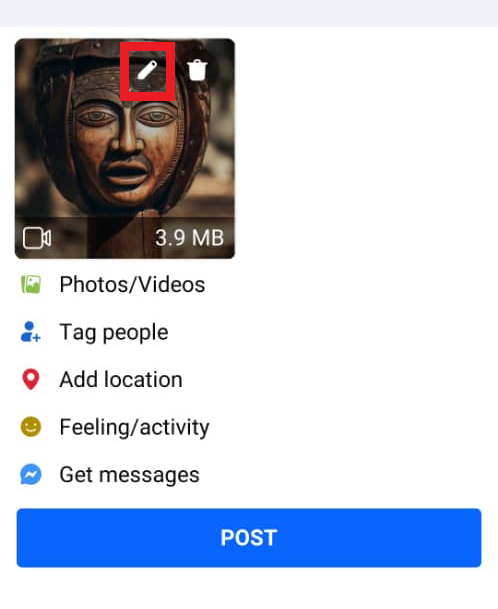
- Tap What’s on your mind in the Facebook app.
- Select the video you want to upload.
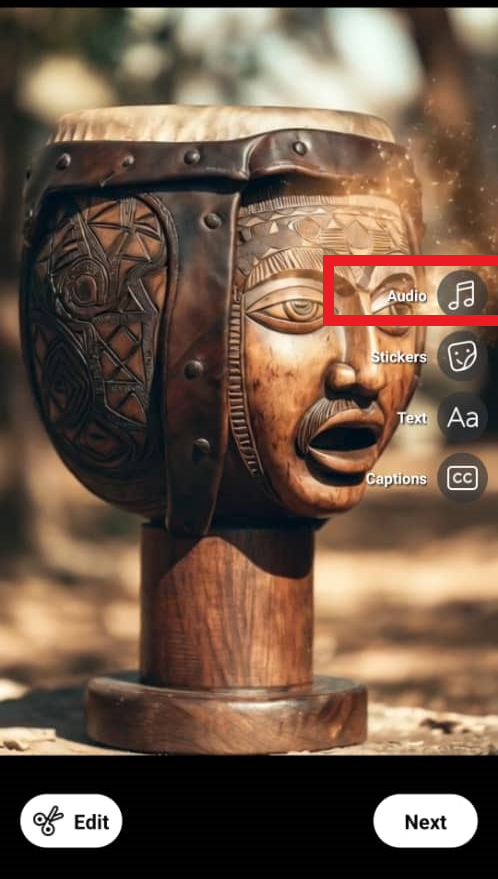
- Tap the Edit (pencil)
- Add music, trim the video, apply effects, insert text or stickers, and adjust the original audio volume if needed.
- You can also record a voiceover directly within Facebook.
- When you’re done, tap Done, write your caption, and publish your post.
Tips for Better Facebook Video Posts
Adding music is only part of the equation. These simple tips can help your videos perform even better.
- Keep videos concise. Shorter videos often hold viewers’ attention longer. Keep your video under 60 seconds for better engagement.
- Choose music that fits the mood. The soundtrack should complement your content, not distract from it.
- Don’t rely on audio alone. Many people browse Facebook with the sound off, so adding captions makes your videos easier to follow.
- Use high-quality audio. Clear sound creates a much better viewing experience than distorted or low-volume music.
- Publish when your audience is online. Even a great video can struggle if it’s posted when very few people are active.
How to Add Music to Facebook Reels
Facebook Reels are built for short, engaging videos, and music is one of the biggest reasons they perform so well. Now that you know how to add music to your Facebook photo and video post, let’s take a moment to see how it works for Reels, too. Luckily, the process is also quick and easy.
Step 1: Create a New Reel
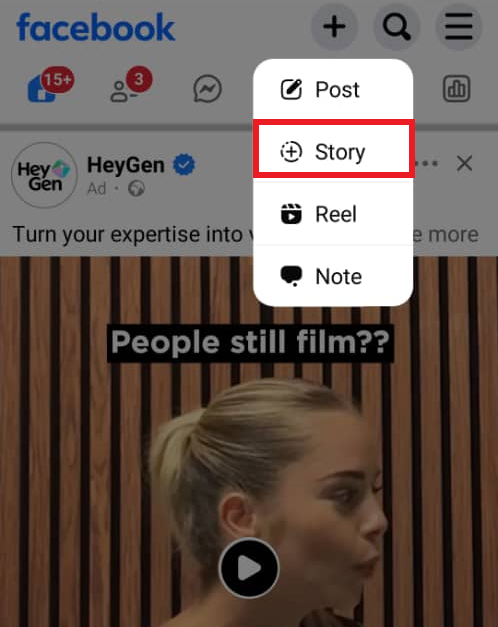
Open the Facebook app and tap the + icon at the top of the screen. From the available options, select Reel.
Step 2: Choose Your Video
Record a new video or select one from your camera roll that you’d like to turn into a Reel.
Step 3: Add a Soundtrack
Tap the Audio option to open Facebook’s music library.
You can browse trending songs or search for a specific artist, song title, or genre. Once you’ve found the track you want, tap it to add it to your Reel.
Step 4: Fine-Tune Your Audio
Adjust the music so it starts at the perfect point in the song.
You can also:
- Lower or mute your video’s original audio.
- Record a voiceover.
- Balance the music and original sound so both are easy to hear.
Before publishing, enhance your Reel with text, stickers, filters, or visual effects if you’d like.
Then write a caption, include relevant hashtags, and tap Share to publish your Reel.
Using trending audio alongside engaging visuals can help your Reels reach a wider audience, making them more likely to appear in Facebook’s recommendations and discover feeds.
How to Add Music to Facebook Stories
Step 1: Create a New Story
Open the Facebook app and tap Create Story at the top of your feed. Choose the photo or video you want to share.
Step 2: Open the Music Library
Tap the Audio or Music option to browse Facebook’s built-in music collection.
You can scroll through recommended songs or use the search bar to find a specific artist or track.
Step 3: Pick the Best Part of the Song
After selecting a song, use the slider to choose the exact clip you want to play in your Story. You can also tap the music sticker to switch between different display styles, such as album artwork or song lyrics (when available).
Step 4: Customize Your Story
Finish personalizing your Story by adding Text, Stickers, GIFs, Effects, Drawings or filters. These small touches can make your Story more engaging and fun to watch.
Once you’re happy with everything, tap Share.
Your Story will be published with your selected music and will be available for your audience to view for the next 24 hours.
How to Add Music to Your Facebook Profile
Do you know that Facebook also lets you showcase your favorite song directly on your profile? Unlike music added to posts or Stories, this doesn’t automatically play for visitors, but it gives people a glimpse of your personality and musical taste.
At the moment, this feature is available only through the Facebook mobile app on Android and iPhone. So, you cannot add music to your profile on desktop – it only works on mobile.
Step 1: Open the Music Section
Launch the Facebook app and go to your profile.
Scroll down until you find the Music section. If you don’t see it immediately, keep scrolling through your profile tabs.
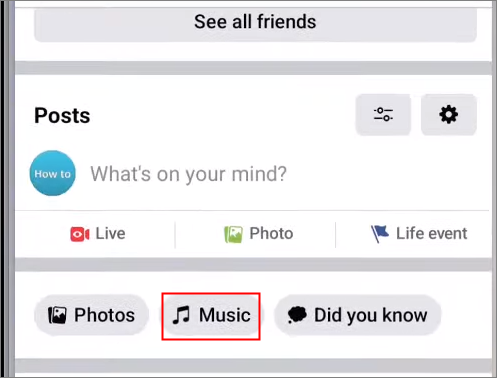
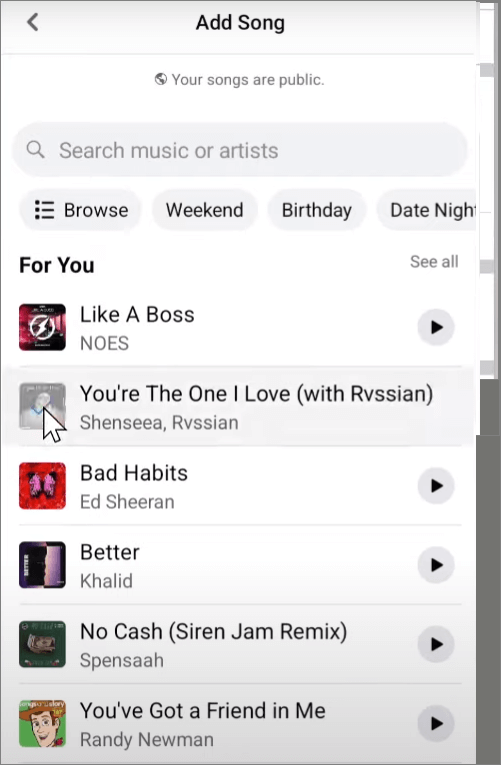
Tap the + icon to browse Facebook’s music library.
Step 2: Choose a Song
Search for a song by title, artist, or genre, or browse Facebook’s recommendations. Once you’ve found the song you want, tap it to add it to your Music section.
The song will now appear in your personal music list on your profile.
Step 3: Pin a Song to Your Profile
If you want one song to be featured at the top of your profile, you can pin it.
Here’s how:
- Open the Music section on your profile.
- Tap the three-dot menu beside the song.
- Select Pin to Profile.
The pinned song will now appear near the top of your Facebook profile, making it one of the first things visitors see.
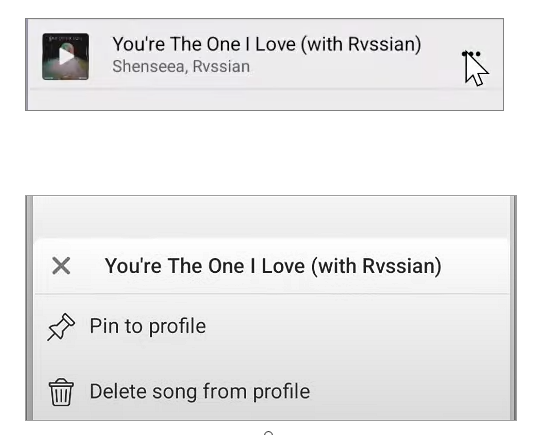
If you ever want to change it, simply tap the three-dot menu again and choose Unpin from Profile, then pin a different song instead.
Tips for Getting Better Results with Music on Facebook
Adding music is easy. Choosing the right music is what makes your content more memorable and engaging. These simple tips can help your Facebook posts, Stories, and Reels make a stronger impression.
1. Use Trending Audio for Reels
If you’re creating Facebook Reels, pay attention to what’s trending.
Using popular sounds can increase the chances of your Reel being discovered because Facebook often recommends content that features trending audio. Before selecting a song, browse the Trending section in Facebook’s music library.
2. Match the Music to Your Content
The soundtrack should complement your message.
Energetic songs work well for product launches, travel clips, workouts, and behind-the-scenes content. Slower, softer tracks are often a better fit for personal stories, inspirational posts, or emotional moments.
When the music matches the mood, the overall viewing experience feels much more natural.
3. Keep Stories Short and Impactful
People usually spend only a few seconds watching Stories, so make those seconds count.
Instead of using a long section of a song, choose a 15 to 30-second clip that captures the best part of the track and supports your content.
A short, memorable snippet is often more effective than playing a longer portion of the song.
4. Balance the Music and Original Audio
Background music should enhance your video, not overpower it.
If your video includes narration, dialogue, or important sounds, reduce the music volume so viewers can hear everything clearly. Always preview your video before publishing to make sure both the music and original audio sound balanced across different devices.
Why Can’t You Find the Music Option on Facebook?
If the music feature is missing or your music library looks unusually limited, don’t worry. In most cases, it has nothing to do with your device. It usually comes down to one of three factors.
1. You’re Using a Facebook Page
Business Pages don’t have the same music library as personal profiles.
Because of music licensing agreements, Facebook limits access to many popular songs on business accounts. If you’re managing a brand, you may only see music that’s licensed for commercial use – or no music option at all.
What to do: If appropriate, create the content from your personal profile and share it to your Page later. You can also use royalty-free music from Facebook Sound Collection or your own licensed audio.
2. Your Region Has Music Restrictions
Music availability isn’t the same everywhere. Facebook licenses songs on a country-by-country basis, so a track that’s available in one region may not appear in another due to copyright agreements.
What to do: Search for an alternative version of the song or choose another track that’s available in your country.
3. Your Page Category Has Additional Limitations
Some Facebook Page categories, such as Government, News, or Religious Organizations, may have stricter restrictions on the music they can use.
These limitations are designed to comply with Meta’s licensing policies.
What to do: If your Page falls into one of these categories, consider using Facebook’s royalty-free music library or original audio instead.
Take Your Facebook Strategy Further With OnlySocial
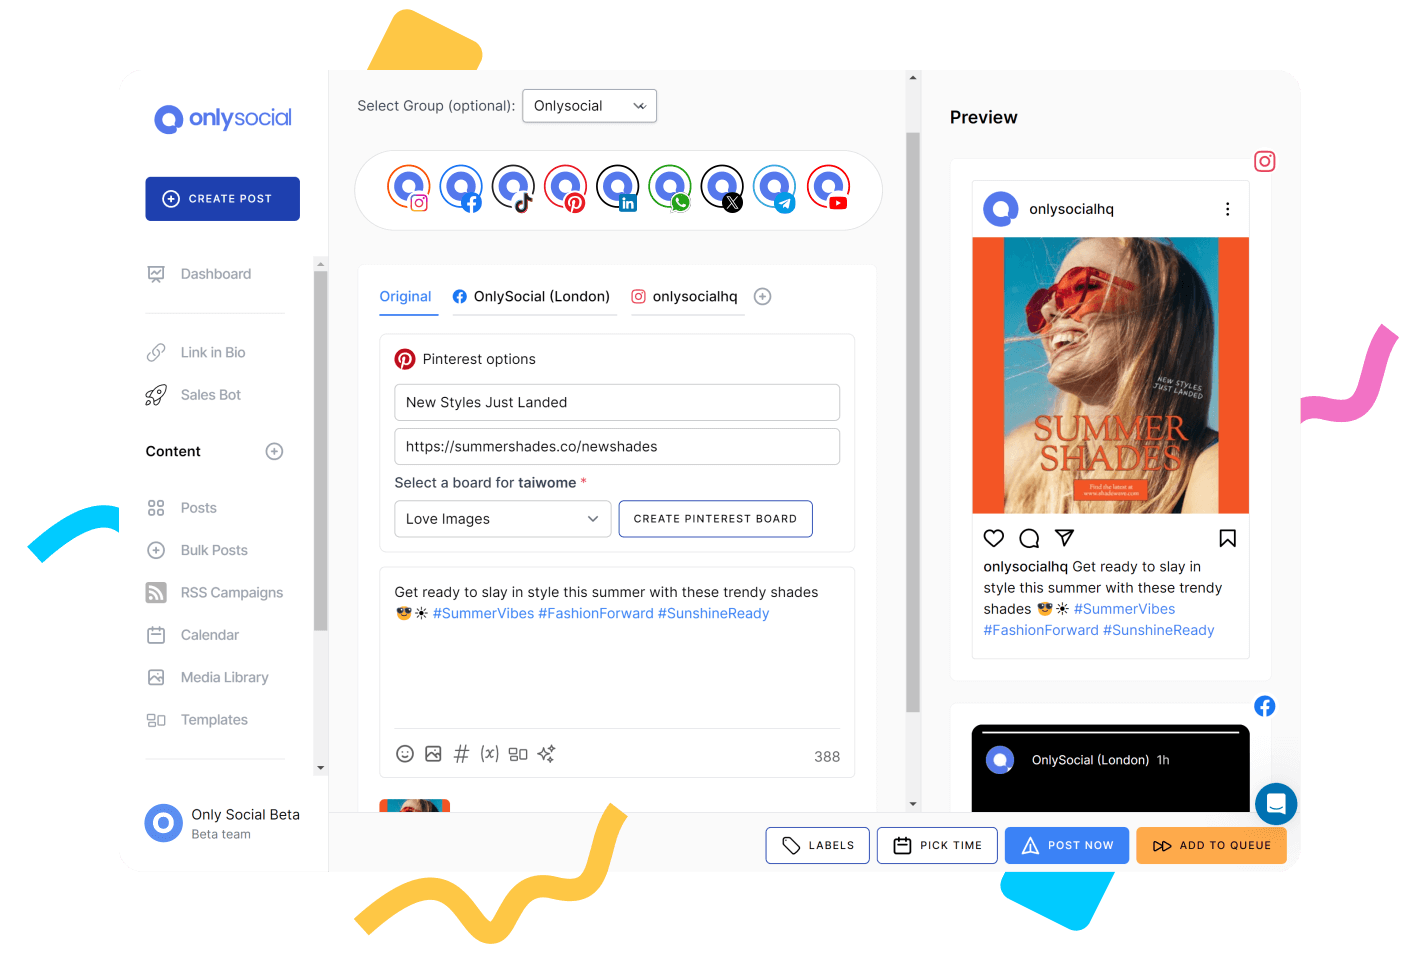
Adding music can make your Facebook posts more engaging, but it’s only one piece of a successful content strategy. To grow consistently, you also need to publish at the right time, stay organized, and understand what’s resonating with your audience.
That’s where OnlySocial comes in.
Plan Your Content with a Visual Calendar
Instead of deciding what to post at the last minute, use OnlySocial’s visual content calendar to map out your Facebook posts in advance.
It gives you a clear overview of your upcoming content, making it easier to maintain a consistent posting schedule and balance different types of posts, including photos, videos, Reels, and promotional campaigns.
Schedule Posts for the Best Time
Timing plays a big role in engagement. With OnlySocial, you can schedule your Facebook posts ahead of time so they go live when your audience is most active. That means you don’t have to be online just to hit the Publish button.
Publish Across Multiple Social Platforms
If you’re sharing the same campaign on Facebook, Instagram, LinkedIn, X, TikTok, or other platforms, OnlySocial lets you manage everything from one place.
Instead of creating and publishing each post separately, you can plan your content once and publish it across multiple social networks, saving time while keeping your messaging consistent.
Track What Gets the Most Engagement
Not every post performs the same.
OnlySocial’s analytics help you see which posts generate the most likes, comments, shares, and engagement over time. By understanding what your audience responds to, you can create more of the content that works and refine the posts that don’t.
Stay Consistent Without the Stress
Consistency is one of the biggest factors behind long-term Facebook growth.
With planning, scheduling, publishing, and performance tracking all in one dashboard, OnlySocial helps you spend less time managing your content and more time creating posts your audience will enjoy.
Final Thoughts
Adding music to your Facebook posts is a simple way to make your content more engaging and memorable. Whether you’re sharing a photo, video, Story, Reel, or highlighting a favorite song on your profile, the right soundtrack can help your posts capture more attention.
Pair that with a consistent publishing schedule and performance tracking through OnlySocial, and you’ll be in a much stronger position to grow your reach, connect with your audience, and get more from your Facebook marketing efforts.
FAQs
Can I add music to a Facebook post after posting?
No. Facebook doesn’t currently let you add or change the music on a post after it’s been published. If you want your post to include a soundtrack, you’ll need to add the music before you tap Post. Otherwise, you’ll have to delete the post and create a new one.
Why is the music option missing on my Facebook Page?
This usually comes down to your account type or location. Business Pages often have limited access to Facebook’s music library because of licensing restrictions. Your region or Page category can also affect which songs are available.
Is Facebook music copyrighted?
Yes. Most songs in Facebook’s music library are copyrighted, but Meta has licensing agreements that allow users to include them in supported content. These licenses don’t cover every situation, especially commercial use on business Pages, which is why some accounts have fewer music options.
How do I add music to a Facebook post on a laptop?
At the moment, Facebook’s music features are primarily available through the mobile app. If you’re using a desktop or laptop browser, you won’t have access to all the music tools available on iPhone or Android. For the best experience, create your post using the Facebook mobile app.
Can you see who viewed the music on your Facebook profile?
No. Facebook doesn’t tell you who viewed or listened to the song you’ve pinned to your profile. While people can see your featured song when they visit your profile, Facebook doesn’t provide visitor or listener analytics for this feature.
Why can’t I add music to my Facebook post?
There are several possible reasons. You may be posting from a business Page with limited music licensing, your Facebook app may need updating, the feature may not be available in your region, or you’re creating a post type that doesn’t support music. Updating the app and checking your account type usually resolves the issue.