Schedule Instagram and Facebook Posts to Reach a Wider Audience
Scheduling your Instagram and Facebook posts is a smart way to stay active on social media without the constant pressure of manual posting.
In today’s digital world, these platforms are key tools for growing your audience and maintaining a strong online presence.
But let’s face it – managing both Instagram and Facebook can quickly become overwhelming, especially when you’re trying to be consistent. That’s where scheduling can help.
By setting specific times for your posts to go live, you ensure that your content reaches your audience at the best moments, without the daily stress.
Whether you’re a business owner, a social media pro, or just someone trying to grow your online following, scheduling posts is a simple yet effective way to save time and expand your reach across both platforms.
Table of Contents
- 1 Save Time by Scheduling to Both Platforms at Once
- 2 How to Schedule Instagram and Facebook Posts Using Meta Business Suite
- 3 Schedule Instagram and Facebook Posts Using Instagram Native App
- 4 Schedule Instagram and Facebook Posts with OnlySocial
- 5 Get More from OnlySocial
- 6 Pro Tips to Manage Your Presence on Instagram and Facebook Through Scheduling
- 7 FAQs
Save Time by Scheduling to Both Platforms at Once
It’s no longer news that having a presence on both Facebook and Instagram is essential for anyone serious about building a reputable presence online.
Why? Each platform offers unique ways to connect with different audiences.
While Instagram is highly visual and great for engaging with younger users, Facebook provides more in-depth interactions and a wider demographic.
Managing both, however, can be time-consuming. That’s why scheduling posts to both platforms at once is a game changer.
It allows you to create and plan your content in one go, ensuring a consistent presence across both without the hassle of logging in and out or manually posting each day.
This not only saves time but also ensures your brand stays active and visible to your audience on both fronts. Now, let’s show you how you can do this – using three different methods.
How to Schedule Instagram and Facebook Posts Using Meta Business Suite
This is the first way you can schedule your posts to both platforms at the same time – using the Meta Business Suit.
Meta Business Suite is a powerful tool designed to make cross-platform scheduling a breeze. It allows you to schedule posts for both Facebook and Instagram simultaneously, saving you the effort of switching between platforms.
With its easy-to-use interface, you can ensure your content reaches your audience at the right time across both platforms.
However, to use the tool, you will need to have a Facebook page and also have page linked to your Instagram account. That way, you can use Meta Business Suite to manage posts across both platforms.
Now, let’s see the steps involved when looking to schedule Instagram and Facebook posts using Meta Business Suite:
Step 1: Open the Meta Business Suite
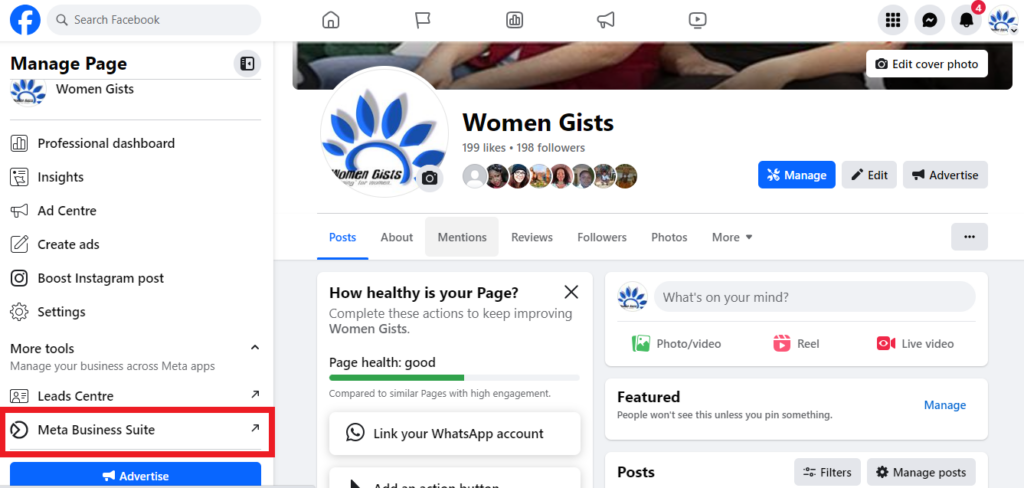
Go to the Meta Business Suite homepage on your desktop. You can click the link to go there straight or go through your Facebook profile.
Just log into your Facebook account and click on your profile picture in the right corner. Now click on the smaller profile picture at the bottom to go to your page.
From your Facebook page, find the Meta Business Suite button on the sidebar and click on it.
Step 2: Create your post
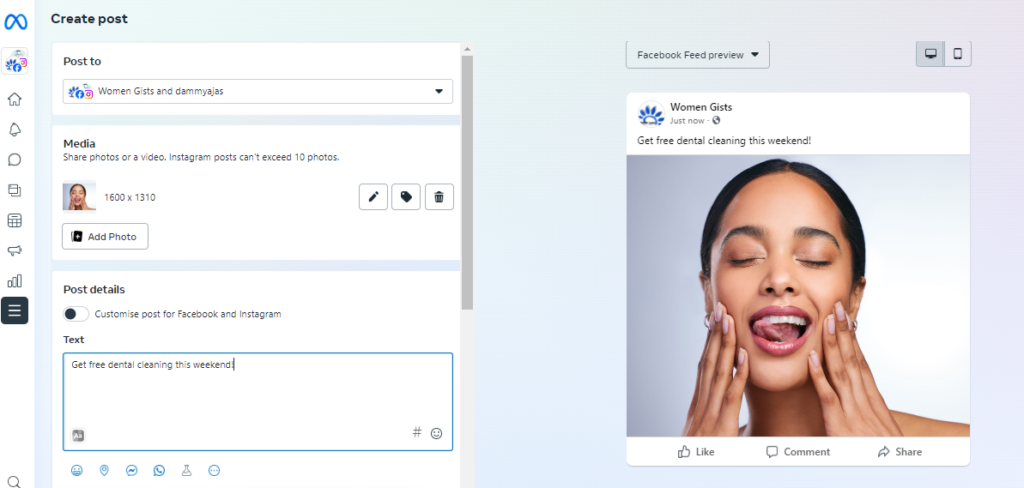
When on the Meta Business Suite homepage, click on the ‘Create Post’ button to create your post. Then select both Instagram and Facebook so you can schedule to both at once.
Add images, videos, text, or templates. You can also use additional features like activity, location, get messages, and emojis or hashtags.
If needed, click on ‘Customize for each platform’ to tailor the post to the specific needs of each platform.
Step 3: Schedule your post
Once your post is set and you are pleased with what you have done, the next thing is to schedule it. Instead of hitting ‘Publish,’ select ‘Schedule Post’ to choose a future date and time for your post to go live on both platforms.
Choose date and time that your audience are most active on the two platforms. That’s the best time to schedule your content to.
After scheduling, you’ll be redirected to the Planner, where you can view and manage your scheduled posts.
Looking to schedule Stories and Reels using this tool? All you need to do is choose the post type when you’re about creating the post. Instead of clicking on ‘Create Post,’ either choose Stories or Reels to the right of the button.
Schedule Instagram and Facebook Posts Using Instagram Native App
While Meta Business Suite is a great tool for scheduling, you can also use the Instagram native app to schedule posts to both Instagram and Facebook simultaneously.
Here’s how:
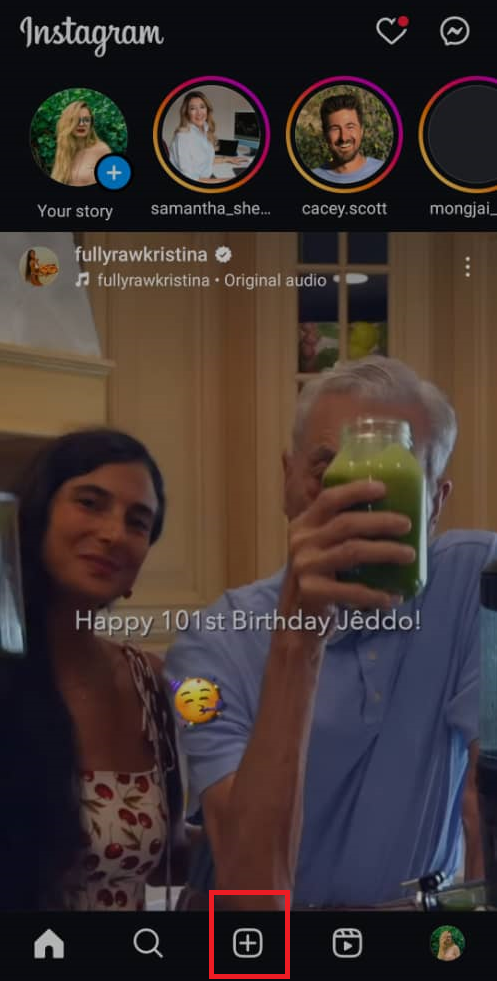
Step 1: Open your Instagram account. At the bottom of the dashboard, you’ll see five options – select the + sign. That is the option right at the middle.
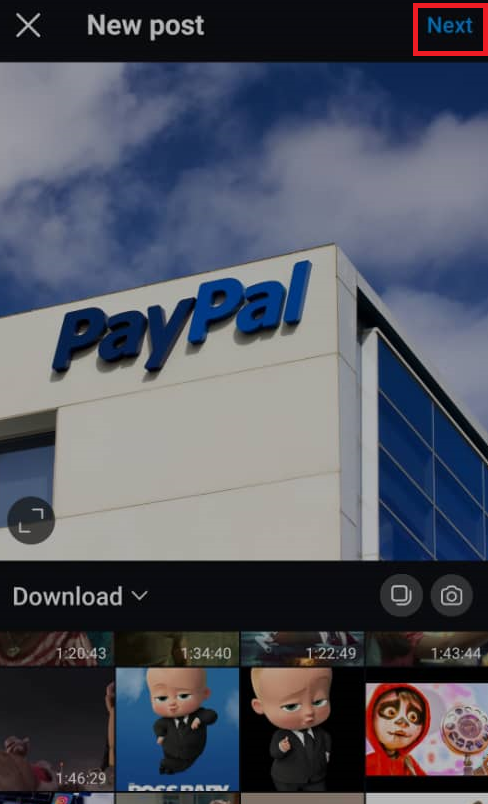
Step 2: Choose the images or videos you want to include in your post, and craft a compelling caption. Don’t forget to add hashtags and location to improve your post’s visibility.
Step 3: After finalizing your post or reel, scroll to the bottom of the final page (where you would normally share). You’ll see options like Add Location, Tag People, and Boost Post.
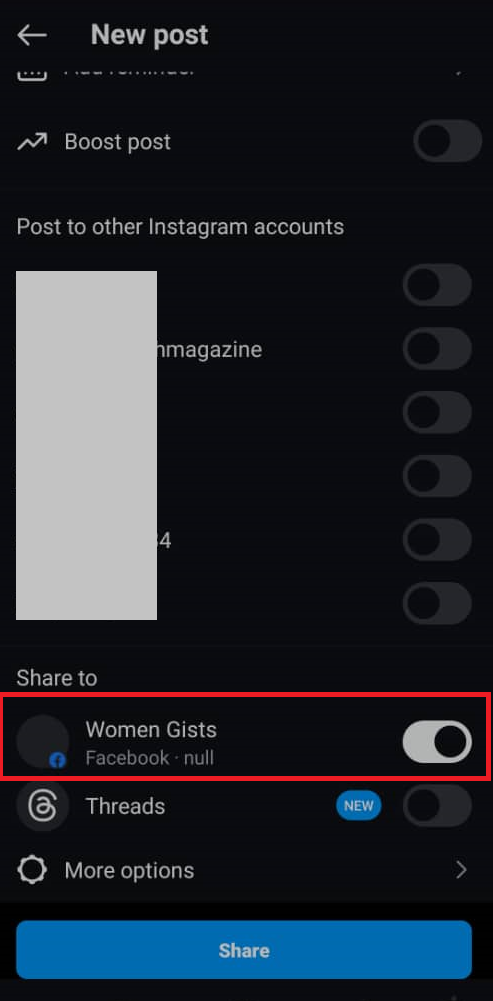
Step 4: Scroll all the way down and select the Facebook page you want the post to also be scheduled to. Once selected, tap on the ‘More Options’ button to see the option to schedule.
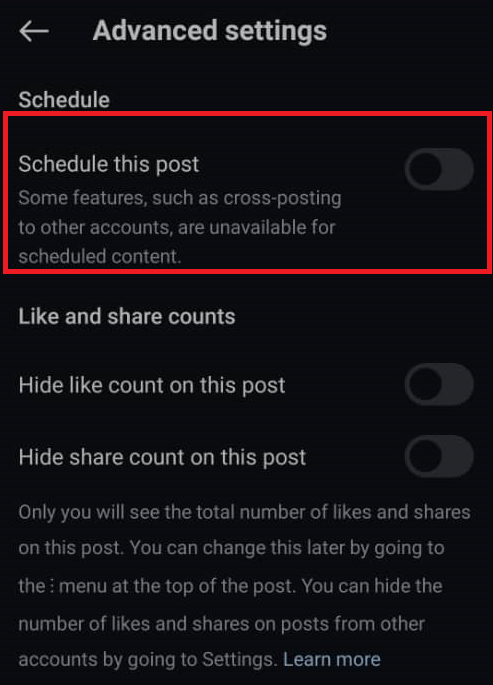
Step 5: Before selecting “Schedule this post,” make sure to turn on the option for Automatic Sharing on Facebook. This ensures your post will be shared on both Facebook and Instagram.
Step 6: Once enabled, select Schedule this post at the top of the page.
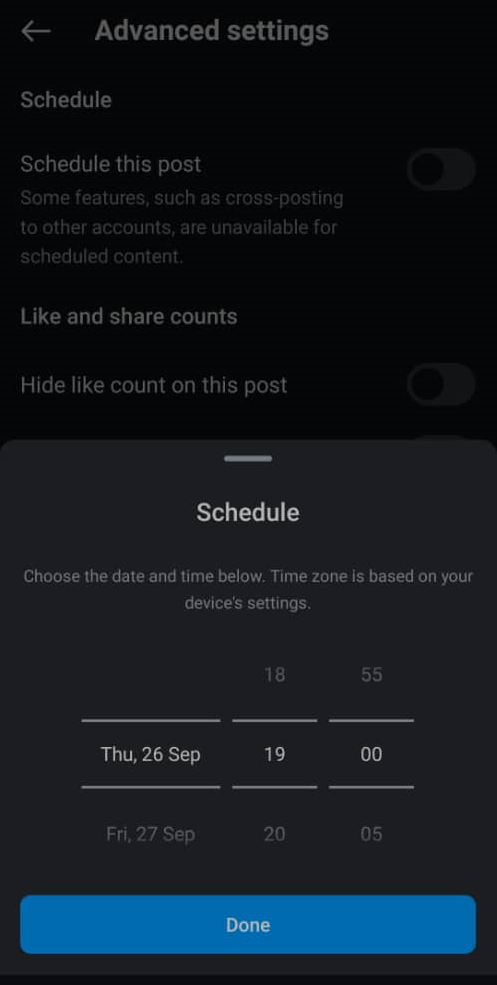
Step 7: A pop-up window will appear allowing you to choose the date and time for your post to go live. Set your preferred schedule, and your post will be ready to publish on both platforms at the scheduled time.
This method allows you to seamlessly manage both Instagram and Facebook content directly from the Instagram app, making scheduling quick and easy.
Schedule Instagram and Facebook Posts with OnlySocial
In addition to using Meta Business Suite or the Instagram app, you can also schedule your posts with third-party tools like OnlySocial.
In fact, these tools offer more flexibility and functionality, making it easier to manage your content across platforms.
Here’s how to schedule your Instagram and Facebook posts using OnlySocial:
Step 1: Connect Your Instagram and Facebook Profiles to OnlySocial
Start by logging into your OnlySocial account. If you’re new, signing up is quick and easy.
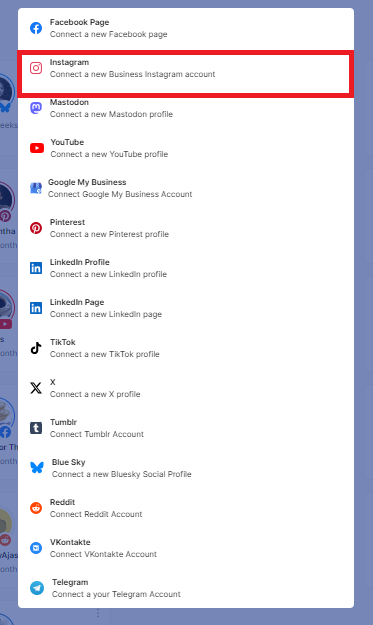
Once inside, navigate to the ‘Accounts’ section on the left side of your dashboard. Select ‘Instagram’ and follow the prompts to connect your account.
Repeat the process for Facebook. Connecting both profiles allows you to manage and schedule posts to both platforms from one place.
Step 2: Compose Your Post
With your Instagram and Facebook profiles connected, click the ‘Create Post’ button in the sidebar to start crafting your content.
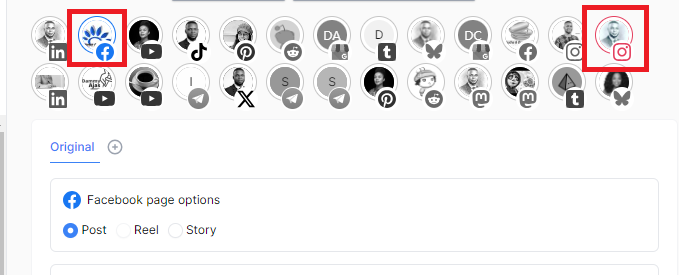
Now select the Instagram and Facebook accounts you have connected to the platform. You can select one or more Instagram and Facebook accounts if you manage multiple profiles.
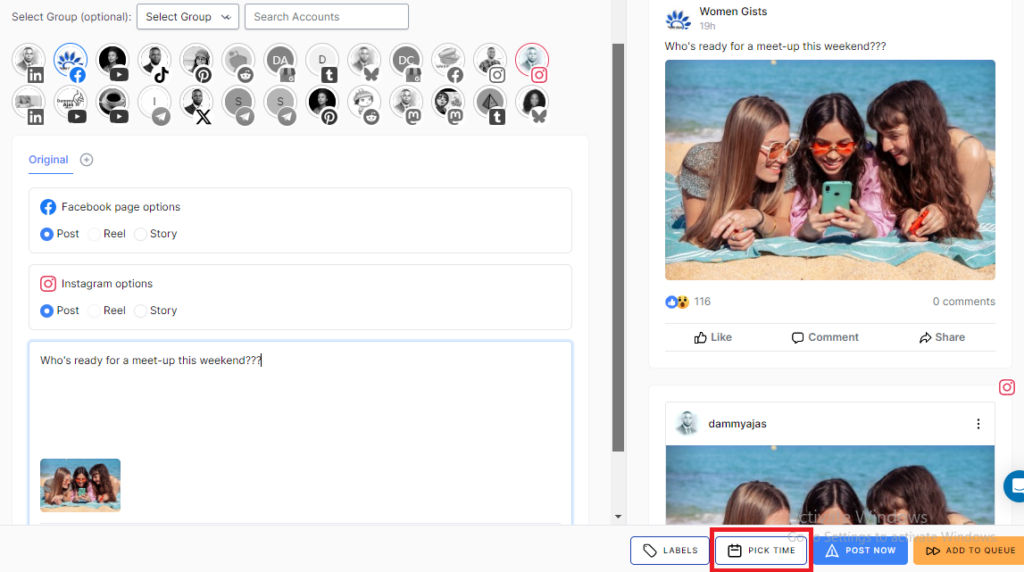
In the text field, add your caption, and include images or videos to make your post more engaging. OnlySocial provides various options to customize your content.
Step 3: Schedule Your Instagram and Facebook Posts
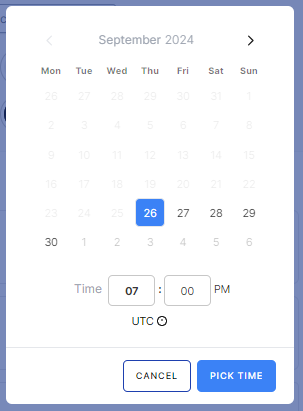
Once your post is ready, scroll to the bottom of the screen and click on ‘Pick Time.’ A scheduling box will appear, allowing you to choose the date and time you want your post to go live.
After selecting the time, simply click the ‘Schedule’ button. Your post is now set to go live on both Instagram and Facebook at the scheduled time.
Get More from OnlySocial
Wondering why many business owners and content creators prefer OnlySocial? The tool offers much more than just simple scheduling.
It’s designed to make managing your social media accounts easier and more efficient across multiple platforms, including Facebook and Instagram.
With OnlySocial, you can schedule posts to any of your connected social media accounts seamlessly. Whether you’re handling one account or several, OnlySocial streamlines the process with its user-friendly interface.
One of its standout features is bulk posting – allowing you to schedule multiple posts at once, saving you time and effort.
It also supports cross-platform posting, so you can schedule and publish content to different platforms simultaneously, ensuring consistent messaging and presence across all your channels.
In addition to these features, OnlySocial provides advanced analytics, helping you track and improve the performance of your scheduled content. With insights on engagement, reach, and other key metrics, you can optimize your strategy based on real-time data.
Best of all, OnlySocial supports up to 15 different social media platforms, giving you complete flexibility to manage your online presence in one place.
Now you see why having the tool in your arsenal is a must if you are looking to build significant presence on social media.
Pro Tips to Manage Your Presence on Instagram and Facebook Through Scheduling
Ready to take your Instagram and Facebook game to the next level? Scheduling your posts can do more than just save you time – it can help you manage your presence like a pro!
So, before we round up this guide, let’s show you some tips to make the most out of scheduling:
Consistency is key
The more consistently you post, the more likely you are to engage your audience. Set up a content calendar and schedule posts in advance to make sure you never miss a beat.
Mix up your content
Don’t just stick to one type of post. Schedule a healthy mix of photos, videos, Stories, and Reels to keep your followers engaged. A little variety goes a long way!
Use analytics to your advantage
If you’re not tracking your post performance, you’re missing out! Take a peek at your Instagram and Facebook analytics to figure out when your audience is most active and schedule your posts accordingly.
Engage in real time
Even though you’re scheduling posts, don’t forget to jump into the conversation! After your posts go live, spend some time interacting with your audience to build stronger connections.
Plan ahead for special events
Got a promotion or special event coming up? Plan ahead by scheduling teaser posts, announcements, and follow-ups. That way, you can focus on the event while your content takes care of itself.
With these pro tips, you’ll not only maintain a strong presence on Instagram and Facebook, but you’ll also build a more engaged and loyal audience. Happy scheduling!
FAQs
How far in advance can I schedule posts for Instagram and Facebook?
You can schedule posts for both platforms as far in advance as you’d like! Whether you’re planning content for the next week or the next month, OnlySocial and Meta Business Suite give you the flexibility to choose the exact date and time for your posts to go live.
This gives you the freedom to plan ahead with ease.
Why can’t I schedule posts on Instagram?
If you’re unable to schedule posts on Instagram, it could be because you’re not using a Business or Creator account, which is required for scheduling features.
Can I schedule Stories on Instagram and Facebook at once?
Yes, with tools like Meta Business Suite and OnlySocial, you can schedule Stories for both Instagram and Facebook simultaneously. This makes managing your content across platforms much easier, ensuring a consistent presence without the hassle of posting in real time.
Can I schedule to all my Facebook pages at once?
Yes, you can schedule posts to multiple Facebook pages at once using OnlySocial.
Simply select the pages you want to schedule for, create your content, and set the posting time. This feature is ideal for managing multiple brand pages or businesses from a single platform.
