How To Edit Pictures For Instagram 8 Pro Tips You Can’t Miss

In social media, where visual content holds immense significance, mastering the art of editing pictures for Instagram has become an essential skill. This article presents eight professional tips that you can’t afford to overlook.
Explore these tips to unlock the potential of captivating and aesthetically pleasing images on this viral platform. Discover the secrets to choosing the most suitable editing applications, understanding the dynamics of lighting, enhancing color and contrast, perfecting composition and framing, utilizing filters and presets effectively, eliminating blemishes and imperfections, creating a consistent aesthetic theme, and complementing your edited pictures with compelling captions.
With these valuable insights, you’ll be well on your way to mastering the art of Instagram photo editing.
Table of Contents
- 1 Choosing the Right Editing App
- 2 Understanding the Basics of Lighting
- 3 Enhancing Colors and Contrast
- 4 Perfecting Composition and Framing
- 5 Mastering Filters and Presets
- 6 Removing Blemishes and Imperfections
- 7 Creating a Consistent Instagram Aesthetic
- 8 Showcasing Your Edited Picture With Captivating Captions
- 9 BONUS
- 10 Frequently Asked Questions
- 10.1 How Do I Choose the Right Editing App for My Pictures?
- 10.2 What Are Some Tips for Understanding the Basics of Lighting in Photography?
- 10.3 How Can I Enhance the Colors and Contrast in My Pictures?
- 10.4 What Are Some Techniques for Perfecting Composition and Framing in Photography?
- 10.5 How Can I Create a Consistent Instagram Aesthetic for My Pictures?
Choosing the Right Editing App

The selection of an appropriate editing application is a crucial step in the process of enhancing pictures for Instagram. With numerous options available, it can be overwhelming to determine which app will best suit your needs. It is important to consider the best editing techniques and find inspiration for edits to make the decision easier.
When choosing an editing app, looking for features that allow precise adjustments and enhancements is essential. Look for tools such as exposure correction, color grading, and cropping options that enable you to refine your images effectively. Additionally, consider apps that offer a wide range of filters and effects to add a unique touch to your photos.
Finding inspiration for edits can significantly enhance the quality of your picture enhancements. Explore popular Instagram accounts with similar styles or search for trending hashtags within your niche. Analyze their editing techniques, such as their use of contrast or saturation levels, and try to incorporate these elements into your edits.
Understanding the Basics of Lighting

This discussion will explore the key points surrounding natural versus artificial lighting and the importance of proper lighting.
Understanding the differences between natural and artificial lighting is essential for creating a desired atmosphere and achieving optimal visibility in various settings.
Additionally, proper lighting is crucial as it can impact mood, productivity, and overall well-being.
Natural Vs. Artificial Lighting
Comparing natural and artificial lighting is essential when editing pictures for Instagram. Understanding the differences between these two types of lighting can significantly enhance the quality of your photos, especially in low-light situations. Here are three key factors to consider:
- Color Temperature:
- Natural lighting tends to have a higher color temperature, resulting in cooler tones.
- Artificial lighting often has a lower color temperature, producing warmer tones.
- Adjusting the white balance during editing can help achieve a more accurate representation of colors.
- Light Intensity:
- Natural light varies throughout the day.
- Soft and diffused light is present during sunrise and sunset.
- Harsher light is experienced at midday.
- Artificial lighting provides consistent intensity but may require additional adjustments to avoid overexposure or underexposure.
- Directionality:
- Natural light creates dynamic shadows and highlights depending on its angle relative to the subject.
- Artificial lighting allows for greater control over directionality.
- Different types of light sources, such as flash or studio lights, can be used to manipulate the directionality of light.
Importance of Proper Lighting
Understanding the importance of proper lighting in photography allows for more visually appealing and accurate representations of colors. Proper lighting ensures a balanced exposure, which is crucial in achieving high-quality images. When the lighting is too bright or dim, it can result in overexposed or underexposed areas, losing detail and inaccurate color representation.
Additionally, proper lighting plays a significant role in creating a mood within a photograph. Bright and well-lit environments convey feelings of happiness and positivity, while low-light settings can evoke a sense of mystery or intimacy. Photographers can enhance or alter their images’ atmosphere and emotional impact by manipulating the lighting conditions.
Therefore, understanding proper lighting techniques is essential for photographers striving to capture captivating and impactful photographs.
Enhancing Colors and Contrast
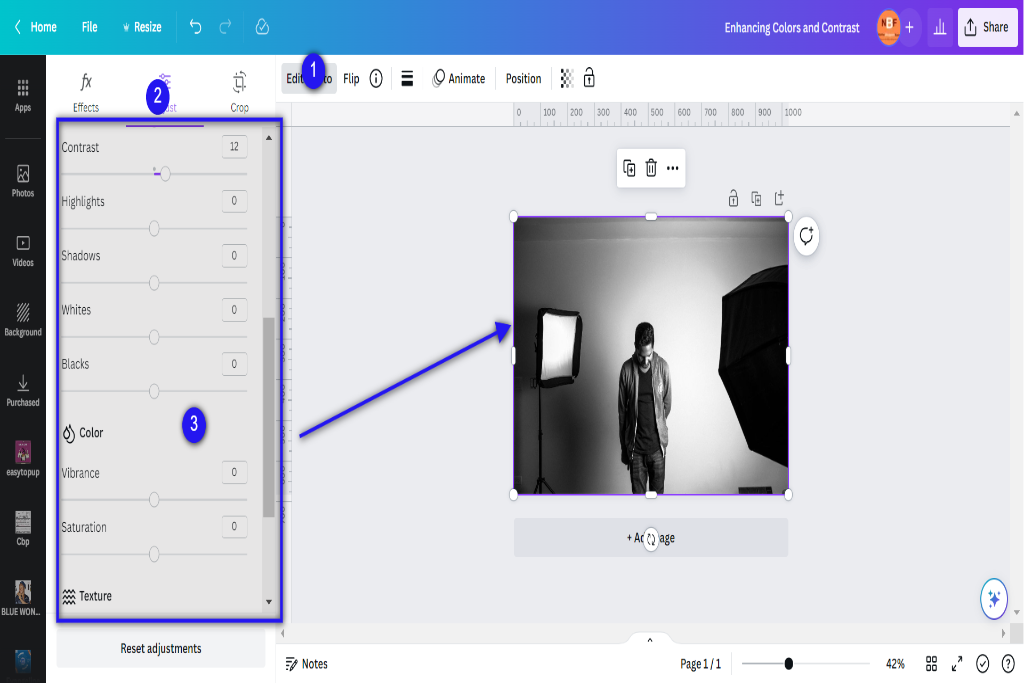
This discussion will focus on three key points for enhancing colors and contrast in images: adjusting saturation levels, using selective color editing, and enhancing image sharpness.
Adjusting saturation levels allows for the intensification or desaturation of colors in an image, creating a desired visual impact.
Selective color editing enables targeted adjustments to specific colors within an image, allowing for more precise control over the overall color palette.
Lastly, enhancing image sharpness involves sharpening the edges and details in an image to improve clarity and definition.
Adjusting Saturation Levels
To achieve the desired visual effect, carefully adjusting the saturation levels of an image is a crucial step in enhancing its vibrancy and overall appeal. Saturation refers to the intensity or purity of colors in an image. Photographers and editors can create more vivid and eye-catching visuals by manipulating saturation levels.
Here are three key reasons why adjusting saturation is important in photo editing:
- Enhancing color richness: Increasing saturation adds depth and richness to colors, making them appear more vibrant and striking.
- Balancing brightness levels: Adjusting saturation can help harmonize the brightness levels across different areas of an image, ensuring a balanced and cohesive look.
- Improving skin tones: By fine-tuning saturation levels, photographers can achieve natural-looking skin tones without sacrificing overall color accuracy.
Using Selective Color Editing
Selective color editing is a technique used in photo editing to isolate specific colors within an image and adjust their properties independently from the rest of the colors. This allows for precise control over selected areas’ color balance, saturation, and hue while keeping the rest of the image intact. Compared to global color adjustments, which affect all colors uniformly, selective color editing offers more targeted and nuanced changes.
One way to achieve selective color editing is by using masks. Masks allow you to define specific areas where your edits can be applied. By creating a mask for a particular color range, you can isolate those colors and make adjustments only within that range. This technique is beneficial when you want to enhance or change the appearance of particular objects or elements in your image without affecting other parts.
To better understand how selective color editing works compared to global adjustments, consider the following table:
| Selective Color Editing | Global Color Adjustments | |
|---|---|---|
| Control | Precise control over specific colors | Uniform changes across all colors |
| Flexibility | Targeted adjustments for different areas | Limited customization |
| Impact | Enhances details and focal points | The overall impact on the entire image |
Enhancing Image Sharpness
Enhancing image sharpness involves adjusting the clarity and definition of details within a photograph. This process is crucial in improving image clarity and ensuring that essential elements are correctly defined.
To achieve this, various sharpening techniques can be employed:
- Unsharp Mask: This technique enhances edges by increasing contrast between adjacent pixels.
- High Pass Filter: This method sharpens images without affecting overall contrast by isolating high-frequency details.
- Intelligent Sharpen: This advanced tool allows precise control over sharpening parameters such as radius, amount, and noise reduction.
Balancing, enhancing sharpness, and avoiding artefacts or halo effects are essential when applying these techniques. Experimentation with different settings may be necessary to achieve optimal results.
Perfecting Composition and Framing
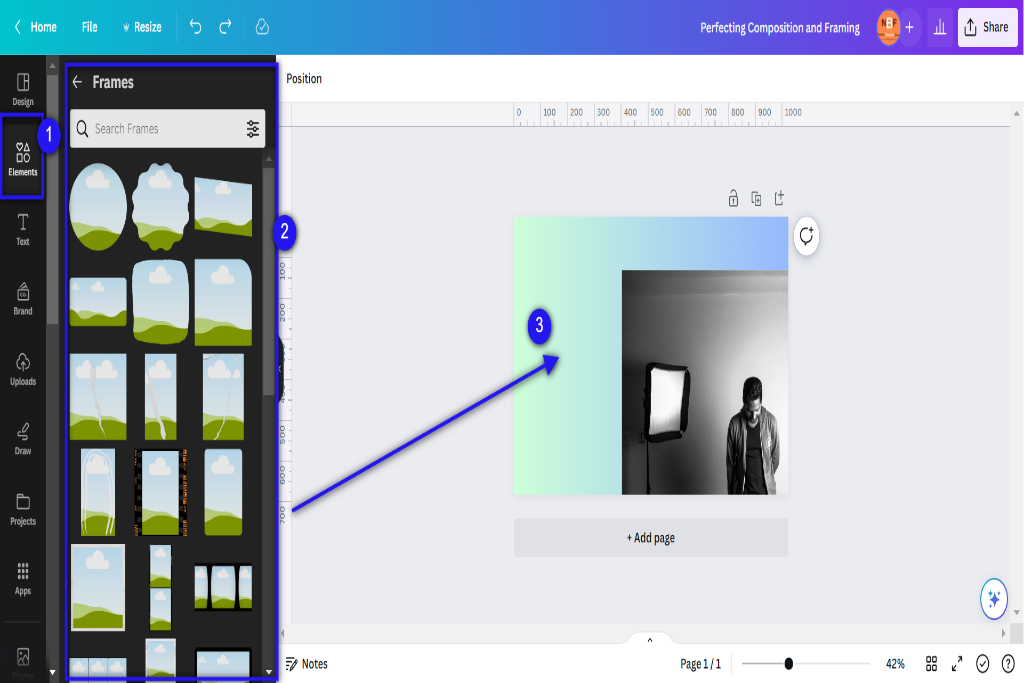
Achieving optimal composition and framing is crucial in enhancing the visual impact of Instagram pictures. One effective technique to achieve this is by applying the rule of thirds in composition and framing. The rule of thirds divides an image into nine equal parts using two horizontal and two vertical lines, creating four intersecting points. Placing important elements along these lines or at their intersections can create a visually pleasing and balanced composition.
Additionally, using leading lines effectively in photography can guide the viewer’s eye through the image and add depth to the composition. Leading lines are actual or implied lines that lead the viewer’s attention toward a specific point of interest within the frame. They can be straight or curved, like roads, rivers, fences, or natural elements like tree branches.
Mastering Filters and Presets
Mastering filters and presets involves understanding how different adjustments can alter an image’s colors, tones, and mood. Filters and presets are powerful tools that allow photographers to enhance their images and create a cohesive aesthetic.
Here are three key aspects to consider when mastering filters and presets:
- Mastering exposure levels: Adjusting the exposure levels is crucial in achieving a balanced image. Overexposed or underexposed photos can result in a lack of detail or contrast. Using filters or presets that effectively control exposure can help bring out the desired level of brightness or darkness in different areas of the image.
- Understanding white balance: White balance refers to the color temperature of an image, which affects its overall tone and mood. Different lighting conditions may cast a warm or cool hue on photographs. Filters and presets that allow for precise adjustment of white balance can help achieve accurate colors and convey the intended atmosphere.
- Experimentation: One should not be afraid to experiment with various filters and presets to find the perfect match for each photograph. Each image has unique characteristics, such as lighting conditions, subject matter, and composition, which require careful consideration when applying filters or presets.
Removing Blemishes and Imperfections
In addition to mastering filters and presets, another crucial aspect of editing pictures for Instagram is removing blemishes and imperfections. These flaws can detract from the overall aesthetic appeal of an image and may distract viewers from the intended focus. Two common issues that often need attention are red eye and noise reduction.
Red eye occurs when the camera flash reflects off the subject’s retina, resulting in a red or orange glow in their eyes. It can be easily corrected using various photo editing software by selecting the affected areas and applying the red-eye removal tool.
Noise refers to random variations in brightness or color that create a grainy image appearance, particularly noticeable in low-light conditions. To reduce noise, photographers employ techniques such as adjusting exposure settings during capture or utilizing dedicated noise reduction tools during post-processing.
To provide a visual representation of these concepts, consider the following table:
| Issue | Solution |
|---|---|
| Red Eye | Use red-eye removal tool in photo editing software |
| Noise Reduction | Adjust exposure settings during capture or utilize dedicated noise reduction tools during post-processing. |
Creating a Consistent Instagram Aesthetic
Consistency in the aesthetic of an Instagram account can be achieved by adhering to a cohesive color palette, utilizing consistent photo editing techniques, and maintaining a uniform composition across all posts.
Users can incorporate props and accessories and explore unique angles and perspectives to enhance an Instagram feed’s visual appeal and individuality.
- Utilizing props and accessories: By incorporating props and accessories in your photos, you can add depth and interest to your compositions. Whether it’s a bouquet, a coffee cup, or a vintage camera, these items can help create a cohesive theme or story throughout your feed. When selecting props, it is important to consider their colors and textures to ensure they fit within your overall aesthetic.
- Incorporating unique angles and perspectives: Experimenting with different angles and perspectives can make your photos stand out. Instead of always shooting from eye level, try shooting from above or below to add variety to your compositions. Additionally, exploring unconventional viewpoints can create intriguing visuals that capture attention.
Showcasing Your Edited Picture With Captivating Captions
Showcasing edited photographs with captivating captions can enhance the storytelling aspect of an Instagram post and effectively engage the audience. Captions play a crucial role in complementing images, allowing users to convey their message and create a deeper connection with their followers. Using captivating captions, individuals can provide context, share personal experiences or emotions, and encourage viewers to interact with the post.
To effectively tell a story through images, aligning the caption with the visual content is important. The caption should describe what is happening in the image and add value by providing additional information or a unique perspective. This can be achieved by sharing exciting anecdotes, asking thought-provoking questions, or even including relevant quotes that resonate with the image.
Furthermore, incorporating storytelling techniques such as creating suspense or evoking emotions can captivate the audience and make them more likely to engage with the post. By carefully crafting captivating captions that complement edited photographs, individuals can cultivate a sense of curiosity and intrigue among their followers.
BONUS
Elevate your Instagram aesthetic with OnlySocial’s powerful Image Editing function. Create stunning graphics that perfectly align with your brand’s social media presence using our free stock images and editor. Choose from a variety of free templates to streamline your design process. With availability on all plans, OnlySocial is your all-in-one platform for social media growth. Don’t miss out on the opportunity to enhance your visual content. Sign up for a commitment-free 7-day trial today.
Frequently Asked Questions
How Do I Choose the Right Editing App for My Pictures?
When selecting an editing app for pictures, it is crucial to consider factors such as the available filters and editing tools. Evaluating these features can help ensure the app aligns with one’s artistic vision and desired outcome.
What Are Some Tips for Understanding the Basics of Lighting in Photography?
Understanding natural lighting and mastering artificial lighting are crucial skills for photographers. By studying the interplay of light and shadow, photographers gain the ability to create visually stunning images that evoke emotions and capture moments in time.
How Can I Enhance the Colors and Contrast in My Pictures?
Enhancing the colors and contrast in pictures can be achieved by increasing saturation and vibrancy. These adjustments result in more vivid and vibrant colors, enhancing the overall visual impact of the image.
What Are Some Techniques for Perfecting Composition and Framing in Photography?
Techniques for perfecting composition and framing in photography include incorporating leading lines to guide the viewer’s eye and applying the rule of thirds to create balance and visual interest. These methods enhance the overall quality of a photograph.
How Can I Create a Consistent Instagram Aesthetic for My Pictures?
Creating a consistent Instagram aesthetic for pictures can be achieved by creating unique filters using props and backgrounds. These techniques enhance the visual appeal and help establish a cohesive theme across an Instagram profile.